One of my most popular recipes! Quinoa Greek Salad is a great side dish, lunch and excellent to bring to potlucks!
Ingredients
Scale
Salad Ingredients
1 1/2cupsQuinoa
3cupsWater
1ptCherry Tomatoes
1Cucumber
1/2cupKalamata Olives
1/2cupFeta Cheese
Balsamic Dressing Ingredients
1/2cupOlive Oil
2tspDijon Mustard
1/4cupBalsamic Vinegar
1/2tspKosher Salt
1/4tspGround Black Pepper
Instructions
For the quinoa and veggies
Rinse the 1 1/2 cups quinoa in a fine mesh strainer. In a medium saucepan, heat 3 cups of water over high heat. Add the rinsed quinoa. Bring quinoa and water to a boil then reduce heat to low and simmer for 15 minutes. The quinoa is done cooking when all the water is absorbed and it is light and fluffy.
Prep and slice veggies.
Peel cucumber and slice off the ends. Cut the cucumber in half lengthwise. Using a small spoon scoop out the seeds. Next, slice each half lengthwise into 1/2 inch long sections. Then stack your long sections together to dice into 1/2 inch dice. Place diced cucumber into a large bowl.
Rinse your cherry tomatoes. Slice each tomato lengthwise (its prettier!). Place into bowl with cucumber.
Slice kalamata olives in half. Place into bowl with cucumber and tomato.
For the balsamic dressing
Into a small mixing bowl or mason jar add all dressing ingredients. Whisk until the dressing is fully emulsified. Taste the dressing and adjust seasonings per your preference
Putting the salad together
Once the quinoa has finished cooking add 3/4 of the dressing to the hot quinoa and stir to mix well. This will allow the quinoa to really absorb the dressing. Place the quinoa into the refrigerator for at least 1 hour.
Once the quinoa has cooled, place it into a large bowl. Add the cucumber, cherry tomatoes and kalamata olives. Next add the feta and mix together, taking care not to smash your tomatoes. Add the remaining 1/4 of the dressing and mix together. Place the salad back into the refrigerator for 1 more hour. Serve chilled, enjoy!
Make Your Own Homemade Kodiak Pancake Mix! With just a few simple ingredients, you can stock your pantry with this easy, protein-packed mix. Perfect for fluffy, flavorful, and filling pancakes whenever the craving hits—no box needed!
Grind the Oats: In the bowl of a food processor, process the oats until they are finely ground into oat flour.
Mix the dry ingredients: In a large mixing bowl combine the oat flour, whole wheat flour, protein powder, brown sugar, baking powder, cinnamon and salt. Whisk everything together until well combined.
Store: Transfer the pancake mix to an airtight container. Seal tightly and store in a cool, dry place until you are ready to mix up some protein pancakes!
Preheat oven to 400° F. Set a large sheet tray out for roasting.
Rinse the cauliflower. Using a sharp knife cut around the root of the cauliflower to remove the florets. Continue working your way around the cauliflower until all florets are removed. Place cauliflower florets onto the sheet tray. Add the whole garlic cloves to the tray. Sprinkle kosher salt and drizzle 1 tbsp olive oil over top. Using clean hands mix together. Place into the oven and roast for 20-25 minutes until the cauliflower is soft tender.
Allow the cauliflower and garlic to cool slightly. Place cauliflower and garlic into the bowl of a food processor. Add 1/4 cup of milk. Process until smooth. Set aside.
Mashed Potatoes
Scrub the potatoes, peel and cut them into large dice.
Fill a large pot with water and heat to boiling. Add the diced potatoes. Cook the potatoes until they are fork tender, about 12-15 minutes.
Drain the potatoes and return to same pot you boiled them in.
Using a potato masher, hand held mixer or potato ricer, mash the potatoes until your desired consistency.
Add the cauliflower puree, additional 1/4 cup of milk, 1/2 tsp kosher salt and butter to the potatoes and mix to combine.
Check the seasonings and adjust the salt and pepper as needed. Serve hot and enjoy!
Roasted Brussels Sprouts with Balsamic Glaze are crispy, caramelized, and coated in a sweet-tangy drizzle that makes veggies feel exciting again. They’re the perfect simple side that adds color, flavor, and a little nourishment to any holiday table.
Ingredients
Scale
Roasted Brussels
1 1/2lbsBrussels Sprouts
1tbspOlive Oil
1tspKosher Salt
1/2tspGround Black Pepper
Balsamic Glaze
1/2cupBalsamic Vinegar
1tbspSugar
Instructions
For the Brussels Sprouts
Preheat your oven to 400° F. Set a large sheet tray out for roasting the Brussels sprouts.
Rinse the Brussels sprouts. Trim the root end off and discard. Slice each sprout in half and place on the sheet tray. Some leaves will fall off, this okay simply add them to the sheet tray too. Discard any outer leaves that are yellow and not green.
Pour one tablespoon of olive oil, 1 tsp kosher salt and 1/2 tsp ground black pepper over the Brussels. Using your hands mix it all together to coat the Brussels. Place the tray into the oven and roast for 25-30 minutes, stirring halfway. Watch them carefully for the last few minutes as the leaves can burn easily.
For the Balsamic Glaze
While the Brussels sprouts roast, make the balsamic glaze. Heat a sauce pan over medium heat.
Add the balsamic vinegar and sugar. Turn the heat up to medium high and bring the mixture to a low boil.
Once it has reached boil, turn it down and simmer on low for 15-20 minutes. The mixture will cook down and get slightly thicker. You will know its done when the liquid will coat the back of a spoon.
After the 20 minutes turn the heat off and allow the glaze to cool slightly. It will thicken and become glaze like as it cools.
To Serve
Using a spoon drizzle the balsamic glaze lightly over the roasted Brussels sprouts. Enjoy hot!
Delicata Squash and Apple Fritters are a fun and delicious appetizer, created for the Black Forest Farmer’s Market.
Ingredients
Scale
Fritters
1Delicata Squash, Peeled, Seeded and Shredded
2Apples (Gala, Honeycrisp), Cored and Shredded
8ozCheddar Cheese
1Egg
1/2cupFeta
1/2cupAll Purpose Flour (or Gluten-Free Flour)
2tbspPear & Beet Shrub or Apple Cider Vinegar
Caramelized Onion & Apple Topping
2Onions
2tspCanola Oil
1tspKosher Salt
1Apple, Julienned
1tbspPear & Beet Shrub or Apple Cider Vinegar
Cheddar Crisps
1cupWhite Cheddar Cheese, Shredded
Instructions
Make the onions
Heat a large cast iron pan to medium-high heat, add the oil, then the onions and salt. Cook on medium-high for about 2 minutes then lower the heat to low and cook for 30-45 minutes until the onions have cooked down and caramelized.
Make the fritters
In a large bowl combine all the ingredients for the fritters, squash, apples, cheddar cheese, eggs, feta, salt, pepper and vinegar.
Heat a large skillet over medium heat. Using a tablespoon, scoop your fritter mixture and then place into the hot skillet. With a spatula press the fritter batter to flatten slightly so it cooks evenly. Cook for 3 minutes on one side and then flip and cook for an additional two minutes. Continue this with the remaining batter.
In a small bowl combine the caramelized onions, julienned apples and vinegar.
Make the cheddar crisps
Preheat your oven to 400° F. To make the cheddar crisps, line a baking sheet tray with parchment paper or a baking silpat. Place teaspoon size portions of shredded cheddar onto the tray, spacing one inch in between each pile of cheese. Bake for 7 minutes, remove from the oven and allow to cool for 5 minutes to set.
To Serve
Top each fritter with 1 tablespoon of the onion and apple mixture. Enjoy hot!
Flourless and gluten-free and naturally sweetened, chickpea blondies will become a family favorite dessert!
Ingredients
Scale
1 can, 15ozChickpeas, drained and rinsed
1/2cup Peanut Butter
1/3cupMaple Syrup or Honey (or a combination)
1tspVanilla Extract
1/4tspBaking Powder
1/4tspBaking Soda
1/2tspKosher Salt
1/2tspCinnamon, ground
1Egg
1/3cupChocolate Chips +2 tablespoons for top
Cooking Spray
Instructions
Preaheat oven to 350° F. Spray an 8×8 inch pan with nonstick cooking spray and set aside.
In a food processor, add all of the ingredients except chocolate chips and process until batter is smooth. This will take a few minutes to get the batter to a smooth consistency.
Using a spatula, fold in the 1/3 cup of chocolate chips.
Spread the batter evenly into the prepared pan. Tap the bottom of the pan onto the counter a few times to get the batter level. Sprinkle 2 tablespoons of chocolate chips on top of the batter.
Bake for 20-22 minutes or until a toothpick comes out clean and the edges are slightly browned. Take care to not over cook! The blondies may look slightly underdone and that is okay.
Allow blondies to cool for at least 10 minutes. Cut into squares and enjoy!
This granola is nut-free making it a great choice for nut-allergies.
Ingredients
UnitsScale
3cupsOld Fashioned Oats
1/2cupFlaxseed
1tspCinnamon
1/2tspKosher Salt
1/2cupUnsweetened Shredded Coconut
1/2cupHoney
1/2cupCoconut Oil
1tspVanilla Extract
1/4cup Dried Cranberries
Instructions
Preheat your oven to 325° F.
In a large mixing bowl, add all the dry ingredients (oats, flaxseed, cinnamon, salt, shredded coconut). Mix together with a spatula.
In a microwave safe bowl or measuring cup, add the coconut oil. Place in the microwave and cook on 20 second intervals until melted. Add the honey and vanilla to the coconut oil, whisk together.
Pour the wet ingredients into the bowl of the dry ingredients. Stir together with a spatula until thoroughly mixed.
Place parchment paper or a silpat onto a large sheet tray. Spread granola mixture evenly onto the sheet tray.
Place sheet tray into the oven and bake for 25 minutes, stirring every 10 minutes.
Remove from the oven and allow to cool at least 10 minutes.
Now is the time to add in dried cranberries or any dried fruit. Mix into the granola and allow to cool.
Naturally sweetened energy bites packed with the perfect combination of peanut butter and chocolate.
Ingredients
Scale
1cupPitted Dates
1/4cupPeanut Butter or Almond Butter
1/4cupDark Chocolate Chips
1tbspFlaxseeds
2/3cupOats
2tbspChocolate Protein Powder
Instructions
Place the dates into a food processor or blender. Blend until they are broken down into very small pieces or they form a ball.
Add the remaining ingredients to the food processor or blender. Blend until the ingredients are combined, about 30 seconds. (You may need to stop and scrape down your bowl if the peanut butter sticks to the side!)
Using a 1-inch scoop or tablespoon, scoop the mixture and then roll gently in your hands to form them into ball shape. The recipe should yield about 15 balls.
Place the bites into a container and then pop them in the fridge. Let them set for 15 minutes (if you can wait that long!), enjoy!
*The salsa is excellent right away or you can pop it into the fridge for at least and hour to allow the flavors to blend. *For a spicier version, add 2 jalapenos. *Salsa will last in the refrigerator for 5-7 days in a sealed container.
Crispy Roasted Potatoes are crunchy on the outside, creamy on the inside, irresistible side dish.
Ingredients
Scale
2lbsPotatoes (Russets are great here or Red Skin or Yukon Golds)
3tbspOlive Oil
1tspKosher Salt
Instructions
Preheat oven to 400° F. Set out a large sheet tray for roasting then move to the potatoes!
Scrub potatoes and rinse with water to clean off any dirt residue.
Dice potatoes into 1 inch chunks and place onto sheet tray. Add 3 tbsp olive oil and 1 tsp kosher salt. Mix together with clean hands and spread out the diced potatoes evenly.
Place sheet tray into the oven and roast for 45-60 minutes (depending on your oven), stirring every 15-20 minutes to ensure even cooking and browning. *Keep an eye on them for the last 5 minutes to make sure they do not burn!
Cookie dough energy balls are naturally sweet and a great snack for adults and kids!
Ingredients
Scale
1cupPitted Dates
1/2cupAlmond Flour
1/4cupVanilla Protein Powder
2tbspOat Flour
1/4cupAlmond Butter
1/2tspVanilla Extract
1/4cupMini Chocolate Chips
Instructions
In the bowl of a food processor add the pitted dates and pulse until thoroughly broken down into small pieces or the dates form into a ball. Alternatively you can use a high powered blender.
Next, add the almond flour, almond butter, oat flour, protein powder and vanilla extract. Pulse again until the mixture begins to come together. To test this, pinch together some of the dough, it should hold its shape
Depending on the wetness of your almond butter, you may need to add a teaspoon or two of water to get the mixture to come together.
Add the mini chocolate chips and pulse for 3-5 times quickly to mix in the chips.
Finally, scoop tablespoon size portions and roll into balls. Continue with the remaining mixture. You should have 16-18 cookie dough balls. Store in the refrigerator and enjoy!
These chocolate lava cakes are a decadent treat, perfect for special occasions.
Ingredients
Scale
1/4cupUnsalted Butter
2ozSemi Sweet Chocolate Chips
1/2cupPowdered Sugar
1Egg
1Egg Yolk
1/2tspVanilla Extract
1/4cupAll Purpose Flour
1/2tspInstant Espresso Powder (Optional)
Instructions
Preheat your oven to 425° F.
Spray two small ramekins (6 or 8 oz) liberally with nonstick cooking spray and place onto a sheet tray. Set aside.
Tip: Be sure to coat your ramekins well otherwise your lava cakes will get stuck.
To a large microwavable bowl, add the butter and chocolate chips. Microwave in 25 second intervals, stirring in between each set, until the chocolate and butter are melted. Tip: Chocolate burns easily! Be sure to only microwave on 25 second intervals and stir thoroughly in between to avoid burning your chocolate.
Whisk the powdered sugar into the chocolate mixture. Next add the whole egg, egg yolk, vanilla extract and espresso powder if using. Whisk together until fully combined.
Add the flour into the mixture and whisk until just combined.
Divide the batter evenly into you two prepared ramekins. Tip: If using a kitchen scale to divide the batter, each ramekin should have about 116-118g or 4 1/8 oz.
Bake the lava cakes at 425° F for 12-14 minutes until the edges are firm and the center is still soft. Remove from the oven and allow to stand for 1 minute.
Run a knife around the edges of the ramekin to fully release the cakes. Then, invert the ramekins onto a plate.
Top with a sprinkling of powdered sugar, berries or peanut butter drizzle if desired.
The lava cake batter can be prepared ahead and kept in the refrigerator until ready to bake. When baking after being refrigerated, add 1-2 minutes to your cook time.
Buffalo Salmon Quinoa & Chickpea salad takes just a few pantry staples to bring this high protein, healthy and spicy grain salad together!
Ingredients
Scale
Salad
1cupQuinoa
1Can Salmon, drained
1Can Chickpeas, drained and rinsed
2Celery Stalks
1Orange Bell Pepper
Dressing
1/4cupGreek Yogurt
3tbspHot Sauce
1tbspWater
1tspOnion Powder
3/4tspGarlic Powder
1tspSmoked Paprika
Instructions
Cook the quinoa according to the package directions.
While the quinoa cooks, combine the dressing ingredients and whisk together. Set aside.
Dice the celery and bell pepper and place into a large mixing bowl. Add the chickpeas, salmon and cooked quinoa. Pour the dressing over top and mix together.
Refrigerate the salad for at least 30 minutes before serving. Serve with extra hot sauce, depending on how spicy you like your food!
Refreshing, delicious and naturally sweet. Raspberry Mango Sorbet is the perfect summer treat!
Ingredients
Scale
16ozFrozen Mango
16ozFrozen Raspberries
2tbspFresh Lime Juice (Juice from 1 whole lime)
3tbspHoney
5tbspWarm Water
Instructions
In the bowl of a food processor add the frozen fruit, lime juice, honey and 2 tablespoons warm water.
Process for 1-2 minutes then stop and scrape down the bowl. At this point you will likely need to add a few more tablespoons of warm water to help break up the frozen fruit.
Process again for another 1-2 minutes until the fruit mixture becomes smooth.
Tip: A little patience is key with this recipe! Sometimes it is helpful to let the mixture thaw for a minute or two and then process again to get the smooth consistency of a sorbet.
After the mixture becomes smooth and cohesive, put the sorbet into a freezer container and place into the freezer for at least 30 minutes (if you can wait that long!)
Simple and delicious whole wheat pizza dough. Perfect for your next homemade pizza night.
Ingredients
UnitsScale
2cupsAll Purpose Flour
1cupWhole Wheat Flour
1/2 tsp Dry Active Yeast
1 1/2 tsp Kosher Salt
1 1/4cupsWater (plus a tablespoon or two if needed)
Instructions
In a large mixing bowl combine the flours, yeast and salt. Mix together with a wooden spoon or spatula.
Pour the water into the bowl and mix the dough together. It should be a shaggy dough. Remember it will rise while it sits!
Cover the bowl with plastic wrap or dish towel. Place the bowl in a draft free area and allow to sit for at least 4 hours, up to 8 hours.
After dough has risen for at least 4 hours it is ready to roll out.
Preheat the oven to 450º. Sprinkle a sheet pan with cornmeal.
Flour your countertop to prevent the dough from sticking. Roll out dough into desired shape and size. If rolling into a rectangle, it will yield one 9×13 crust. Transfer crust to sheet pan sprinkled with cornmeal.
Place the crust into the preheated oven and par-bake for 8 minutes. After this it is ready to be topped and made into pizza!
Notes
Pizza Assembly – After Crust has Par-Baked
Spoon out pizza sauce and spread evenly.
Top with veggies, cheese, and other desired toppings.
Bake for 10-12 minutes until cheese is melted and just starting to turn brown.
Better than Girl Scout Samoa cookies with just 4-ingredients! Plus, no added preservatives or artificial nonsense here!
Ingredients
Scale
2cupsUnsweetened, Shredded Coconut
2cupsPitted Dates
1/2cupSemi-Sweet Chocolate Chips
1tspCoconut Oil
Instructions
Preheat oven to 400° F for toasting the coconut.
In the bowl of a food processor add the dates and pulse for 10-20 seconds to break down the dates.
Pour coconut onto a sheet tray with a silpat or parchment paper and place in the oven to toast for 3-5 minutes. (Take care to watch it as it will burn easily!) Remove from oven and allow to cool for 2 minutes.
Add the toasted coconut to the dates in the food processor and pulse for 10-15 seconds. You will know the mixture is ready when it can be pinched together and stays together.
Scoop out tablespoon size portions of the mixture and form into a round cookie shape, pressing it into shape with your fingers. Place onto your sheet tray with the silpat or parchment from toasting the coconut. Continue to form cookies with the remaining mixture.*To make authentic Girl Scout Samosas, take a toothpick or small spatula handle and make a hole in the center of each cookie. You may need to press and shape the cookies to retain their shape.
Place the sheet tray into the freezer and freeze for 5 minutes to set the cookies shape.
Meanwhile, place the chocolate chips and coconut oil into a microwave safe bowl. Microwave on 25 second intervals until the chocolate is fully melted, stirring in between each interval.
Next, remove the cookies from the freezer. Dip the bottom of each cookie into the melted chocolate to coat the bottom and return to your silpat or parchment covered sheet tray. Repeat for all cookies. Then, using a spoon, drizzle the remaining chocolate over the cookies in a stripe pattern for the full Samoa look.
Place the cookies back into the freezer for at least 10 minutes so that the chocolate will set. Remove from the freezer and carefully peel the cookies off your silpat or parchment. Enjoy!
Pomegranate Lime Sparkling Refresher is bubbly, with a balance of sweet and tart, it is a great summertime, (or anytime!) drink.
Ingredients
Scale
5ozSparkling Water
3ozPomegranate Juice
1tbspLime Juice
Instructions
In a large glass, add the sparkling water, pomegranate juice and lime juice. Stir with a spoon. Add a lime slice on the side of your glass to fancy it up (or if you want an extra squeeze of lime)!
Chocolate dipped fruit is a simple dessert with the wow factor! Pick your favorite fruit and dip away!
Ingredients
Scale
1/2cupSemi-Sweet Chocolate Chips
1tbspCoconut Oil
1lbFresh Fruit (Strawberries, Kiwi, Blueberries, Whatever you like!)
Instructions
Prep your Tray
Cover a sheet tray or plate with a silpat or parchment paper and set aside.
Melt Your Chocolate
In a medium sized microwave safe bowl, add the chocolate chips and coconut oil. Microwave for 25-second intervals, stirring after each interval until the chocolate and coconut oil are melted.
Rinse, Dry and Peel Your Fruit
Rinse the strawberries and pat them dry with a clean cloth or paper towel. Peel and slice the kiwis into 1/4 inch slices.
Dip Your Fruit
Holding the stem of the strawberry, dip half of the fruit into the chocolate and then set onto parchment paper. For the kiwis, dip half of each slice into the chocolate and then place onto parchment paper.
For blueberries or other small berries, use a spoon or fork to help cover the fruit in chocolate and then place onto parchment paper.
Set the Chocolate
Once all the fruit has been dipped, place the fruit into the fridge to chill and allow the chocolate to set and harden for 15 minutes.
Mango Popsicles are made with real, whole fruit with a touch of honey and lime, the perfect summer treat!
Ingredients
Scale
3cupsFrozen Mango
1tbspLime Juice
1/8tspLime Zest
1/4cupHoney
1/3cupWater
Instructions
Place all the ingredients into the bowl of a food processor. Process for 15 seconds, then stop and scrape down the bowl with a spatula. Process again for another 15-20 seconds until the mixture is smooth.
Spoon the mixture into your popsicle molds. Once full, tap the mold onto the counter a few time to release any air bubbles and level out the mango mixture and place popsicle stick and cover on top. Continue to fill all popsicle molds, then place into the freezer for at least 2 hours to fully harden.
*If you do not have a popsicle mold, enjoy this as mango sorbet! Simply put the mixture into a freezer safe container. Allow to freeze for 2 hours and then scoop out and enjoy!
The perfect fall dinner! You won’t even miss the meat with this triple bean, pumpkin, chipotle chili. Pumpkin adds fiber, vitamin A and a delicious creaminess to this fall meal.
Ingredients
UnitsScale
1 Onion, diced
1 tbsp Olive Oil
1 Orange Bell Pepper, diced
3 Garlic Cloves, minced
2cupsChicken Stock or Vegetable Stock
1/4cupWater
15ozPinto Beans, Canned
15ozKidney Beans, Canned
15ozBlack Beans, Canned
15ozCanned Pumpkin Puree
1 Chipotle in Adobo + 1 Tbsp Chipotle Sauce
30ozPetite Diced Tomatoes
1 tbsp Chili powder
1 tsp Smoked Paprika
1 tsp Kosher Salt
1/2 tsp Black Pepper
2 tsp Cumin
1 pinch Cinnamon
Instructions
Heat a large skillet over medium high heat. Add 1 tbsp olive oil and the minced onions. Sautee onions for 8 minutes until soft. Then, add the diced bell pepper and sautee for another 3-4 minutes.
Next, add the minced garlic and cook for 30 seconds until fragrant. Turn off the pan and remove from heat.
In a large slow cooker, add the sauteed onion, bell pepper and garlic mixture.
Next, add the remaining ingredients. Stir together with a wooden spoon or spatula.
Cover and cook on low for 6-8 hours.
Notes
If you like extra spice, add more chipotle peppers or adobo sauce!
When it is time to serve, top with your favorite chili toppings! We like a dollop of Greek Yogurt, scallions, thinly sliced jalapenos or shredded cheddar cheese.
Homemade Whole Wheat Air Fryer Bagels with simple ingredients. Your kitchen will smell like a bagel shop in no time!
Ingredients
Scale
2cupsGreek Yogurt
1cupAll Purpose Flour
1cupWhole Wheat Flour
1tbspBaking Powder
1/2tspKosher Salt
1Egg
Instructions
Preheat air fryer to 325° F.
Add the Greek Yogurt, flours, baking powder, and salt to a stand mixer bowl or a large bowl.
With the paddle attachment, mix the ingredients together on low until the dough comes together in a ball. (Alternatively, you can mix this by hand with a wooden spoon or spatula.)
Remove the dough from the bowl to countertop and knead by hand a few times to full incorporate the yogurt into the flour.
Divide the dough into 8 equal portions. Roll each portion into a ball and then using your finger, punch a hole through the middle to create the bagel shape. (Note: This is a sticky dough! Add a little flour as needed to help the dough from sticking too much.)
Place the egg into a bowl and add 1 tbsp of water. Whisk to break up the egg and combine. Next, brush each bagel with the egg wash. Sprinkle on toppings to your preference. (I love everything bagel seasoning here!)
Spray your air fryer basket with nonstick spray and place 4 bagels at a time into the air fryer. Air fry at 325° F for 12 minutes. Then, remove the bagels from the air fryer to a wire rack and allow to cook for at least 10 minutes. Repeat with remaining 4 bagels.
A sweet and refreshing twist on classic sorbet, this Carrot Sorbet recipe was created for the Black Forest Farmer’s Market.
Ingredients
Scale
Carrot Sorbet
2cupsCarrots
2cupsWater
1cupSugar
2tbspFresh Mint Leaves
1/3cupLemon Juice
1/3cupLime Juice
Blackberry Syrup Drizzle
1ptBlackberries
1tbspMaple Syrup
1tbspWater
1tbspLemon Juice
Instructions
Blackberry Syrup Drizzle
In a small sauce pan, add the blackberries, maple syrup, lemon juice and water. Bring to a boil and then turn down to simmer. Simmer for 10 minutes.
Allow syrup to cool at least 10 minutes. Using a fine mesh strainer, strain the seeds from the liquid. Place the liquid into container with a lid. Set aside.
*Don’t throw away the pulp! Spread it onto a parchment or silpat lined sheet tray and bake at 400 F for 25-35 minutes to make fruit leather.
Carrot Sorbet
Scrub and peal and trim the ends off carrots.
Place 2 cups of water in a large pot. Add the carrots and bring to a boil. Turn down to a simmer and cook carrots until tender, 7-8 minutes. Once tender, drain and allow to cool slightly.
While the carrots cook, make the simple syrup. In a small sauce pan add 2 cups of water and 1 cup of sugar. Bring to a boil and then turn down to a simmer. Add the mint leaves and simmer for 10 minutes to infuse the mint into the simple syrup. After 10 minutes remove the mint leaves from the mixture and allow to cool slightly.
In the bowl of a food processor at the drained carrots, simple syrup, lemon juice and lime juice.
*Optional: add in 1 tbsp of corn syrup to make the sorbet extra smooth.
Puree the mixture for 4-5 minutes until completely smooth.
Now it’s time to freeze the sorbet. Add the carrot mixture to the frozen bowl of an ice cream maker. Turn ice cream maker on and allow to freeze for 15-20 minutes depending on your ice cream maker.
Pour the frozen mixture into a freezer save container and place in the freezer until ready to serve.
To serve, scoop the carrot sorbet into a bowl and top with a small drizzle of blackberry syrup. Enjoy!
A simple Mediterranean salad in just 5 minutes. No copping required! This Mediterranean Tuna, White Bean & Sundried Tomato Salad is loaded with protein and fiber, a filling lunch for your workday!
Ingredients
Scale
15ozCannellini Beans
2tbspSundried Tomatoes (julienned)
6ozTuna (packed in water)
1cupRaw Baby Spinach
1/4cupCrumbled Feta
1tbspOlive Oli
1tbsp Red Wine Vinegar
1Pinch Kosher Salt
1/4tspGround Black Pepper
Instructions
Drain and rinse the Cannelilini beans and then place into a medium size bowl.
Next, add the spinach. Using your hands gather about 1 cup of spinach and tear it into smaller pieces before adding to the bowl.
Add the remaining ingredients and mix together with a spoon.
Taste the salad and adjust seasonings to your preference. Enjoy!
Healthy Banana Nut Muffins are one of my most popular recipes! They are filled with flavor and potassium to keep you full and satisfy your sweet tooth.
Ingredients
Scale
1/2cupOat flour
1/2cupWheat flour
1/2cupAll-purpose flour
1/4cupFlaxseed
1tspCinnamon
1tspBaking soda
1/2tspKosher Salt
2Over Ripe Bananas
1/2cupHoney
1Egg
1/4cupOlive Oil
1/4cupAlmond milk
1/2tbspVanilla Extract
1/2cupPecans (chopped)
Instructions
Set out all in Ingredients and equipment for healthy baking!
Preheat your oven to 350° F. Line a muffin tray with paper liners or spray with nonstick spray.
In a large bowl add the flours, flaxseed, baking soda, cinnamon and salt and whisk together. Set aside.
In a medium bowl whisk together the mashed bananas, olive oil, honey, egg, milk, and vanilla.
Slowly add the dry ingredients to the wet ingredients.
Set 2 tbsp of pecans aside. Add the remaining pecans to the batter, mixing with a spatula, Be sure not to over mix! (This produces tough muffins.)
Spoon the batter evenly into 12 muffin cups.
Sprinkle remaining 2 tbsp chopped pecans over top of each muffin batter.
Place muffin tray into the oven and bake for 20-25 minutes until the tops are golden brown and a toothpick inserted in the center of a muffin comes out clean.
Allow muffins to cool on a wire rack for 10 minutes.
Notes
*Muffins will last up to 5 days in the refrigerator and up to 3 months in the freezer.
Watermelon Granita, a simple and refreshing dessert with just 3 ingredients!
Ingredients
Scale
5cupsWatermelon, Seedless, cubed
1Lime
1/4cupSugar
Instructions
In the bowl of a food processor or blender, add the 5 cups of watermelon and blend on high until smooth.
Zest the lime and add 1/2 tsp lime zest to the watermelon. Then, juice the entire lime (you should have about 2-3 tbsp) and add all the juice to the food processor.
Add the sugar and blend the mixture again on high until smooth.
Pour the mixture into a 9 x 13 pan and carefully place into the freezer. (Make sure you have a flat space in your freezer for the pan to sit on, otherwise you will have granita stuck to your freezer!)
Freeze for 2 hours and then remove from freezer. Using a fork, scrape the mixture, creating little crystals. Pop your pan back into the freezer for another hour.
Remove from the freezer and give the granita another rake with a fork to break up the entire mixture. Serve in a pretty glass or bowls, enjoy the slushy, refreshing crunch of watermelon granita!
Naturally blue from blueberries and made with oat flour and olive oil, these are a healthy, tasty treat!
Ingredients
Scale
1/2cupBlueberries
1/3cupSugar
1/2tspLemon Zest
1/3cupOlive Oil
1Egg
3/4cupAll Purpose Flour
1/4cupWhole Wheat Flour
1/2cupOat Flour
1/4tspSalt
1tspBaking Powder
1/3cupWhite Chocolate Chips
Instructions
Preheat your oven to 350° F. Prep a baking sheet with a silpat or parchment paper and set aside.
Place the blueberries into a microwave safe bowl and microwave on high for 30 seconds. Stir and microwave again for 15 seconds. Remove from the microwave and stir again, mashing the blueberries with a fork. Set the blueberries aside to cool slightly while you work on the the rest of the batter.
In the bowl of a stand mixer add the sugar, lemon zest, olive oil and egg. Cream together for 1 minute until fully mixed.
Next, add the oat flour, all purpose flour, whole wheat flour, salt and baking powder. Mix on low for 30 seconds or until the batter is just mixed together. Finally, add the blueberries and any juice into the batter and mix on low for 20-30 seconds. Watch as your batter turns blue/purple!
Remove the mixing bowl from your mixer. Add the 1/3 cup white chocolate chips to the batter and mix in with a rubber spatula.
Using a 1 1/2″ scoop, spoon batter onto sheet tray, leaving about 1″ between each cookie. Continue until all the batter as been scooped onto your baking trays. You should have 18-20 cookies.
Bake at 350° F for 9-10 minutes.
Move the cookies to a wire rack to cool slightly. Enjoy!
Black Bean, Corn & Tomato Salad is a simple summer salad with fresh flavors and a spicy avocado lime dressing.
Ingredients
Scale
Black Bean, Corn & Tomato Salad
2Ears Fresh Corn
1ptCherry Tomatoes
1Cucumber
1/4cupScallions
1Can Low-Sodium Black Beans (15oz), drained and rinsed
Spicy Avocado Lime Dressing
1Avocado
1Garlic Clove
1/4cupBasil
1/4tspKosher salt
1/4tspGround Black Pepper
1/4cupGreek Yogurt
1 1/3cupsWater
2tbspOlive Oil
2tbspJarred Jalapeño (add up to 1/4 cup for extra spice!)
Instructions
Make the Dressing:
Place all ingredients into a food processor (or blender). Blend until smooth. You may need to add additional water to get the dressing to the consistency you like. Taste the dressing and add additional jalapenos if you like some heat! Using a spatula, scoop the dressing into a mason jar or a container with a lid. Set aside.
Make the Salad:
Prep your veggies. Start with the corn, shuck and rinse each corn cob. Stand the corn cob up on a cutting board and using a knife slice down against the cob, cutting the kernels off. Rotate the cob to cut off the next section of kernels, repeat for both ears of corn then place the corn into a large bowl.
Slice the cherry tomatoes in half and place into the mixing bowl with the corn. Peel the cucumber, slice in half lengthwise and using a spoon, remove the seeds. Then half lengthwise into thirds, line up your thirds and cut horizontally making 1/2 inch cuts. Place cucumber into bowl with corn and tomato. Trim the ends off the scallions and then mince and add to your other veggies.
Add the black beans to the corn, tomatoes and cucumber. Mix together with a large spoon. Add 1/4 of the dressing to the salad and mix together. Taste and add additional dressing to your preference. Enjoy!
Simple, fast and delicious! Creamy melted zucchini pasta cooks up in no time and delivers a meal that the entire family will enjoy.
Ingredients
Scale
3Medium Zucchini
1lbSpaghetti Pasta (Look for Bronze, Die-Cut Pasta)
1/2cupOlive Oil
3Garlic Cloves, Whole
1cupParmesan Cheese, Grated
1/2tspLemon Zest
1/4tspKosher Salt
1/2tspGround Black Pepper
Instructions
Cook the pasta according to the package directions. Take care to not over cook, we want al dente pasta here! But, DO NOT DRAIN THE PASTA WATER! We will use some of the pasta water for our sauce.
While the pasta cooks, work on the sauce and zucchini.
Heat a large skillet over medium heat. Add the olive oil and allow to heat up for 1 minute, then add the whole garlic cloves and cook for 4-5 minutes to infuse the oil with the garlic.
While the garlic cooks, grate the zucchini. Set a clean dish towel out on a counter or cutting board. Over top the towel, grate the zucchini using a box grater. Gather the towel by the ends and then, over the sink or a bowl, squeeze the liquid out of the shredded zucchini.
Slowly, in batches, add the shredded zucchini to the olive oil skillet. (Take care and go slow because the oil is hot!) Cook the zucchini in the oil for 10-12 minutes, stirring occasionally with a wooden spoon or spatula. The zucchini will start to break down and “melt” into the oil, this is when it is done. Remove the garlic cloves from the zucchini, discard.
Using tongs, remove the pasta from the pot directly into the skillet with the zucchini. Add the Parmesan cheese and lemon zest, and using the tongs, stir together the pasta, cheese, zest and zucchini. The cheese will melt into the mixture, creating the sauce for this dish. If the pasta seems dry, add a few tablespoons of pasta water to loosen up the pasta and create more of a sauce.
Add salt and pepper and adjust seasonings based on your preference. Serve hot and enjoy!
Combine all the ingredients into a mason jar or a glass container with a lid. Allow to marinate for at least 12 hours, ideally 24 hours.
Roasted Beet Puree
Preheat your oven to 400 F.
Scrub the beets to remove any dirt then cut off the tops and bottom and peel the beets. Place each beet into a square of aluminum foil, top with olive oil, salt and pepper. Pinch and seal the foil then place each parcel onto a large sheet tray. Place the sheet tray with beets into the oven and roast for 40-50 minutes until the beets are very tender.
Place the roasted beets into the bowl of a food processor with 1/2 cup water. Puree until mixture is smooth.
Beet Pizza Dough
In the bowl of a stand mixer add 1 cup of warm water, sugar and yeast. Allow the yeast to bloom for 5 minutes.
Next, add the salt, flour and beet puree. Mix on low to incorporate all the ingredients, then increase the speed to medium. Add additional flour as needed to form a soft and spongy dough. Cover the bowl and allow dough to rise for 1 hour.
Get ready to roll and cook the dough! Preheat your oven to 475 F.
Flour a countertop or large board to roll out the dough. Using a rolling pin, roll to 1/4 inch thick. Then, using a small 2 inch cutter, cut out the dough and place onto a large sheet tray. Continue to cut out the rest of the dough, place on the tray and then bake at 475 F for 5 minutes. Allow to cool on a wire rack.
Broccoli Pesto
Combine the broccoli and garlic scapes into the bowl of a food processor and process for 1 minute.
Add the salt, pepper and balsamic vinegar and pulse again to mix. Next, with the processor on, drizzle the olive oil in through the feed tube. Then add the Parmesan cheese and process once more to fully incorporate all ingredients. Taste the pesto and adjust seasonings to your preference.
Assembling the Pizzettes
Heat a large skillet over medium heat. Add 1 tsp olive oil. Crisp a pizzette in the oil, turning over after 1 minute and then cooking the other size for 1 more minute.
To the pizzette, add 1 tsp broccoli pesto, top with 1 tsp julienne sugar snap peas and two small, pickled onions. Finally top with a sprinkle of sea salt. Serve immediately, enjoy!
Roasted Cherries topped onto a goat cheese crostini is a lovely sweet and savory appetizer. This appetizer was created for the Black Forest Farmer’s Market
Ingredients
Scale
1lbCherries, Pitted and Halved
2tspOlive Oil
2tspMaple Syrup
1/2tspLemon Zest
3ozGoat Cheese
2tbspBasil, Julienned
1Baguette
Instructions
Preheat your oven to 400° F.
On a large sheet tray, place a piece of parchment paper. Next add the cherries, olive oil and maple syrup and stir together gently.
Roast for 7 minutes until the cherries are tender and slightly bubbling.
Slice the baguette into 1/2 inch slices. Place slices onto a sheet tray and drizzle with 1 tablespoon olive oil. Roast for 5 minutes then flip the slices over and roast for another 3 minutes until fully crisp.
To serve, spread 1/2 tablespoon goat cheese onto a crostini and top with 1 tablespoon roasted cherries then sprinkle with basil.
Fresh veggies, sourdough croutons, feta and vinaigrette, savory, sweet, and crunchy Mediterranean Panzanella Salad.
Ingredients
UnitsScale
Salad
1 pinch Pint Cherry Tomatoes, sliced in half lengthwise
1 Large Cucumber, peeled, seeded & diced into 1– inch pieces
1 Yellow Bell Pepper, seeded and diced into 1-inch pieces
1 Orange Bell Pepper, seeded and diced into 1-inch pieces
1/4cupKalamata Olives, sliced in half lengthwise
1/4cupBasil, juilenned
1/4cupFeta Cheese
4 Slices Sourdough Bread, diced into 1-inch pieces
1/2cupOlive Oil
Vinaigrette
1/2 tsp Dijon Mustard
1 tsp Minced Garlic
1 tsp Honey
3 tbsp Red Wine Vinegar
4 tbsp Olive Oil
1/2 tsp Kosher Salt
1/4 tsp Ground Black Pepper
Instructions
Make the Vinaigrette
Combine all ingredients into a mason jar or small bowl. With the lid on, shake the mason jar to mix together, or whisk together in the bowl. Set aside.
Make the Salad
Heat a large saute pan over medium heat. Add 4 tablespoons olive oil to pan. Add the bread cubes to the pan and cook until golden brown, tossing occasionally. Remove from heat and all to cool.
In a large bowl, add the tomatoes, bell peppers, basil, feta, cucumber and olives. Next add the bread cubes to the veggies.
Mix the vinaigrette one more time then pour half of the dressing over the salad. Stir the salad together with a large spoon.
Taste the salad and add more of the vinaigrette if needed. Enjoy!
Notes
*Make this salad your own, add your favorite veggies, cheese and enjoy!
Pumpkin Chocolate Chip Muffins are full of fall flavors, packed with fiber and made extra special with chocolate chips.
Ingredients
UnitsScale
1/2cupOat Flour
1/2cupWheat Flour
1/2cupAll Purpose Flour
1/4cupGround Flaxseed
2 tsp Pumpkin Pie Spice
1 tsp Baking Soda
1/2 tsp Kosher Salt
3/4cupPumpkin Puree
1/2cupHoney
1/4cupOlive Oil
1/4cupAlmond Milk
1 Egg
1/2 tbsp Vanilla Extract
1/2cupChocolate Chips
Instructions
Preheat oven to 350° F. Line a muffin tray with paper liners or spray with nonstick spray.
In a large bowl add the flours, flaxseed, baking soda, pumpkin pie spice and salt and whisk together. Set aside.
In a medium bowl whisk together the pumpkin puree, olive oil, honey, egg, milk, and vanilla.
Slowly add the dry ingredients to the wet ingredients.
Set 2 tbsp of chocolate chips aside. Add the rest of the chocolate chips to the batter, mixing with a spatula, Be sure not to over mix! (This produces tough muffins.)
Spoon the batter evenly into 12 muffin cups then sprinkle the remaining 2 tbsp chocolate chips over top of each muffin batter.
Place muffin tray into the oven and bake for 20-25 minutes until the tops are golden brown and a toothpick inserted in the center of a muffin comes out clean.
Allow muffins to cool on a wire rack for 10 minutes.
Packed with flavor and nutrients, this spin on nachos uses rainbow fingerling potatoes as the base and then is topped with cheddar cheese and fresh and zesty tomatillo salsa.
Ingredients
UnitsScale
Tomatillo Salsa
2 Garlic Cloves
1/2 Yellow onion
1 Jalapeno, seeds removed
7 Tomatillos, husks removed
1 tbsp Fresh Lime Juice
1/4 tsp Ground Black Pepper
1/4 tsp Ground Cumin
1/4 tsp Kosher Salt
Fingerling Potato Nachos
3lbsFingerling Potatoes
1 tbsp Olive Oil
1 tsp Kosher Salt
1 tsp Ground Cumin
1/2 tsp Chili Powder
1/2cupCheddar Cheese, Shredded
Instructions
Tomatillo Salsa
In the bowl of a food processor add the garlic, onion and Jalapeno. Process for 15-20 seconds until the vegetables are broken into fine pieces.
Next, dice the tomatillos, removing the small core, and add to food processor.
Then add the remaining ingredients to food processor. Pulse until salsa is mixed together but not pureed.
Taste and adjust seasonings to your liking!
Fingerling Potato Nachos
Preheat oven to 400° F. Get out a large sheet tray and set aside.
Using a mandoline, slice the potatoes into 1/4 inch fry shape. Alternatively, you can slice with a knife by hand.
Place slice potatoes into a large bowl filled with warm water. Stir the potatoes around to help release their starch then drain into a colander. This step helps to create the crispiest potatoes!
Pour the drained potatoes onto your sheet tray. Top with olive oil, salt, cumin and chili powder and mix together with clean hands. Place into the oven and roast for 30 minutes, stirring halfway.
Once the potatoes have fully cooked and crisped, top with 1/4 cup of cheddar cheese. Place back into the oven for 3-4 minutes to melt the cheese.
Top the nachos with tomatillo salsa, enjoy!
Prep Time:10
Cook Time:45
Category:Appetizer, Black Forest Farmer's Market, Gluten-Free, Sides, Snack, Vegetarian
Everything bagel edamame is a quick and protein packed savory snack.
Ingredients
Scale
1/2cupFrozen Edamame (in the pod)
1tbspWater
1tspEverything Bagel Seasoning
Instructions
In a microwave safe bowl, add 1/2 cup frozen edamame and 1 tablespoon water. Microwave for 3 minutes to steam the edamame and it has cooked through.
Using pot holders, carefully remove from the microwave and drain off any extra water. Sprinkle 1 teaspoon everything bagel seasoning over top and stir together with a spoon so that the seasoning gets onto all the edamame.
Better than bakery scones, these homemade pumpkin scones save on fat and calories but not on flavor.
Ingredients
Scale
For the Scones
2cupsWhole Wheat Flour
3/4cupOat Flour
1tbspBaking Powder
3/4tspKosher Salt
2 1/2tspPumpkin Pie Spice
5tbspUnsalted Butter
2/3cupPumpkin Puree
1/3cupMaple Syrup
1Egg
2tspVanilla Extract
Simple Vanilla Icing
1/2cupPowdered Sugar
1tbspAlmond Milk (or soy for nut free)
1/4tspVanilla Extract
Instructions
Preheat oven to 425°F and line sheet tray with Silpat or parchment paper. Set aside.
In a large bowl, add the whole wheat flour, oat flour, baking powder, salt and pumpkin pie spice. Whisk together to combine.
Next, cut the 5 tbsp of unsalted butter into small pieces. Then, add to the dry ingredients. Using a pastry cutter or a fork, blend the butter into the dry ingredients until the butter is incorporated and the size of peas.
Add the wet ingredients to the bowl: canned pumpkin, maple syrup, egg, and vanilla extract. Stir into dry ingredients with a spatula until the dough just comes together.
Place dough onto prepared sheet tray. Form into 9 inch round circle. Using a bench scraper or butter knife, score the dough in half then each half into 5 slices.
Bake for 12-15 minutes until firm to the touch. While scones are baking, mix up the icing.
In a small bowl, whisk icing ingredients together until smooth. Allow scones to cool for at least 5 minutes before topping with icing. Using a spoon, drizzle icing over the scones. Enjoy!
Enjoy the ultimate fall flavors with this Harvest Farro Grain Salad, packed with dried cranberries, crisp apples, and a tangy maple lemon dressing—perfect for a healthy, seasonal meal or side dish!
Ingredients
UnitsScale
Salad:
1cupFarro
1/4cup Dried Cranberries
1/4cupRaw Pecans, chopped
1/2 Granny Smith Apple, diced
1/2cupRaw Baby Spinach
1/4cupGoat Cheese or Feta (Optional)
Vinaigrette:
1/4cupOlive Oil
1 tsp Lemon Zest
2 Tbsp Lemon Juice
1 Tbsp Maple Syrup
1/8 tsp Kosher Salt
1/8 tsp Ground Black Pepper
Instructions
Cook the farro according to the package directions.
While the farro cooks, prep the rest of the salad.
In a small bowl, whisk together the vinaigrette ingredients, set aside.
Once the farro is finished cooking, drain off any excess liquid and place farro into a large bowl.
Pour the vinaigrette over top the farro and stir with a wooden spoon or spatula. Place the farro into the fridge to chill for at least 30 minutes.
After 30 minutes, add the diced apple, dried cranberries, pecans, spinach and cheese (if using) to the farro. Stir with spatula to combine.
Cover the salad and refrigerate before serving. Enjoy!
Flavorful, filling & fast! These savory pumpkin and lentil quesadillas are the perfect lunch, dinner or appetizer. Plus they are great for using up that little bit of leftover pumpkin!
Ingredients
Scale
1/2cupCanned Lentils (drained and rinsed)
1/4cupPumpkin Puree
1/4cupBaby Spinach
1/4cupBell Pepper, Diced
1/4cupReduced Fat Mexican Shredded Cheese
1/8tspGround Cumin
1/8tspOnion Powder
1/8tspGarlic Powder
1/8tspPaprika
Chili Powder
2Whole Wheat Tortillas
1tspOlive Oil
Instructions
Heat a skillet or cast iron pan to medium heat. Add 1 tsp olive oil, then add bell pepper and cook until tender.
Next to the skillet add the lentils, pumpkin, spinach and spices. Cook until spinach slightly wilts.
Heat a separate pan to medium heat. Place one tortilla down into skillet, add half the cheese, top with the lentil pumpkin filling then add remaining cheese to top of filling. Place second tortilla over top to make your quesadilla. Cook for 2-3 minutes then flip and cook another 2-3 minutes until the cheese has melted.
Serve with Greek yogurt, salsa and hot sauce (if you like spicy!)
Heat a 9-inch cast iron pan over medium low heat. Add the butter and cook until melted. Then turn off heat to pan.
In a medium sized bowl, add the eggs and whisk so the eggs are fully broken down. The sugar, lemon zest and salt. Whisk vigorously until mixture becomes slightly foamy on top.
Next, add the almond milk to the bowl and whisk.
Add the flours and whisk again to combine batter.
Pour the mixture into your pan with melted butter. Top with mixed berries, spread them out so that each bite will get berries!
Place into the oven and bake for 18-22 minutes until nicely golden brown.
Sprinkle powdered sugar over top, slice and enjoy!
Simple sauteed Bok Choy is a fast and flavorful side dish for any dinner!
Ingredients
Scale
2lbsBok Choy (One Large Bunch or Two Medium Bunches)
1tspSesame Oil
1Garlic Clove, minced
2tbspSoy Sauce
Instructions
Trim the root end off of your bok choy and discard. Then fan the leaves open, rinse off any dirt and shake off excess water.
Place the rinsed bok choy onto a cutting board. Line the bok choy up horizontally and with a sharp knife, starting with the white part and moving to the leafy green, chop into roughly 1-inch pieces.
Heat a medium sized skillet, wok or cast iron pan over medium-high heat. Add the sesame oil and allow to heat up for 30 seconds.
When the oil is heated, add the white parts of the bok choy only! (This is key so that the greens do not wilt while the white part cooks!) Allow to cook for 1 minute.
Next, add the rest of the boy choy, (the greens!) and cook for another 2 minutes. Then turn the heat down to medium low and add the garlic and soy sauce. Cook for an additional minute until the garlic just softens. Serve immediately.
Sunrise Banana Pancakes are the perfect healthy weekend breakfast! Filled with fiber and potassium, plus the anti-inflammatory benefits of turmeric, top with a little maple syrup and enjoy!
Ingredients
Scale
2Ripe Bananas
2Eggs
1cupAlmond Milk
2cupsOat Flour
3tspBaking Powder
1tspGround Cinnamon
1/2tspGround Turmeric
1/4tspSalt
1tspVanilla Extract
1tbspMaple Syrup
Instructions
Add all ingredients into a blender and blend until smooth.
Allow the batter to sit for 5 minutes while you heat up your pan or griddle. (Oats absorb moisture!)
Preheat a griddle to 325° F or a skillet to medium heat. Spray your pan with nonstick spray, or alternatively add 1 tbsp butter or oil to pan.
Pour 1/4 cup of batter onto griddle or pan, then, leaving about 1-inch between, make additional pancakes to fit within your pan.
Allow pancakes to cook 1-2 minutes until the bubbles that have formed on top begin to burst. Then flip and allow to cook an additional 1 to 2 minutes.
Remove pancakes from pan and serve immediately. Or, place on a sheet tray and keep warm in a 180° F oven until you are ready to serve. Enjoy!
Parmesan Crisps are an easy, gluten-free and low carb snack!
Ingredients
Scale
3/4cupParmesan, Grated on Large Box Grater
Instructions
Preheat oven to 400°F.
Line a sheet tray with parchment paper or a silpat.
Scoop 1 tbsp size mounds of Parmesan onto the sheet tray, spacing them at least an inch apart.
Bake for 5-7 minutes until the cheese is bubbly and just starts to brown.
Allow to cool on the tray for 5 minutes. Then remove using a thin spatula and place on a paper towel lined plate to absorb any excess moisture or grease.Enjoy!
This vibrant salad brings together sweet, savory, tart, and crunchy flavors in every bite—perfect as a nutritious side dish!
Ingredients
UnitsScale
Salad:
1 Sweet Potato
4cupsBaby Spinach
1/4cupPecans, Chopped
1/4cupPomegranate Arils
1/8cupParmesan Shavings
1 tbsp Olive Oil
1/4 tsp Kosher Salt
1/4 tsp Ground Black Pepper
Dressing:
1/4cupBalsamic Vinegar
1/4cupOlive Oil
1/2tspDijon Mustard
1tbspHoney
1/2tspKosher Salt
1/4tspGround Black Pepper
Instructions
Start by roasting your sweet potato. Preheat oven to 400° F, get a large sheet tray out and set aside. Peel and dice the sweet potato into 1-inch dice.
Place the diced sweet potato onto your sheet tray and top with 1 tbsp olive oil, kosher salt and pepper. Place into the oven and roast for 25-30 minutes until just starting to brown and crisp, stirring halfway. Allow the sweet potato to cool for at least 10 minutes before adding to the salad. (If it is hot it will wilt the spinach!)
While the sweet potato roasts, prepare the rest of the salad. Place the baby spinach into a large bowl. Add the pomegranate arils and pecans and using two spoons, toss together.
Next, mix up the dressing. Add all the ingredients into a mason jar, pop a lid on and give it a shake. Or, add the ingredients to a small bowl and whisk together. Set aside.
After the sweet potato has cooled, add to the salad mixture.
Next, pour over 3/4 of the dressing and toss the salad together. Taste for seasoning and add more dressing if you’d like.
Lastly, using a peeler, shave thin pieces of Parmesan cheese to top the salad. Enjoy!
This spinach pesto does everything. Toss it with pasta, spread it on sandwiches, or use it to instantly upgrade chicken, fish, and grain salads with fresh, herby flavor.
Ingredients
Scale
6cupsSpinach
2Garlic Cloves
2/3cupAlmonds or Walnuts (or pine nuts if you’re feelin’ fancy!)
1/4cupGrated Parmesan Cheese
3/4tspSalt
1/4tsppepper
2tbspBalsamic Vinegar
1/2cupOlive Oil
Instructions
In the bowl of a food processor, add the spinach and garlic cloves. Process until the spinach and garlic are broken down into small pieces.
Add the Parmesan cheese, nuts, salt and pepper. Pulse again until combined but not totally smooth.
Add the balsamic vinegar and pulse again.
Next turn on the food processor and slowly pour in the olive oil through the feed tube.
Taste your pesto and adjust any seasonings as needed.
Serve over roasted vegetables, fish, chicken, on sandwiches or salads its delicious!
Creamy, cheesy, and absolutely delicious! Butternut Squash Mac and Cheese is packed with flavor, fiber and nutrients. It is the perfect dish for your holiday meals.
Ingredients
UnitsScale
1Butternut Squash
3Garlic Cloves
2tspKosher Salt
1 1/2tspGround Black Pepper
1tbspOlive Oil
1cup Vegetable Stock
4ozGruyere Cheese, Shredded
8ozSharp Cheddar Cheese, Shredded
16ozCavatappi Pasta
Breadcrumb Topping:
1/2cupWhole Wheat Panko Breadcrumbs
1 tbsp Chopped Herbs (Such as Thyme, Sage)
1 tbsp Olive Oil
Instructions
Preheat oven to 400° F. Line a large sheet tray with foil, set aside.
Using a sharp knife, slice the butternut squash in half lengthwise. Be careful as the squash’s skin is quite tough! Using a spoon, scoop out the seeds and bit of flesh from the squash.
Spread 1 tablespoon olive oil over the squash halves. Place garlic cloves into each squash half. Add 1 tsp kosher salt and 1/2 tsp ground black pepper. Place sheet tray into the preheated oven and roast for 40-60 minutes, depending on the size of your butternut squash. You will know the squash is done when you can press it with a fork and it is soft.
While the squash is roasting, cook your pasta. Fill a large pot with water and bring to a boil. Add 2 tsp salt to your water. Add your pasta and cook 1 minute under the recommended time. You want your pasta to be “al dente” and have a little bite to it. Drain the pasta and set the pot aside to use again.
Let the squash cool for at least 10 minutes. After 10 minutes scoop the flesh of the butternut squash out and place into the bowl of a food processor. Be sure to scoop all the flesh and the garlic!
Add 1 cup of stock to the food processor. Process the mixture until it is smooth and creamy.
Place the pot you used for the pasta onto the stove and heat to low. Using a spatula spoon the butternut squash mixture into the pot. Add both the shredded gruyere and cheddar cheeses. Stir the cheeses into the butternut squash mixture until they are melted. At this point check your mixture for seasoning. Add additional salt and pepper to taste.
Add the cooked pasta to your squash and cheese mixture. Mix thoroughly.
Place pasta mixture into a 9×13 dish that has been coated with cooking spray.
Sprinkle 1/2 cup panko breadcrumbs over top of mac and cheese. Then top with herbs and drizzle 1 tbsp olive oil over top.
Bake for 25-30 minutes or until bubbly and golden brown on top. Allow to cool for 5 minutes, enjoy!
This is hands-down the BEST roasted tomato and red pepper soup—healthy, comforting, and made with real ingredients. Perfect with a grilled cheese for serious dipping.
Ingredients
Scale
10Roma Tomatoes, halved and seeded
2Red Bell Peppers, quartered and seeded
1Onion
8Cloves Garlic
2Carrots, peeled and sliced into 2 inch pieces
4tbspOlive Oil, divided
2tbspBalsamic Vinegar
6ozTomato Paste
1/4cupBasil Leaves, julienned
6cupsVegetable Stock
2tspKosher Salt
1tspBlack Pepper
Instructions
Preheat oven to 400° F degrees. Prep vegetables as listed above.
On a sheet tray toss together tomatoes, red pepper, onion, garlic, 2 tablespoons olive oil, balsamic and salt and pepper. Arrange tomatoes and peppers skin side up. Roast for 45-50 minutes until lightly charred.
In a large pot, warm the remaining 2 tablespoons olive oil, stir in the tomato paste and mix well. Add the roasted vegetables including juices and stir to combine with tomato paste. Stir in the stock, cover and bring to a boil. Reduce heat to low and simmer for 20 minutes.
Transfer soup to a blender in batches so that soup fills blender only halfway. Place kitchen towel over blender lid and puree soup to desired consistency. Blend remaining soup and return to soup pot.
Heat the pureed soup to warm through. Ladle soup into bowls, top with basil and enjoy.
Sweet and savory fall flavors with a kick of heat. Cozy up this fall with a soothing bowl of Harvest Soup. Roasted squash and apples along with a jalapeno for surprising heat make this the perfect fall soup!
Ingredients
Scale
2Large Apples
2Yellow Onions
6Cloves of Garlic
3lbsSquash (Buttercup, Carnival, whatever you like!)
2tbspOlive Oil
2tspKosher Salt
1tspGround Black Pepper
4cupsVegetable Stock
1Jalapeno
1tspApple Cider Vinegar
Instructions
Preheat oven to 400°F. Get out two sheet trays and set aside.
Prep the veggies. Peel and chop onion, garlic cloves, apple and squash into large chunks
Place vegetables evenly on both sheets and drizzle each with 1 tbsp olive oil.
Season with salt and pepper and toss gently with your hands. Add the whole jalapeno to one of the sheets. Roast for 50 minutes to 1 hour until the squash is fork tender. Remove from the oven and allow to cool.
Once the vegetables are cool enough to handle, remove the skins from the apples, jalapenos, and squash and de-seed the jalapenos.
In a large soup pot, add roasted vegetables and vegetable stock. Let simmer for 20 minutes.
Turn off the heat, and puree the soup a blender in batches until smooth – be sure not to overfill your blender!
Place pureed soup back into pot over stove, stir in the apple cider vinegar and warm through. Serve with toasted sourdough bread, croutons or gluten-free bread.
Sautéed green beans with dried cranberries and almonds are the perfect balance of flavor and nutrition—packed with fiber, antioxidants, and healthy fats, they’re a simple, delicious addition to any family feast.
Ingredients
UnitsScale
12oz Fresh Green Beans
2 tsp Olive Oil
1/4cup Dried Cranberries
2 tbsp Slivered Almonds
1/2 tsp Kosher Salt
1/4 tsp Ground Black Pepper
Instructions
Rinse and trim your green beans. Do so by lining up several green beans and trim off about 1/4 inch on each end.
Heat a saute pan or cast iron pan over medium heat. Add olive oil to pan.
Add the green beans to your warmed pan. Season with salt and pepper. Cook stirring occasionally, for 7-10 minutes, depending on how soft you like your green beans. (Tip: Put a lid over your pan to cook the beans quicker!)
In the last 2 minutes of cooking, add the dried cranberries and almonds. Continue to stir to warm the cranberries and almonds. Taste your green beans and adjust seasoning as needed.
Joseph, S. V., Edirisinghe, I., & Burton-Freeman, B. M. (2014). Berries: Anti-inflammatory Effects in Humans. Journal of Agricultural and Food Chemistry, 62(18), 3886–3903. https://doi.org/10.1021/jf4044056
Juárez-Chairez, M. F., Meza-Márquez, O. G., Márquez-Flores, Y. K., & Jiménez-Martínez, C. (2022). Potential anti-inflammatory effects of legumes: A review. British Journal of Nutrition, 128(11), 2158–2169. https://doi.org/10.1017/S0007114522000137
Land Lail, H., Feresin, R. G., Hicks, D., Stone, B., Price, E., & Wanders, D. (2021). Berries as a Treatment for Obesity-Induced Inflammation: Evidence from Preclinical Models. Nutrients, 13(2), 334. https://doi.org/10.3390/nu13020334
Parkinson, L., & Keast, R. (2014). Oleocanthal, a Phenolic Derived from Virgin Olive Oil: A Review of the Beneficial Effects on Inflammatory Disease. International Journal of Molecular Sciences, 15(7), 12323–12334. https://doi.org/10.3390/ijms150712323
Peng, Y., Ao, M., Dong, B., Jiang, Y., Yu, L., Chen, Z., Hu, C., & Xu, R. (2021). Anti-Inflammatory Effects of Curcumin in the Inflammatory Diseases: Status, Limitations and Countermeasures. Drug Design, Development and Therapy, Volume 15, 4503–4525. https://doi.org/10.2147/DDDT.S327378
Rajaram, S., Damasceno, N. R. T., Braga, R. A. M., Martinez, R., Kris-Etherton, P., & Sala-Vila, A. (2023). Effect of Nuts on Markers of Inflammation and Oxidative Stress: A Narrative Review. Nutrients, 15(5), 1099. https://doi.org/10.3390/nu15051099
Schultz, H., Ying, G.-S., Dunaief, J. L., & Dunaief, D. M. (2021). Rising Plasma Beta-Carotene Is Associated With Diminishing C-Reactive Protein in Patients Consuming a Dark Green Leafy Vegetable–Rich, Low Inflammatory Foods Everyday (LIFE) Diet. American Journal of Lifestyle Medicine, 15(6), 634–643. https://doi.org/10.1177/1559827619894954
Shin, J.-H., Ryu, J. H., Kang, M. J., Hwang, C. R., Han, J., & Kang, D. (2013). Short-term heating reduces the anti-inflammatory effects of fresh raw garlic extracts on the LPS-induced production of NO and pro-inflammatory cytokines by downregulating allicin activity in RAW 264.7 macrophages. Food and Chemical Toxicology, 58, 545–551. https://doi.org/10.1016/j.fct.2013.04.002
Simopoulos, A. P. (2002). Omega-3 Fatty Acids in Inflammation and Autoimmune Diseases. Journal of the American College of Nutrition, 21(6), 495–505. https://doi.org/10.1080/07315724.2002.10719248
Stromsnes, K., Correas, A. G., Lehmann, J., Gambini, J., & Olaso-Gonzalez, G. (2021). Anti-Inflammatory Properties of Diet: Role in Healthy Aging. Biomedicines, 9(8), 922. https://doi.org/10.3390/biomedicines9080922
Yu, Z., Malik, V. S., Keum, N., Hu, F. B., Giovannucci, E. L., Stampfer, M. J., Willett, W. C., Fuchs, C. S., & Bao, Y. (2016). Associations between nut consumption and inflammatory biomarkers,. The American Journal of Clinical Nutrition, 104(3), 722–728. https://doi.org/10.3945/ajcn.116.134205
Boost your pizza night with vibrant beet pizza dough! This nutrient-packed dough combines roasted beets with classic pizza ingredients for a stunning pink hue and earthy flavor. Rich in fiber, antioxidants, and vitamins, it’s a colorful and delicious way to enjoy a healthier homemade pizza.
Ingredients
Scale
Roasted Beet Puree
1Beet
1tspOlive OIl
1pinchKosher Salt
Beet Pizza Crust
1cupWarm Water
1tspSugar
2 1/4tspDry Active Yeast
1 1/2tspKosher Salt
3 3/4cupsAll Purpose Flour
3/4cupBeet Puree
Instructions
Roast Beet & Make Puree
Preheat your oven to 400 F.
Scrub the beet to remove any dirt then cut off the tops and bottom and peel the beet.
Place the peeled beet onto a square of aluminum foil, top with olive oil, salt and pepper. Pinch and seal the foil around the beet then place the parcel onto a large sheet tray. Place the sheet tray with beet into the oven and roast for 40-50 minutes until very tender.
Place the roasted beet into the bowl of a food processor with 1/4 cup water. Puree until mixture is smooth. Next, make Beet Pizza Dough.
Make Beet Pizza Dough
In the bowl of a stand mixer add 1 cup of warm water, sugar and yeast. Allow the yeast to bloom for 5 minutes.
Next, add the salt, flour and beet puree. Mix on low to incorporate all the ingredients, then increase the speed to medium. Add additional flour as needed to form a soft and spongy dough. Cover the bowl and allow dough to rise for 1 hour.
Get ready to roll and cook the dough! Preheat your oven to 475 F. Sprinkle cornmeal onto your pizza stone or sheet tray. Set aside.
Flour a countertop or large board to roll out the dough. If using a round pizza stone, divide the dough into 2 and using a rolling pin, roll out each portion into a circle. If using a large sheet tray use the entire dough and roll into rectangle shape.
To roll the dough, flour the rolling pin, start at the center of the dough and roll outwards, continue rolling around the dough until you have made your circle or rectangle. Place on your pizza stone or sheet tray.
Place your pan into the oven and par bake the crust for 8 minutes. Then your pizza crust is done!
Eating the Mediterranean way is easier than think!
Here are 7 EASY ways to start bettering your health with the Mediterranean eating pattern today.
#1 Cook with Olive Oil
Olive oil is an unsaturated fat filled with antioxidants and polyphenols. When we sub in olive oil in cooking and sub out butter and other saturated fasts, not only are you following the Mediterranean way but the health benefits are numerous.
#2 Give Veggies the Attention they deserve
The Standard American Diet is SAD, literally the acronym for it is SAD! Highly processed, fried foods, simple carbohydrates and sugar-laden sweets certainly do not give us the nutrients our bodies need. Only 1 in 10 Americans are eating enough veggies each day.
One of the biggest tenants of the Mediterranean eating pattern is the abundance of vegetables.
As a dietitian I’ve heard the same saying numerous times, “I don’t like vegetables.” Yet this is a self-fulfilling prophecy. You may not love how they were cooked for you as a kid (who actually likes mushy veggies?) or you may have tried green beans from a can and disliked the flavor. But, if you change your mindset to, “I am open to trying new things” or “I will try 1 new vegetables a week” the script is flipped. Be open, try new varieties and new methods. There are so many ways to cook vegetables that make them taste delicious. Plus fresh, frozen and even canned (low to no-sodium) all provide nutrients to fuel our best selves.
For your next meal, think of veggies first, fill half your plate with them and complement the vegetable with your protein and carbohydrate. Season with olive oil and spices, bon appetit!
#3 Beans, Beans, Beans
Beans are a staple part of the Mediterranean eating pattern. They give us loads of fiber, protein and minerals. Plus they’re cheap!
Beans work so well to give protein to a meatless meal. They are also a great way to plus up meals with meat. For example, add black beans to ground turkey tacos, white beans are great thickeners for soups. And don’t forget beans in dips, falafel, burgers and or a salty snack with crispy chickpeas.
George Clooney and I share the same sentiment for chickpeas.
#4 Swap in Whole Grains
First, let me say this, yes you can have bread! Swap out white breads and rice for whole wheat, whole grain varieties. Whole grains have more fiber, vitamins and minerals, plus more flavor and health benefits.
Plus you can have fun trying new grains. Never had farro? It is delicious, nutritious and truly simple to cook. It’s very similar to cooking rice! And don’t forget about oats, quinoa, farro, and brown rice. This simple swap will help you follow along the Mediterranean pattern.
#5 Snack on Whole Foods
What do I mean by snack on whole foods? Choose an apple with peanut butter. A handful of nuts. Sliced veggies and hummus. Peaches and yogurt. There’s nothing more fast food than an apple or banana.
Fruit, nuts and seeds are a big part of the Mediterranean eating pattern. They can certainly be incorporated into breakfast, lunch and dinner (and they should!) they also make great, portable snacks.
#6 Stop the Soda
One of the most impactful and beneficial changes in your eating will be to lose the sodas, energy drinks, and sweet teas and swap with unsweetened beverages. This might look like swapping 1 soda a day for a sparking water, then 2, then 3 per week and so on.
Plus, there are so many fun, unsweetened drinks out there now. Try a new sparkling water or jazz up still water with some fresh cut fruit or cucumber. You will feel fancy, trust me.
#7 Go Meatless or swap in fish 1x week
When you fill your plate with vegetables, whole grains, beans, nuts and seeds, it is easy to go meatless. Lentils are a great plant-based source of high protein. Give my lentil bolognese a try and let me know what you think!
This does not mean you have to go to the grocery or fish market twice a week for fresh fish. Canned fish totally counts here! Try salmon patties with canned salmon, they are GOOD. Tuna also works great as a shelf stable option. If you’re choosing canned, aim for only 1x week. And don’t forget fresh or frozen fish are excellent. Seared, roasted, air-fried, there are so many ways to cook fish that are delicious and not boring. And by the way if you are a vegetarian who does not eat fish or vegan, go for more veggies, beans and nuts instead. Walnuts and flaxseeds are nice plant-based options for getting your omega-3’s.
Have you heard of the Mediterranean eating pattern and wondered if it actually lives up to the hype? Well, researchers, doctors and dietitians talk it up as one of the healthiest, and most sustainable eating patterns in the world. Plus, US News & Health has ranked it #1 for the past 6 years in a row.
Let’s dive into the top 5 reasons you should give the Mediterranean eating pattern a try!
#1. Protects Your Heart – A ton of research has been done on the Med pattern and heart health. And study after study continues to back up the facts, the foods of the Med pattern help to lower cholesterol, lower blood pressure and reduce the risk of cardiovascular disease. With heart disease the #1 killer in the United States, I’d say this is a good reason to give the Mediterranean eating pattern a go!
#2. Fights Inflammation – Inflammation seems to be a buzz word these days so I’ll break it down a bit. Inflammation is our body’s immune system response to injury or infection. Our immune system sends out white blood cells to surround the area to help with healing. Chronic inflammation is the big problem. Chronic inflammation is when the body continues to send out inflammatory cells even when there is no danger. For example, in rheumatoid arthritis, inflammatory cells attack joints leading to an inflammation. Thus, chronic inflammation is associated with certain diseases such as Type 2 Diabetes, Arthritis, certain Cancers, Asthma, Alzheimer’s Disease and Heart Disease.
So, what does all this science mean for you? Reducing inflammation with anti-inflammatory foods is beneficial to all cells in the body.
#3. Boosts Your Brain – This might be THE most exciting aspect of the Mediterranean eating pattern. “Higher adherence to a MedDiet is associated with slower rates of cognitive decline, reduce conversion to Alzheimer’s disease, and improvements in cognitive function.” 1
What does that mean? Well, eating the Med way is protective to our brain as we age, and can reduce our risk of Alzheimer’s Disease, and that is awesome.
#4. Good for Your Gut – Our digestive system has trillions of bacteria living inside, both good bacteria and bad bacteria. These bacteria are called our gut-microbiome and lots of research has shown the link between our gut health and our overall health. Eating a variety of fruits, vegetables, beans, legumes, nuts, seeds and healthy fats increases the good bacteria in our digestive system.
On the other hand, foods that increase the bad bacteria in our gut include highly processed foods, fast foods, refined sugar foods, lots of red meat.
#5. It’s Easy & Delicious – The best part of this eating pattern is that it is NOT a diet. Let me repeat that, it is NOT a diet. It is a style of eating with lots of flexibility. You will eat lots of fruits, vegetables, whole grains, beans, legumes, nuts, healthy fats, fish, herbs and spices. You CAN eat bread and have dessert, it is all about choosing a variety of whole foods. Plus, its so delicious. Black bean salad with avocado citrus dressing, zucchini pasta, chocolate dipped fruit, all these foods fit!
Sources:
Hardman RJ, Kennedy G, Macpherson H, Scholey AB, Pipingas A. Adherence to a Mediterranean-Style Diet and Effects on Cognition in Adults: A Qualitative Evaluation and Systematic Review of Longitudinal and Prospective Trials. Front Nutr. 2016;3. doi:10.3389/fnut.2016.00022
Nani A, Murtaza B, Sayed Khan A, Khan NA, Hichami A. Antioxidant and Anti-Inflammatory Potential of Polyphenols Contained in Mediterranean Diet in Obesity: Molecular Mechanisms. Molecules. 2021;26(4):985. doi:10.3390/molecules26040985
Woodside J, Young IS, McKinley MC. Culturally adapting the Mediterranean Diet pattern – a way of promoting more ‘sustainable’ dietary change? Br J Nutr. 2022;128(4):693-703. doi:10.1017/S0007114522001945
Merra G, Noce A, Marrone G, et al. Influence of Mediterranean Diet on Human Gut Microbiota. Nutrients. 2020;13(1):7. doi:10.3390/nu13010007
Rosato V, Temple NJ, La Vecchia C, Castellan G, Tavani A, Guercio V. Mediterranean diet and cardiovascular disease: a systematic review and meta-analysis of observational studies. Eur J Nutr. 2019;58(1):173-191. doi:10.1007/s00394-017-1582-0
Pollicino F, Veronese N, Dominguez LJ, Barbagallo M. Mediterranean diet and mitochondria: New findings. Experimental Gerontology. 2023;176:112165. doi:10.1016/j.exger.2023.112165
Caso F, Navarini L, Carubbi F, et al. Mediterranean diet and Psoriatic Arthritis activity: a multicenter cross-sectional study. Rheumatol Int. 2020;40(6):951-958. doi:10.1007/s00296-019-04458-7
Ballarini T, Melo Van Lent D, Brunner J, et al. Mediterranean Diet, Alzheimer Disease Biomarkers, and Brain Atrophy in Old Age. Neurology. 2021;96(24):e2920-e2932. doi:10.1212/WNL.0000000000012067
Martínez-González MA, Gea A, Ruiz-Canela M. The Mediterranean Diet and Cardiovascular Health: A Critical Review. Circ Res. 2019;124(5):779-798. doi:10.1161/CIRCRESAHA.118.313348
UEG Week: Plant-based foods and Mediterranean diet associated with healthy gut microbiome, research reveals. Accessed August 23, 2023. https://ueg.eu/a/30
I hear from many parents tales of dinner time battles with their kids about eating their vegetables. This frustrating scene plays over and over each night with parents trying every tactic possible (bargaining, pleading, demanding, “no dessert if you don’t eat your veggies!”).
As parents the concern for children to eat a healthy meal comes from a good place. Fruits and vegetables are loaded with vitamins, minerals, antioxidants and fiber that not only help children’s development but have also been shown to reduce the risk of chronic diseases. So, why do some kids refuse? Well, some veggies are bitter, dark leafy greens I’m looking at you, some may not look appealing, others are new to kids who would rather have something they are familiar with.
The good news is if you are concerned about your kids vegetable and fruit intake, you are already on the right track by reading these tips. And, think back to your childhood, what vegetable or fruit did you dislike then that you like now? I’m sure there’s a few!
Here are 10 tips to help kids eat more fruit and vegetables:
Autonomy is everything (to kiddos) – How many times as your child urged you to let them pick out the shirt they are going to wear or demanded they can do it themselves (whatever the “it” might be for the day)? In the spirit of autonomy, the next time you go to the grocery let your child choose one fruit or vegetable they want to try.
Go Raw and Colorful – Slice a few vegetables and serve them raw for kids to try. Even adults don’t want to eat mushy green beans.
All about the DIP! Who doesn’t love some ranch or hummus to dip fresh veg into? For fruit try chocolate hummus for a new, protein and fiber-packed dip.
Keep them in plain site – As a mom and dietitian, I’m not a big fan of hiding foods. My kids always want to know what is in a dish I make. Plus, being open about what you’ve cooked and why, creates conversation and an opportunity to discuss the benefits of fruits and veggies with your children.
Talk Up the Benefits – When I go into schools to talk about how great whole foods are I explain it so that kids can understand. For example, blueberries help our brains and our memory, Vitamin C in strawberries helps keep our skin healthy and helps to heal our cuts and scrapes, Vitamin D in spinach helps keep our bones strong.
Set the Example – Yes this means you as the adult need to eat your fruits and veggies too! Kids want to be just like their parents.
Smoothie for the Win – Smoothies are a simple and fun way to add fruit and vegetables to a child’s eating pattern. And hey, if you let them pick the ingredients (with a few helpful suggestions) they are likely more willing to try it.
Take the Pressure Off – Encourage kiddos to try fruits and veggies without pressure and fear of repercussions. Taking the pressure off, (no more bargaining or pleading!) takes stress off the entire family meal.
Lentil Bolognese is a plant-based one-pot meal that takes just 30 minutes to come together.
Ingredients
Scale
16ozShells Pasta, Whole Wheat
28ozCrushed Tomatoes, Canned
1tbspOlive oil
1Onion, minced
2Garlic Cloves, minced
1/2cupVegetable Stock
1/2cupUnsweetened Almond Milk (or milk of your preference)
14ozBrown Lentils, can, drained and rinsed
1/2cupParmesan Cheese, grated, plus extra for topping
1tspDried Oregano
1tspOnion Powder
1tspGarlic Powder
1/8tspRed Pepper Flakes
1/2tspKosher Salt
1/4tspGround Black Pepper
1/4cupNutritional Yeast
Instructions
Heat a large stock pot with water. Add a pinch of salt to the water. Cook the pasta according to package directions. Before draining, set aside 1/2 cup pasta water.
In a large skillet, add 1 tablespoon olive oil and then add the onion and sautee over medium heat for 7-10 minutes until softened. Turn the heat down to low and add the minced garlic, sautee for 1-2 minutes until fragrant.
Next, add the crushed tomatoes, vegetable stock, onion powder, garlic powder, oregano, red pepper flakes, salt and ground black pepper. Simmer for 15-20 minutes, stirring occasionally.
After 20 minutes add 1/2 cup of almond milk and the lentils. Stir and allow to simmer another 5 minutes.
Finally, add the Parmesan cheese, pasta and nutritional yeast. If the pasta seems a too thick, add a few tablespoons of pasta water to thin.
To serve, spoon into bowls and top with a sprinkling of Parmesan. Serve hot and enjoy!
You may have heard the term, food freedom or seen inspirational posts on Instagram with pictures of yummy food. But, what does food freedom mean exactly?
A Mindset
Food freedom means that all rules, diets and restrictions around food are eliminated. Our culture loves to promote fad diets and the misconception that certain foods are good and certain foods are bad. Food freedom removes boundaries around food and allows you to enjoy food without restriction, guilt or diets. This mindset brings freedom to the way we eat as well as our mental space around food. It is “freeing” to forget diets, lose the guilt and embrace whole foods!
Diet Quality not Calories
Diet quality is focusing on whole foods that nourish our bodies. This means a focus on vegetables, fruits, whole grains, beans, lean proteins and healthy fats. By incorporating a wide variety of foods into our diet including complex carbohydrates and a healthy dose of fiber, we increase our fruit and vegetable intake and make our gut microbiome happy.
No Guilt
Food freedom removes the guilt that can be associated with food. Allowing ourselves to enjoy the foods we like while focusing on diet quality over calories. Food freedom takes the stress and guilt away from food and gives you freedom to enjoy foods you like while fueling your body with high quality, whole foods. Making peace with food, is a freeing feeling!
Building Positive Perspectives
By ditching diets and restrictions around food, food freedom also builds positive perspectives around what you eat. This means nourishing ourselves with a quality diet and learning that food and eating can be enjoyable and good for you.
Are Intuitive Eating and Mindful Eating the same as Food Freedom?
Intuitive eating and mindful eating are practices that can bring you to food freedom. Intuitive Eating is based on 10 principles that include rejecting diet mentality, making peace with food and challenging the food police. Mindful eating focuses on the eating experience, encouraging experiencing your food with all five senses, no distractions while eating (i.e. television and phones), listening to your bodies ques for hunger and satiety. The principals and goals of intuitive eating and mindful eating can help you get to a place of food freedom. If you are interested in intuitive eating or mindful eating, I encourage you to find a registered dietitian who can guide you on these practices.
Curious what food freedom can do for you?
If food freedom has been on your mind and you are interested in learning more, I would love to help you on your journey. Send me a quick email or book a call with me to learn more.
These days, social media seems to be full of numerous so-called nutrition “experts.” Here’s a news flash for you, anyone can call themselves a “nutritionist!” Crazy, right? It is a completely unregulated term. However, registered dietitians ARE nutrition experts who have earned credentialing to obtain the title.
All dietitians are nutritionists, but not all nutritionists are dietitians.
If this is confusing to you, you are not alone. Registered dietitians can use RD (registered dietitian) or RDN, (registered dietitian nutritionist) in their title, both options are approved for use by the Commission on Dietetics Registration. Dietitians can provide Medical Nutrition Therapy (MNT) to help patients manage chronic diseases, while “nutritionists” cannot.
Here’s a quick breakdown of the difference in education and training between dietitians and nutritionists.
Requirements to become a Registered Dietitian:
A Bachelor’s Degree or higher in nutrition/dietetics field from an accredited institution
Completed an accredited supervised practice program with 1,200 hours combined at a health-care facility, public health and foodservice organization
Passed a national examination given by the Commission on Dietetic Registration
Obtained licensure based on state requirements
Continuing education of 75 credits per 5 year cycle
Abide by code of ethics
Requirements to become a Nutritionist:
NONE!
If you find yourself seeking nutrition advice, I urge you to do some background research on the person providing the advice. Do they have a degree and are credentialed in dietetics? If not, how do they claim to be an expert?
There is a LOT of misinformation out in the world related to nutrition. This misinformation is on social media, the internet, as well as books! Yes, people with no background in nutrition have published books on nutrition! Do not believe every “nutritionist” who gives advice or tells you to eat what they eat. Dietitians work in a variety of settings and will always have their credentials listed.
Areas of Practice for RDNs:
Hospitals and health-care facilities
Sports Nutrition
Corporate Wellness
Private Practice
Community and Public Health
Research
Universities
Food and nutrition related industries
All nutrition recommendations should be INDIVIDUALIZED. We are all unique people with unique needs, and nutrition advice should always be tailored that way. If you want sound advice, seek out a registered dietitian nutritionist who has the education, credentials and knowledge to assist you in your health goals. If you are looking to get started on your health journey through nutrition, I’m here for you! Email me or send me a message here.
Delicious Greek-Style Nachos with Chickpeas, Feta, Tomato & Olives
Ingredients
Scale
Chickpeas
1lbDried Chickpeas (See notes for alternative options)
1tbspOlive OIl
1Onion (medium)
4Garlic cloves
2tspPaprika
2tspGround Cumin
1/4tspGaram Masala (Optional)
1/4tspCayenne Pepper
1/2tspLemon Zest
2tspKosher Salt
4cupsVegetable Broth
Pita Chips
2Pita Bread
2tbspOlive Oil
1/2tspKosher Salt
Veggie Salad
1Cucumber, peeled, seeded and chopped
1 pt Cherry Tomatoes, sliced in half
Toppings
Greek Yogurt
Feta Cheese
Kalamata Olives
Hot Sauce (Optional)
Instructions
Chickpeas
Sort and rinse your dried chickpeas. (If using canned skip this step.) Fill a large bowl with 6 cups water, pour chickpeas into bowl and soak overnight.
Preheat oven to 375° F. Drain your soaked chickpeas, set aside.
In a large dutch oven or large pot, heat 1 tbsp olive oil over medium heat. Add sliced onion to pan, sautee until slightly browned.
Lower the heat to medium-low and add minced garlic and sautee for 1-2 minutes until fragrant.
Add the spices, salt and lemon zest to garlic and onions and sautee for another 30 seconds.
Add vegetable stock to pot and then the chickpeas (soaked or canned). Using a wooden spoon or spatula, stir mixture together and then bring to a boil. Then, turn the heat off and cover the pot with a lid.
Next, put the dutch oven into your preheated oven and bake for 45 minutes to 1 1/2 hours, depending on the chickpeas you are using. (If you are using canned, it should take around 45 minutes for the chickpeas to soak up the yummy liquid. If you are using dry, soaked chickpeas it will take closer to an hour to an half and half for the beans to soak up the liquid.)
Once the liquid has been absorbed by the chickpeas they are done. Remove from the oven and set aside.
Toppings:
Slice your pita bread into triangles, drizzle 1 tbsp olive oil and 1/8 tsp salt over top and place onto a sheet tray (Skip this step if you bought pre-made pita chips!)
Bake pita chips in the oven with your chickpeas for 8-10 minutes. Keep an eye on them as they burn easily!
Vegetable Topping:
Slice 1 pint cherry tomatoes in half lengthwise. Peel, seed and chop cucumber to 1 inch chunks.
Serve with Greek yogurt, feta cheese, kalamata olives and hot sauce as desired.
To Plate:
Set pita chips on plate, top with dollops of Greek Yogurt, then the delicious braised chickpeas, cucumber and tomatoes, feta, kalamata olives and hot sauce. Enjoy!!
Ultra-chocolaty, chewy, and naturally sweet, these healthy brownie bites with dried cranberries are a delicious treat in every bite. Loaded with fiber and antioxidants, they’re the perfect mix of rich cocoa and tart cranberry zing!
Ingredients
Scale
1 Cup Oat Flour
1/2 cup Cocoa Powder
1/4cupVanilla Protein Powder
2tbspGround Flax Seed
1tspBaking Powder
1/2tspKosher Salt
1/4cupHoney
1/4cupMaple Syrup
1/2cupAlmond Butter
1Egg
1/2 tsp Vanilla Extract
1/2cupDried Cranberries
1/2cupChocolate Chips
Instructions
Preheat your oven to 350° F
Set a nonstick sheet tray out for baking. Or line a sheet tray with parchment paper or silpat. Set aside.
In a large mixing bowl add the oat flour, cocoa powder, protein powder, salt, baking powder and flax seed. Whisk to combine the dry ingredients.
In a small mixing bowl add the honey, maple syrup,almond butter, vanilla extract and egg. Mix together to combine.
Add the wet ingredients to the dry ingredients. Using a spatula stir the batter together. It will be quite thick!
Add the dried cranberries and chocolate chips to the batter. Stir to combine.
Using a 1 1/2″ scoop, spoon batter onto sheet tray, leaving about 1″ between each brownie bite. The cookies will not spread very much. Continue until all the batter as been scooped onto your baking trays.
Bake at 350° F for 8-9 minutes. Be sure not to overcook, you want them slightly soft and gooey.
Maple & Olive Oil Granola is an antioxidant fueled breakfast that goes great over Greek Yogurt or eaten plain as a snack.
Ingredients
Scale
1/2cupOlive Oil
1/2cupMaple Syrup
1tspVanilla Extract
3 3/4cupsOld Fashioned Oats (Use 3 3/4 cups for more granola clusters, use 4 cups for “crumbly” granola)
1/4cupFlaxseed
1tspGround Cinnamon
1/8tspCardamom (Optional)
1 1/2cupsRaw Nuts (I used Pecans and Sliced Almonds)
1/4tspKosher Salt
1/4cupDried Cranberries (Or your favorite dried fruit)
Instructions
Preheat oven to 325° F.
To a large mixing bowl add the oats, nuts, cinnamon, cardamom (if using), and salt. Stir together with a spatula and set aside.
In a liquid measuring cup add the olive oil and maple syrup. Mix together and then add the vanilla extract.
Pour the liquid mixture over the oats mixture and stir together thoroughly with a spatula.
Spread the granola mixture evenly onto a large sheet tray and bake for 25 minutes, stirring every 10 minutes.
After 25 minutes remove the granola from the oven and add the dried cranberries. Mix together and then allow the granola to cool before serving.
Tip: If you want your granola to have large clusters (which I do!) after you add the dried cranberries, press the granola down with the back of a spatula, then allow to cool fully.
Serve over Greek Yogurt or enjoy plain as a snack!
Waffled Veggie Latkes are a fun and nutritious twist on laktes and waffles. Add your favorite veggies, crisp them up in the waffle iron and top with scallions, Greek Yogurt or your favorite toppings.
Ingredients
Scale
3Carrots
2Zucchini (medium size)
1Orange or Red Bell Pepper
1/2 Red or Yellow Onion
4Russet Potatoes (medium size)
1/2cupFlour
1tspBaking Powder
1tspKosher Salt
1/2tspGround Black Pepper
3 Eggs
Toppings
Cream Cheese
Greek Yogurt
Smoked Salmon
Scallions
Everything Bagel Seasoning
Instructions
Shred those veggies! Spread a clean kitchen towel over your work surface. Using a box grater, grate the carrots, zucchini, potatoes and half onion right onto the towel.
Finely dice the bell pepper and add to the veggies on the towel.
Gather the towel with the shredded vegetables and move to a sink or bowl. Squeeze the towel with the veggies to remove as much liquid as possible.
Place the shredded vegetables into a large mixing bowl. Add the 3 eggs and mix together. Next, add the 1/2 cup flour, baking powder, salt and pepper. Using a large spatula or spoon thoroughly stir the mixture.
Heat a waffle iron to medium heat. Coat waffle iron with olive oil or spray with cooking spray. Place 1/2 cup of the mixture into the waffle iron. Cook for 4-5 minutes until golden brown. Tip: Keep the cooked Latkes in a 300° oven to stay warm and avoid getting soggy while the others cook.
Top waffled veggies with your choice of toppings. Suggestions include, cream cheese, Greek yogurt, smoked salmon, scallions and everything bagel seasoning.
A take on butternut squash macaroni and cheese with farm fresh ingredients from the Black Forest market. Key ingredients from the market include butternut squash, Gouda cheese, cheddar cheese, sourdough breadcrumbs, mushrooms, and garlic along microgreens for garnish.
Ingredients
Scale
1 Medium-SizedButternut Squash
2Garlic Cloves
2tspKosher Salt
1 1/2tspGround Black Pepper
2tbspOlive Oil
1cupMilk or Vegetable Stock
4ozAged Gouda Cheese, Shredded
8ozSharp Cheddar Cheese, Shredded
8ozOyster Mushrooms (Optional)
16ozPasta, Cavatappi
Breadcrumb Topping
1cupSourdough Bread
1Garlic Clove
1/4cupHerbs (Parsley, Basil)
1tspOlive Oil
Instructions
Preheat oven to 400° F Line a large sheet tray with foil, set aside.
Using a sharp knife, slice the butternut squash in half lengthwise. Be careful as the squash’s skin is quite tough! Using a spoon, scoop out the seeds and bit of flesh from the squash.
Spread 1 tablespoon olive oil over the squash halves. Place 1 garlic clove in each squash. Add 1 tsp kosher salt and 1/2 tsp ground black pepper. Place sheet tray into the preheated oven and roast for 40-60 minutes, depending on the size of your butternut squash. You will know the squash is done when you can press it with a fork and it is soft.
While the squash is roasting, cook your pasta. Fill a large pot with water and bring to a boil. Add 2 tsp salt to your water. Add your pasta and cook 1 minute under the recommended time. You want your pasta to be “al dente” and have a little bite to it. Drain the pasta and set the pot aside to use again.
Let the squash cool for at least 10 minutes. After 10 minutes scoop the flesh of the butternut squash out and place into the bowl of a food processor. Be sure to scoop all the flesh and the garlic!
Add 1 cup of milk or stock to the food processor. Process the mixture until it is smooth and creamy.
Place the pot you used for the pasta onto the stove and heat to low. Using a spatula spoon the butternut squash mixture into the pot. Add both the shredded Gouda and cheddar cheeses and the mushrooms (if using). Stir the cheeses into the butternut squash mixture until they are melted. At this point check your mixture for seasoning. Add additional salt and pepper to taste.
Add the cooked pasta to your squash and cheese mixture. Mix thoroughly.
Place pasta mixture into a 9×13 dish that has been coated with cooking spray.
In a small bowl, mix together the breadcrumbs, herbs, minced garlic and olive oil. Spread mixture evenly over top of your mac and cheese.
Bake for 25-30 minutes or until bubbly and golden brown on top. Allow to cool for 5 minutes, enjoy!
The realm of weight loss is a big business that includes everything from shakes and powders to supplements and bars. Within this mentality of a “quick-fix” for weight loss, weight-loss medications are ever popular. As the holidays are approaching many individuals become concerned with “staying on track” as sweets and treats become more abundant. Now the demand has turned to popular diabetes medications to help individuals quickly lose weight or keep it off through the holidays. Even Elon Musk credited Wegovy (as well as fasting) for his dramatic slim down, and celebrities are using Ozempic for quick weight loss before big events. So, what are these medications and are they an answer for weight loss? Let’s dig in.
What is Ozempic?
Ozempic (semaglutide) is a medication used to reduce A1C levels, in individuals with type 2 diabetes. It also works to reduce the risk of heart attack and stroke in these individuals. Semaglutide works by targeting GLP-1 receptors in the pancreas and brain. These receptors control the release of insulin and glucacon in the body. Semaglutide binds to these receptors to increase the amount of insulin released and decrease glucagon levels. This reduces the amount of sugar in the bloodstream. The medication also slows gastric emptying, which leads to a decreased food intake due to a feeling of fullness.
When Ozempic first came on the market, patient weight loss results were so significant the manufacturer started running trials on the drug with the outcome of treating obesity.
Wegovy, which uses the same medication (semaglutide) as Ozempic, was released by Novo Nordisk to treat obesity along with a reduced calorie diet and physical activity.
What is the difference between Wegovy and Ozempic?
The difference between Wegovy and Ozempic is the dosing. Lower doses are appropriate for the treatment of type 2 diabetes, while higher doses are typically used for weight loss. However, there have been some instances where Ozempic has been prescribed off label and used for weight loss. Several articles detail celebrities losing weight for events using Ozempic.
Both medications are once weekly injections. The pens must be kept in the fridge until first use. After first use, Ozempic pens can remain at room temperature for 56 days. Wegovy pens are single-use only and should be discarded after use.
Side effects to be aware of with this medication:
Diarrhea
Nausea
Constipation
Vomiting
Acute abdominal pain
New Trials for Weight Loss in Adolescents
New trials are now being conducted to test the appropriateness of this medication to combat obesity in teenagers. Approximately 17% of adolescents in the 10 to 17 age range are considered obese. This comes with serious health complications such as early onset hypertension, type 2 diabetes, high cholesterol, and joint problems. So far in trials, Wegovy has shown to be more effective for weight loss in obese teenagers than lifestyle interventions alone. More information is needed to understand the underlying cause of teenage obesity so targeted lifestyle interventions can be improved.
The Problem With Weight Loss Medications Alone
Many times weight loss medications are viewed as “quick-fix” options for extreme weight loss. The problem with this mentality is that this weight loss is not sustainable. Both Ozempic and Wegovy mention the drugs should be used in combination with “a reduced calorie meal plan and increased physical activity.”
A new study found that long-term 10% weight loss was achieved when the weight loss medication was used in conjunction with lifestyle interventions.
Also, depending on your individual health, wellness and goals, weight loss medications may not be right for you. Another study notes that, “In a head to head trial, lifestyle intervention was superior to pharmacotherapy in preventing type 2 diabetes in patients at high risk for the condition.”
It is also important to mention that one trial showed that weight loss slowed after stopping Wegovy , even with lifestyle intervention. Further research is needed to determine an appropriate long-term plan for patients requiring Wegovy for weight loss.
Pharmacist Sam’s Tips:
Semaglutide should be used appropriately – Ozempic for diabetes, Wegovy for weight loss. This prevents strain on the manufacturer to keep up with high demand and improves accessibility to medication for diabetics.
Use these medications while working with a dietitian and pharmacist on lifestyle changes to improve long-term results.
Ask your pharmacist about how to properly store, inject, and discard your medication.
Know what to do if you miss a dose.
Common side effects should reduce over time, typically within the first month.
Amy RD’s Tips:
Always discuss medications with your doctor as well as your pharmacist for questions
Weight loss medications should be used in conjunction with lifestyle interventions, dietitians are experts in nutrition and lifestyle interventions
Find a dietitian that will work with you and your specific needs and goals
Remember that small changes can add up to big results, weight loss medications are not always the answer for long-term, sustainable weight-loss
This fall compote is an easy appetizer, snack or even breakfast! Mix it up with your favorite apples or pears and serve on crostini or whole wheat waffles for a fall twist to your morning meal.
Ingredients
Scale
3Honey Crisp Apples
2Bartlett Pears
2tbspButter
1tbspHoney
1/2tspCinnamon
1/2tspLemon juice
Pinch of Salt
Instructions
Peel and core the Apples and Pears.
Cut fruit into 1/2-inch pieces. Set aside.
Heat a small saucepan over medium heat. Add butter and melt.
To the saucepan add apples, pears, cinnamon, honey, lemon juice and a pinch of salt.
Bring the mixture to a boil. Once the mixture has been brought to boil, reduce heat to low and simmer for 20 minutes, stirring occasionally, until the apples and pears are soft and tender.
Serve over pancakes, a toasted baguette with goat cheese, or ice cream.
Prep Time:10
Cook Time:20
Category:Appetizer, Black Forest Farmer's Market, Breakfast, Dessert, Snack
Fresh, flavorful and full of nutrients this salad is always a crowd-pleaser. Add your favorite vegetables to make it your own!
Ingredients
UnitsScale
Salad
1 pt Cherry Tomatoes, sliced in half lengthwise
1 Red Bell Pepper, diced into 1-inch pieces
1 Yellow or Orange Bell Pepper, diced into 1-inch pieces
1 Large Cucumber, peeled, seeded and diced into 1-inch pieces
1/2 Red Onion, sliced thinly
10 Basil Leaves, torn
1 Ear of Corn, kernels removed
1/2 Loaf of Sourdough Bread
Vinaigrette
1 tsp Minced Garlic
1/2 tsp Dijon Mustard
3 tbsp Red Wine Vinegar
1/2cupOlive Oil
1/2 tsp Kosher Salt
1/4 tsp Ground Black Pepper
1 tsp Honey
Instructions
Prepare the Vinaigrette
Combine all vinaigrette ingredients into a mason jar or medium mixing bowl and whisk all the ingredients together. Set aside.
Salad Directions
Slice bread into 1-inch cubes.
Heat large sauté pan over medium heat. Add 4 tablespoons olive oil to pan. Add bread cubes to pan and cook until golden brown, tossing occasionally. Remove from heat and allow to cool.
In a separate bowl add the tomatoes, bell peppers, red onion, basil, and corn. Add the bread cubes to the mixture.
Stir in half of the vinaigrette and mix together. Taste the salad and add more vinaigrette as needed. Enjoy!
Halloween is a fun time for kids and parents, dressing up, trick-or-treating and the thrill of being out after dark. Halloween excitement can quickly turn to stress and anxiety for parents of children with food allergies. In the United States one in 13 children has a food allergy and we have some tips for parents on how to help reduce some anxiety related to this candy-filled holiday.
Top 8 Food Allergens:
Milk
Eggs
Peanuts
Tree Nuts
Soy
Shellfish
Fish
Wheat
Thrive Nutrition RDN’s Tips for Parents:
Talk About It: Talk with your child about their food allergy. Depending on their age this can be a simple or in-depth explanation. For young children, explain that certain foods can make them sick. You can do this by using terms you feel comfortable with. Some parents use simple “yes” and “no” foods, other ideas are “safe” and “unsafe” foods, or “green light foods” and “red light foods.” Whatever you choose, stick with the those terms while your child is young in order keep the message clear. Reassure your child that “yes/safe/green light” foods are okay for them to eat. Finally, make sure your child knows what to do if they think they’ve eaten a food they are allergic to, such as tell an adult, especially if they do not feel well.
Check the labels: Always read the ingredients labels and look for ingredients that relate to your child’s allergy. Many times candy is processed in a facility that also processes peanuts or tree nuts so be sure to look for that notation on a label. Also, any candy that does not have a nutrition label should be avoided.
Find a Teal Pumpkin: The Teal Pumpkin Project promotes safe trick-or-treating for children with food allergies. A teal pumpkin on a doorstep signals that non-food treats are inside.
Work Together on Rules: Set boundaries with your child before trick-or-treating. Do they need to wait until they get home before sampling any candy? If so talk about it together. If you know they will want to have some candy while walking the neighborhood, have some on hand so that you can give them treats you know are safe. Also, if one child has an allergy and another does not, be sure to include the entire family in the conversation around allergies and rules. Instead of phrasing the rules as restrictive, set it up so it feels special. Such as “we get to dive into our candy bowls together as a family after trick-or-treating.” Or, “to be safe we will save all of our candy for when we get home and then you can have 5 pieces before bedtime.” When boundaries are set, especially with a reward such as x amount of candy after trick-or-treating, kids feel prepared and know what will happen which helps to reduce their anxiety and in turn, yours as the parent.
Provide Non-Food Fun: While Halloween is certainly a candy focused holiday, there are other non-food ways to make it fun. Have a few non-food items to pop into your child’s bucket if all of the candy options pose a threat to their allergy. Glow sticks are always a winner, cracking the tube and watching it light up and light the way as you walk. Other ideas include stickers, spider rings, monster stamps, vampire teeth and bookmarks.
Allergy Friendly Candy:
Dum-Dums
Skittles
Swedish Fish
Starbursts
Smarties
Lifesavers
Always read the label before giving a treat to your child. If you are uncertain about an ingredient in a candy, please do not give it to your child. Select an allergy friendly option or non-food treats.
I received such great feedback from my collaboration with Vegnews on a the benefits of a plant-based diet for psoriasis I thought I would expand on this topic.
What is Psoriasis?
First off, what exactly is Psoriasis? Psoriasis is an immune mediated disease, meaning that the exact cause of this disease is unclear. What we do know is that it causes inflammation in the body which is generally characterized by raised plaques and/or scaly skin. The National Psoriasis Foundation estimates that psoriasis affects 3% of the adult U.S. population.
Current Treatments
Treatments for psoriasis can vary and include everything from pharmacology steroids, to light therapy to alternative treatments such as aloe Vera and fish oil supplements. The chronic inflammation of this disease is characterized by psoriatic lesions, resulting in oxidative stress. For those suffering with psoriasis the unpredictability of the disease can induce even more stress, triggering more psoriasis flare-ups.
While the internet is full of lots of helpful health information, regarding psoriasis, a 2019 research report estimated that nearly two-thirds of YouTube videos on psoriasis disseminate misleading or even dangerous content. Always consult your doctor or medical professional before making health changes. Registered dietitians are credentialed and licensed by state to provide you with expert nutrition recommendations.
Plant-Based Diet Effect on Psoriasis
Now, back to psoriasis inflammation and how plants can help! As with all nutrition recommendations I go to the research. At the foundational level, a diet for inflammation should be anti-inflammatory focused. This is where a plant-based diet comes in.
Plant foods are rich in antioxidants and phytochemicals. Antioxidants are substances that protect against harmful effects of free radicals. Phytochemicals, also referred to as phytonutrients are chemicals found in plants, fruits, vegetables, whole grains, legumes, beans, nuts, herbs and spices that have the potential to stimulate the immune system, reduce inflammation and reduce oxidative damage to cells. Research shows that a diet rich in vitamin C, Beta-carotene and flavanoids helps to improve psoriatic skin lesions. Keep in mind many of these antioxidant nutrients are found in skincare products and oral supplements, however the best way to get the benefits of these nutrients is through food sources.
Key Nutrients for anti-inflammatory benefits:
Vitamin C: Vitamin C is an antioxidant and helps with collagen formation, a key structural component of our skin.
Sources: Broccoli, kiwi, strawberries, bell peppers, tomatoes
Vitamin E: This antioxidant is found in our skin oil and helps create a natural barrier to keep moisture in our skin and helps reduce skin’s inflammatory response.
Sources: Nuts, seeds, avocado, legumes
Omega-3: These polyunsaturated fatty acids have been suspected to have anti-psoriatic effects.
Sources: Walnuts, flaxseed, salmon, mackerel
Flavanoids: These plant compounds have been shown to have anti-inflammatory effects in the body.
Dietary Fiber and short-chain fatty acids: Short-chain-fatty-acids are the by-products of fiber fermentation in the colon. They help to regulate inflammation in the intestines and have been shown to improve psoriasis.
Sources: Most SCFAS are made in the gut when following a plant-based diet. Sources include high fiber fruits and vegetables: garlic, onions, peas, lentils, bananas, apples, carrots. The list goes on!
Foods to Avoid:
Studies have shown that certain foods can promote the inflammatory response in the body and worsen skin disorders, such as psoriasis. Foods that promote inflammation include saturated fats such as those in red meat. Of course, if you are eating a plant-based diet red meat is not of concern. However, simple sugars have been shown to exacerbate psoriasis. So, avoiding excessive intake of simple sugars and simple carbohydrates is recommended.
Research shows that alcohol and smoking can exacerbate the symptoms of psoriasis and should be avoided when possible to reduce symptoms. Psychological stress is also a risk factor for psoriasis and dealing with psoriasis also causes stress, so this is a cycle that makes dealing with psoriasis very difficult.
Thrive RDN Final Thoughts:
Replacing processed foods, simple carbohydrates and simple sugars with vegetables, fruits, nuts, seeds, and legumes will help support healthy skin and help to ease the inflammation associated with psoriasis. A diet that is rich in antioxidants and plant-focused can help in providing relief to those dealing with psoriasis.
Garbicz, J., Całyniuk, B., Górski, M., Buczkowska, M., Piecuch, M., Kulik, A., & Rozentryt, P. (2021). Nutritional Therapy in Persons Suffering from Psoriasis. Nutrients, 14(1), 119. https://doi.org/10.3390/nu14010119
Kanda, N., Hoashi, T., & Saeki, H. (2020). Nutrition and Psoriasis. International Journal of Molecular Sciences, 21(15), 5405. https://doi.org/10.3390/ijms21155405
Musumeci, M. L., Nasca, M. R., Boscaglia, S., & Micali, G. (2022). The role of lifestyle and nutrition in psoriasis: Current status of knowledge and interventions. Dermatologic Therapy, 35(9), e15685. https://doi.org/10.1111/dth.15685

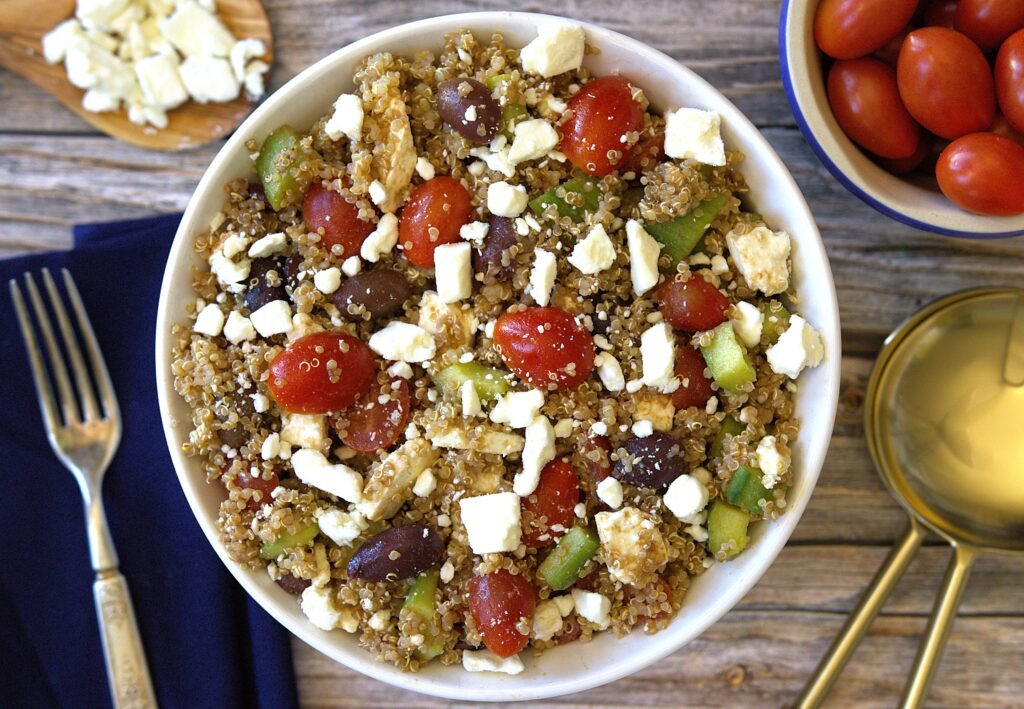


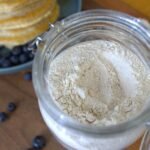
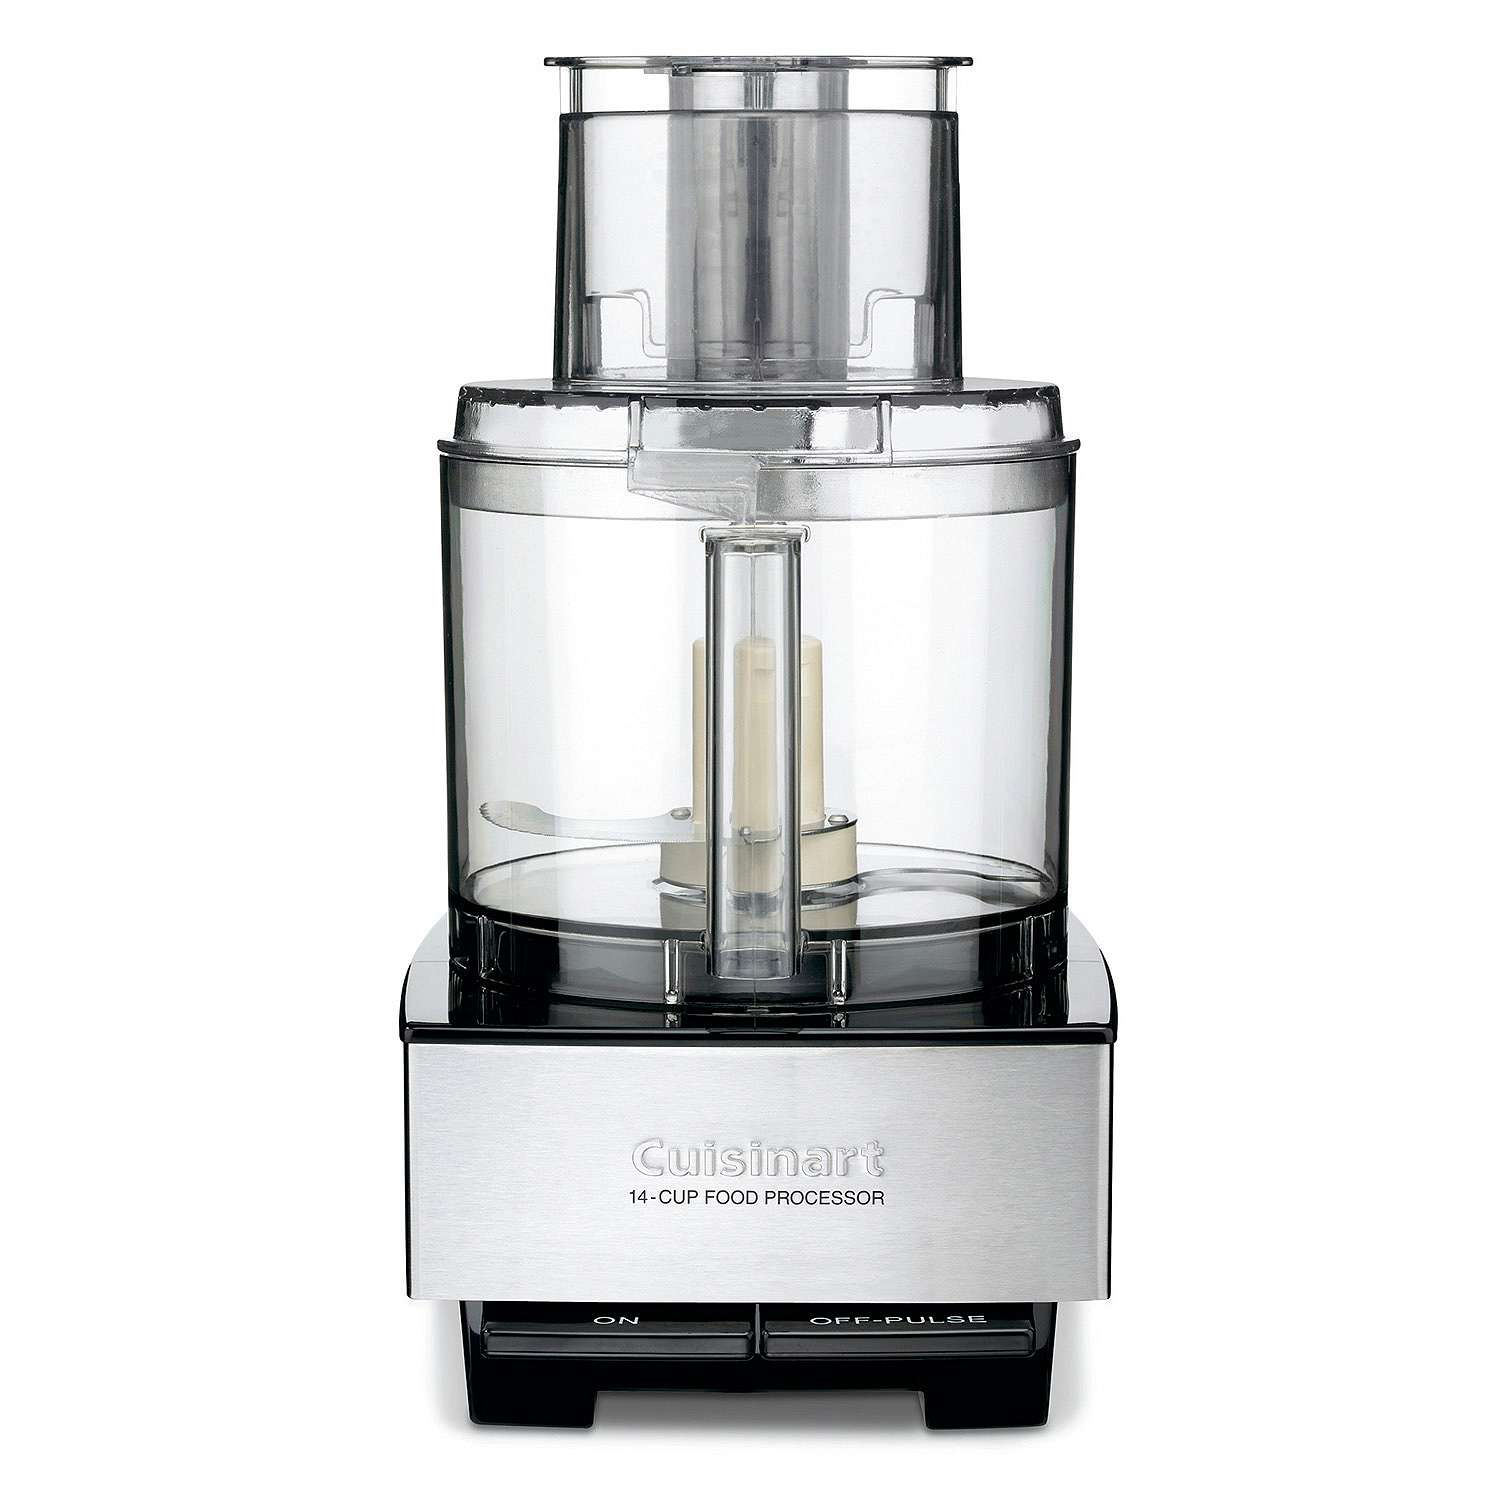


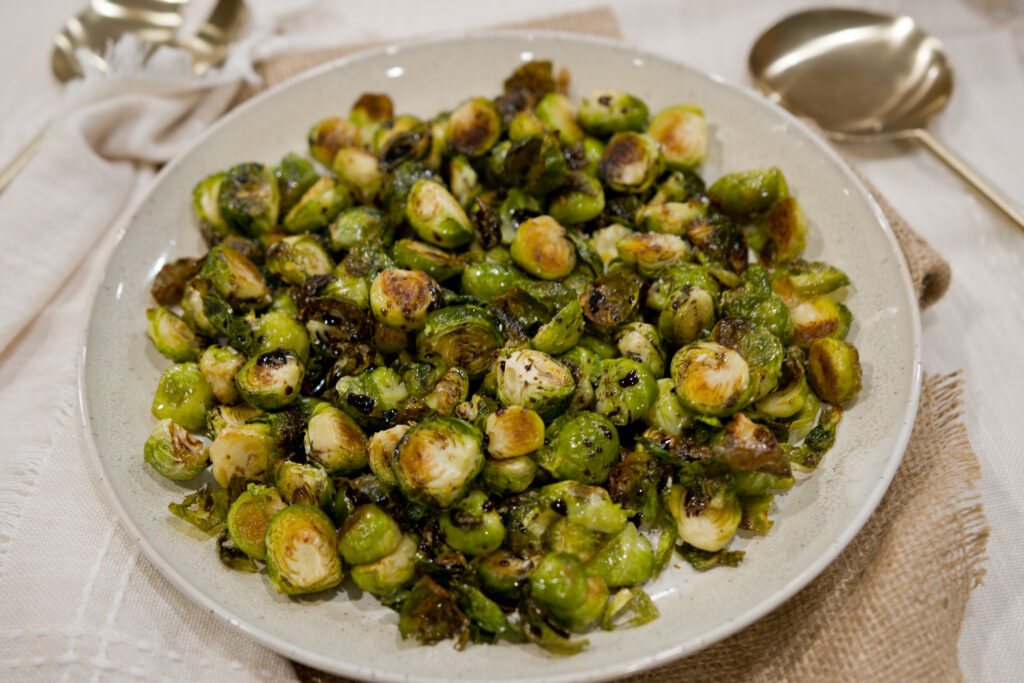


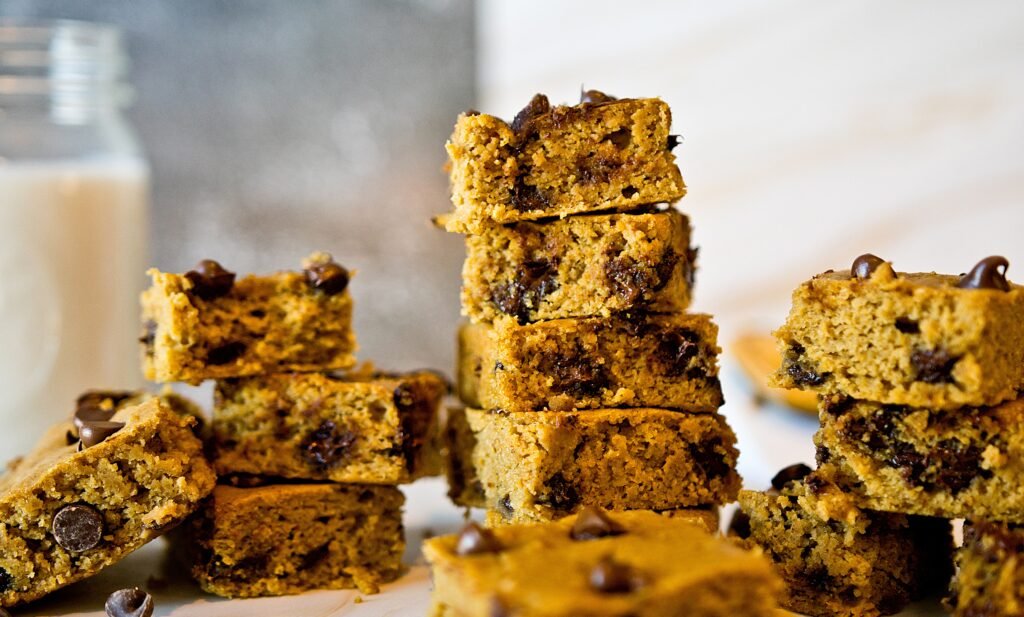


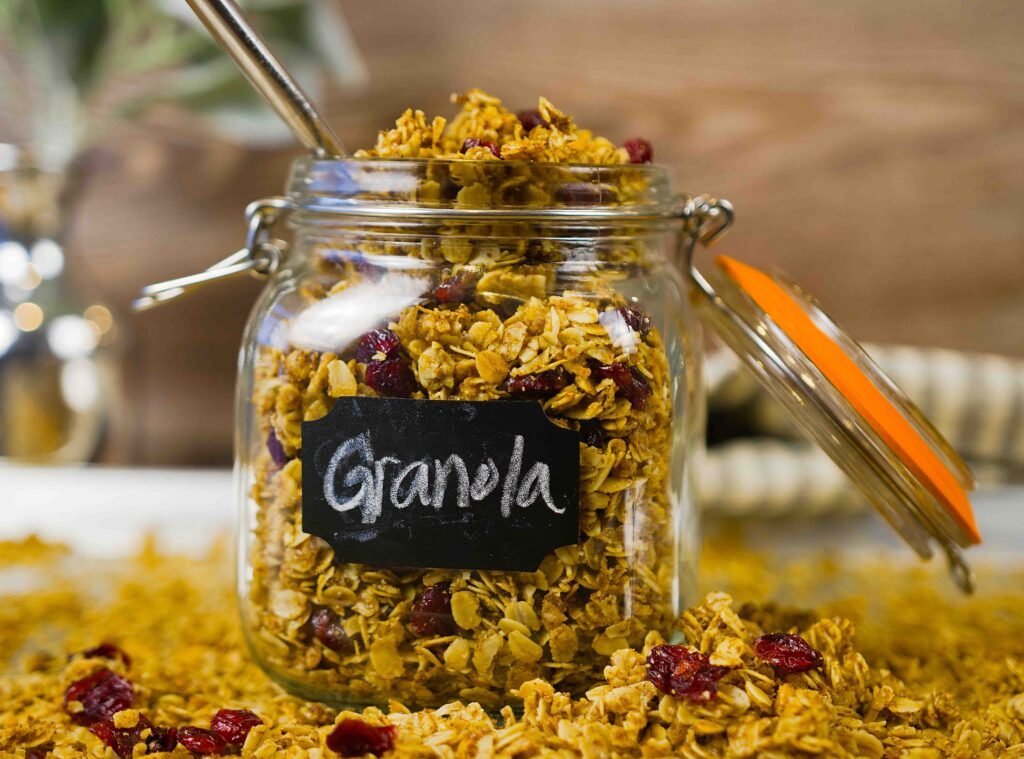


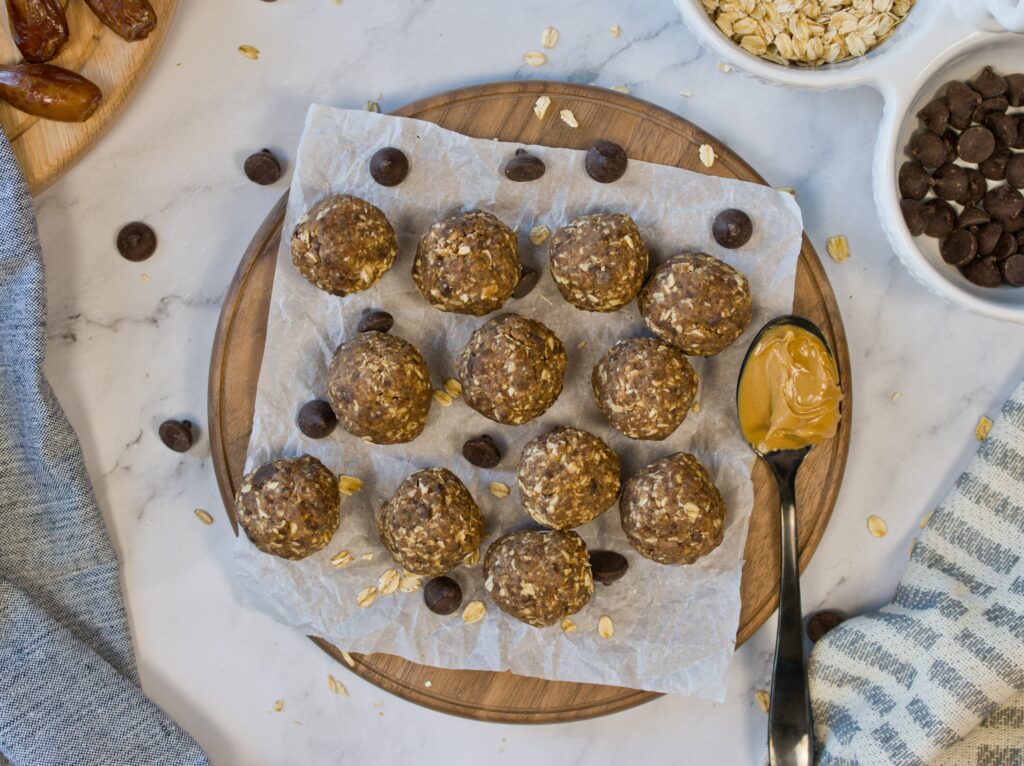
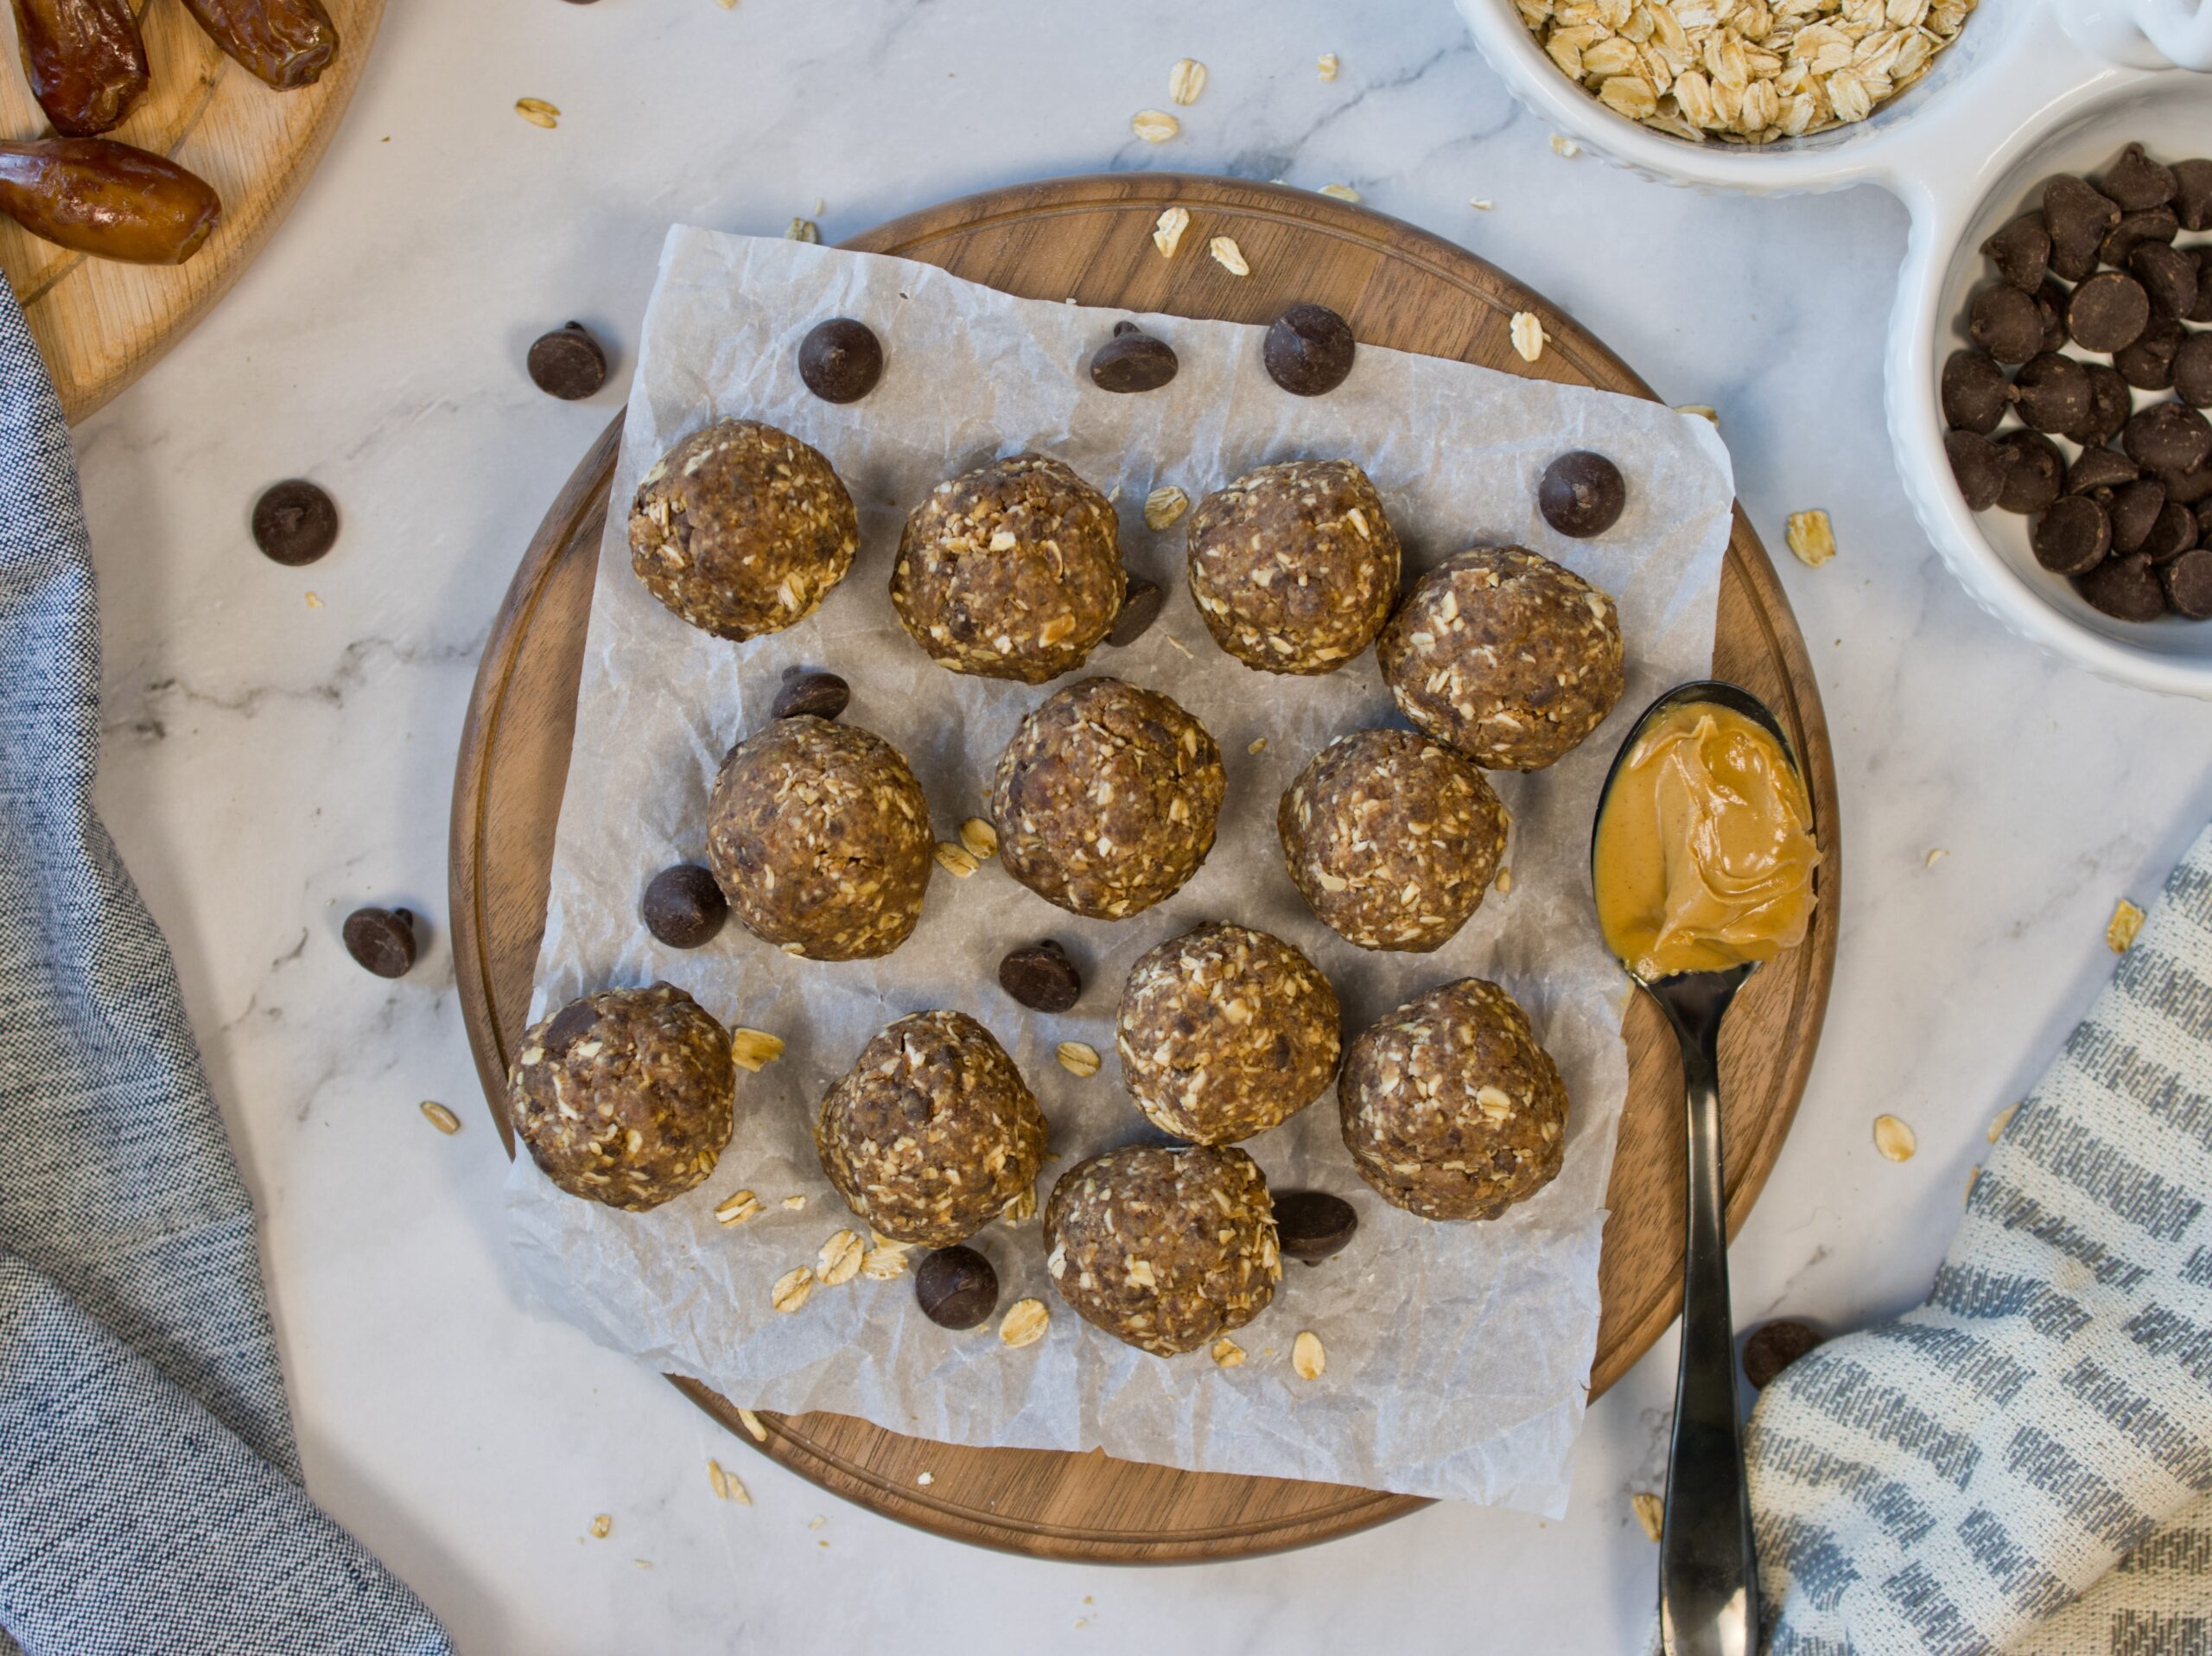


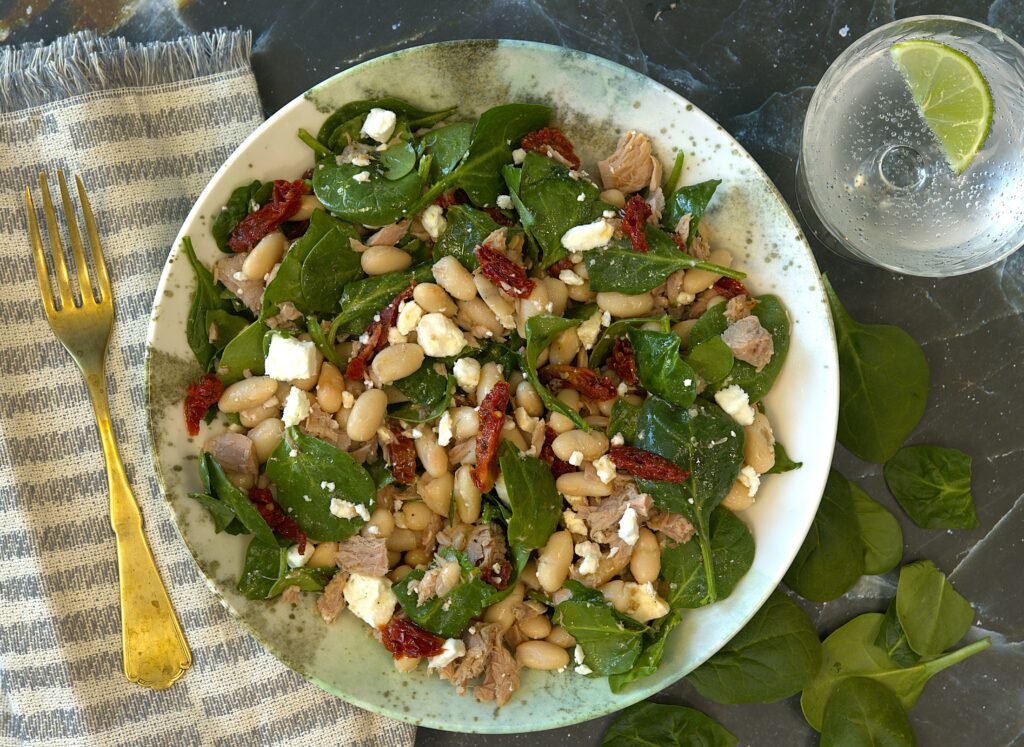


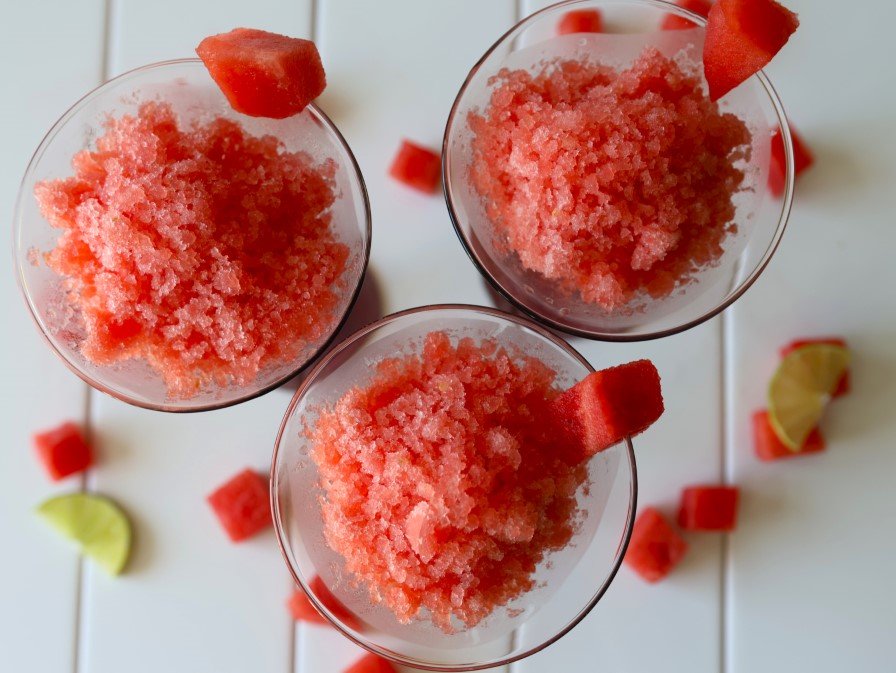


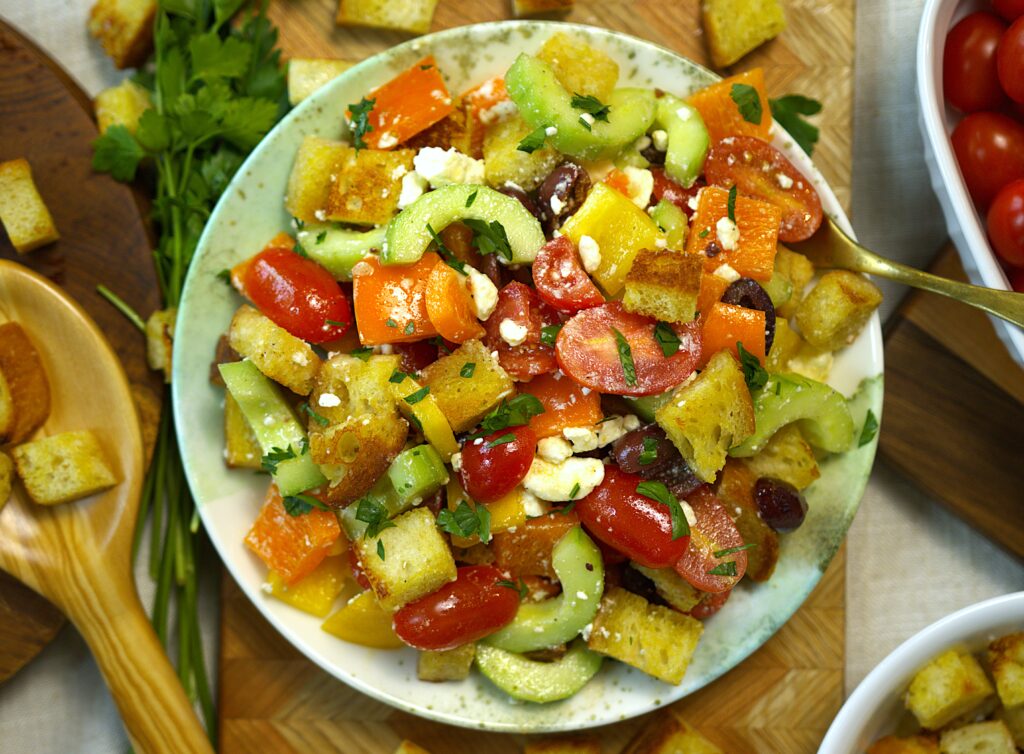
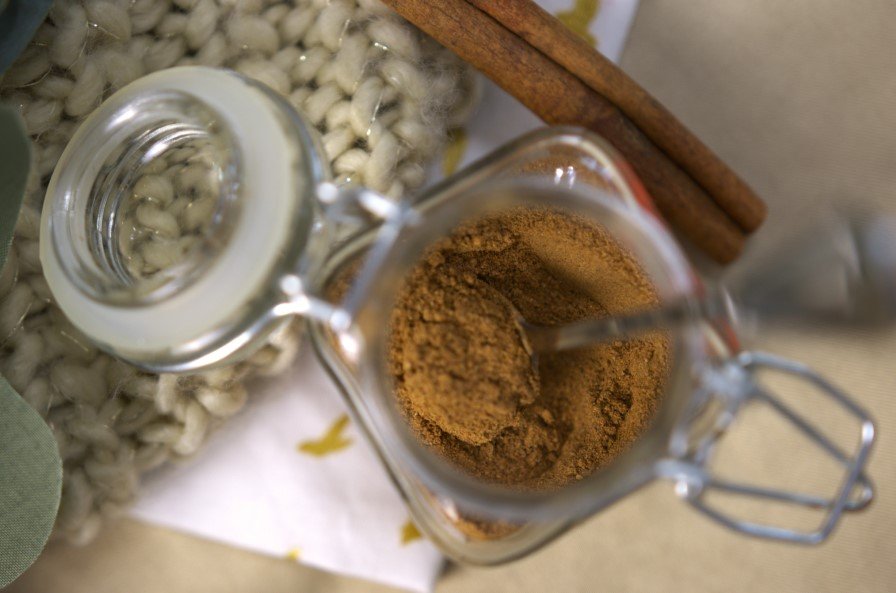


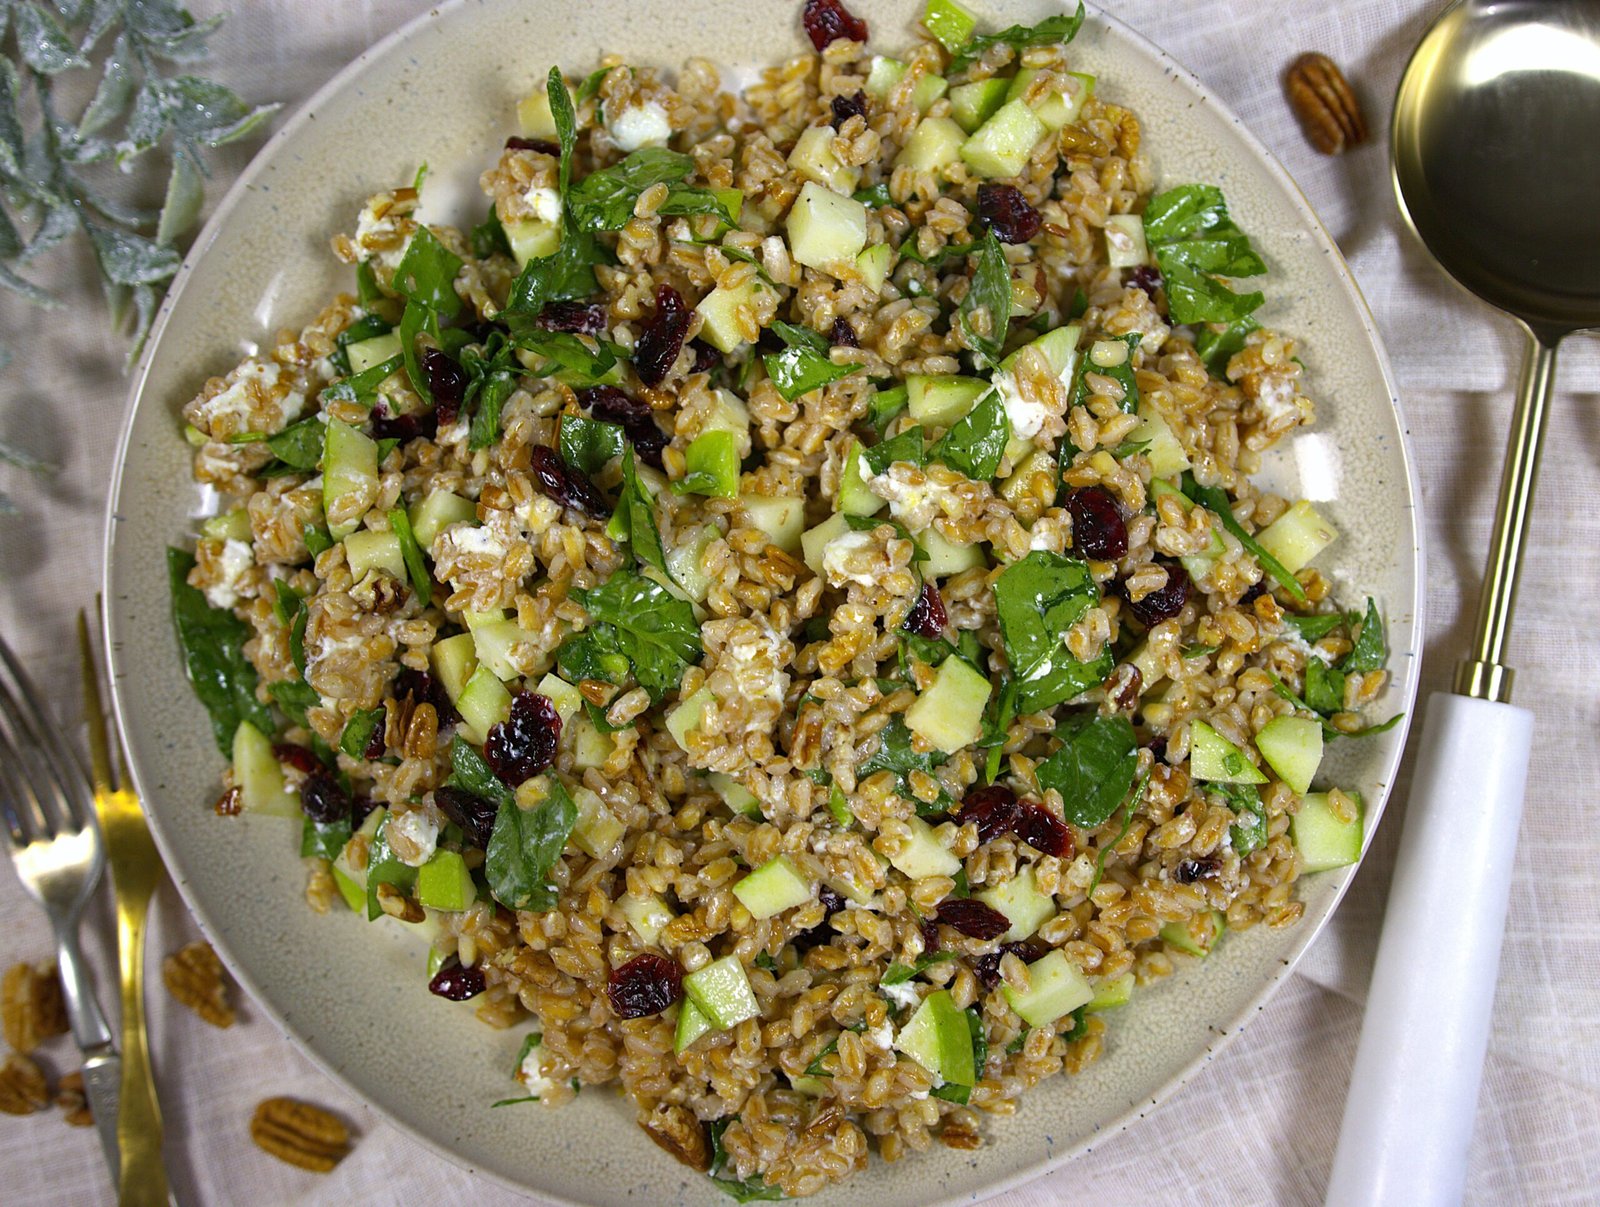


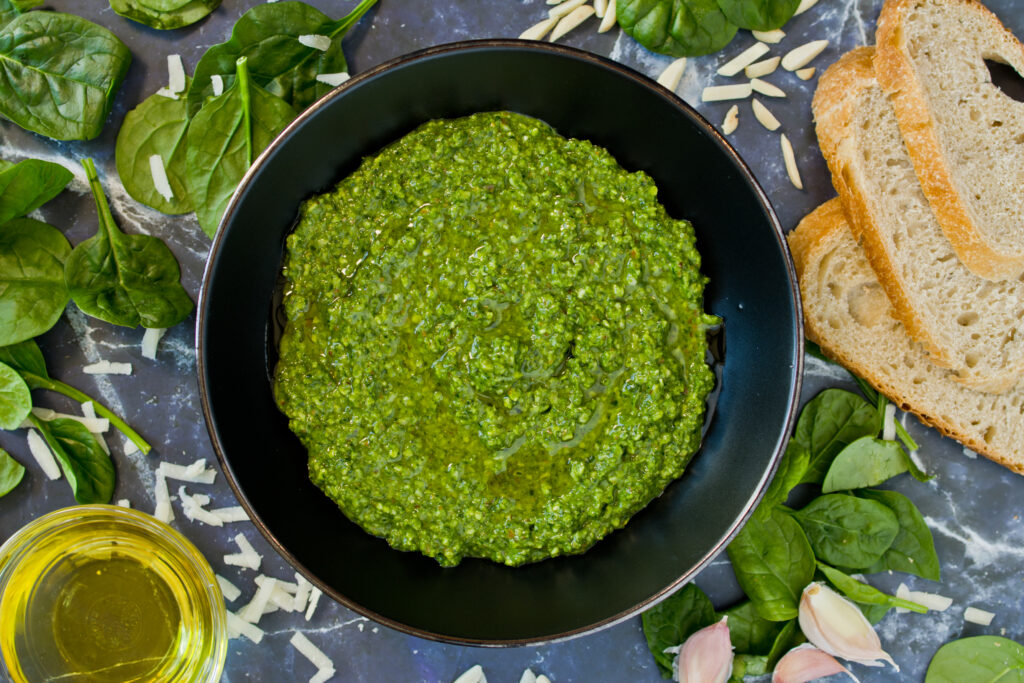


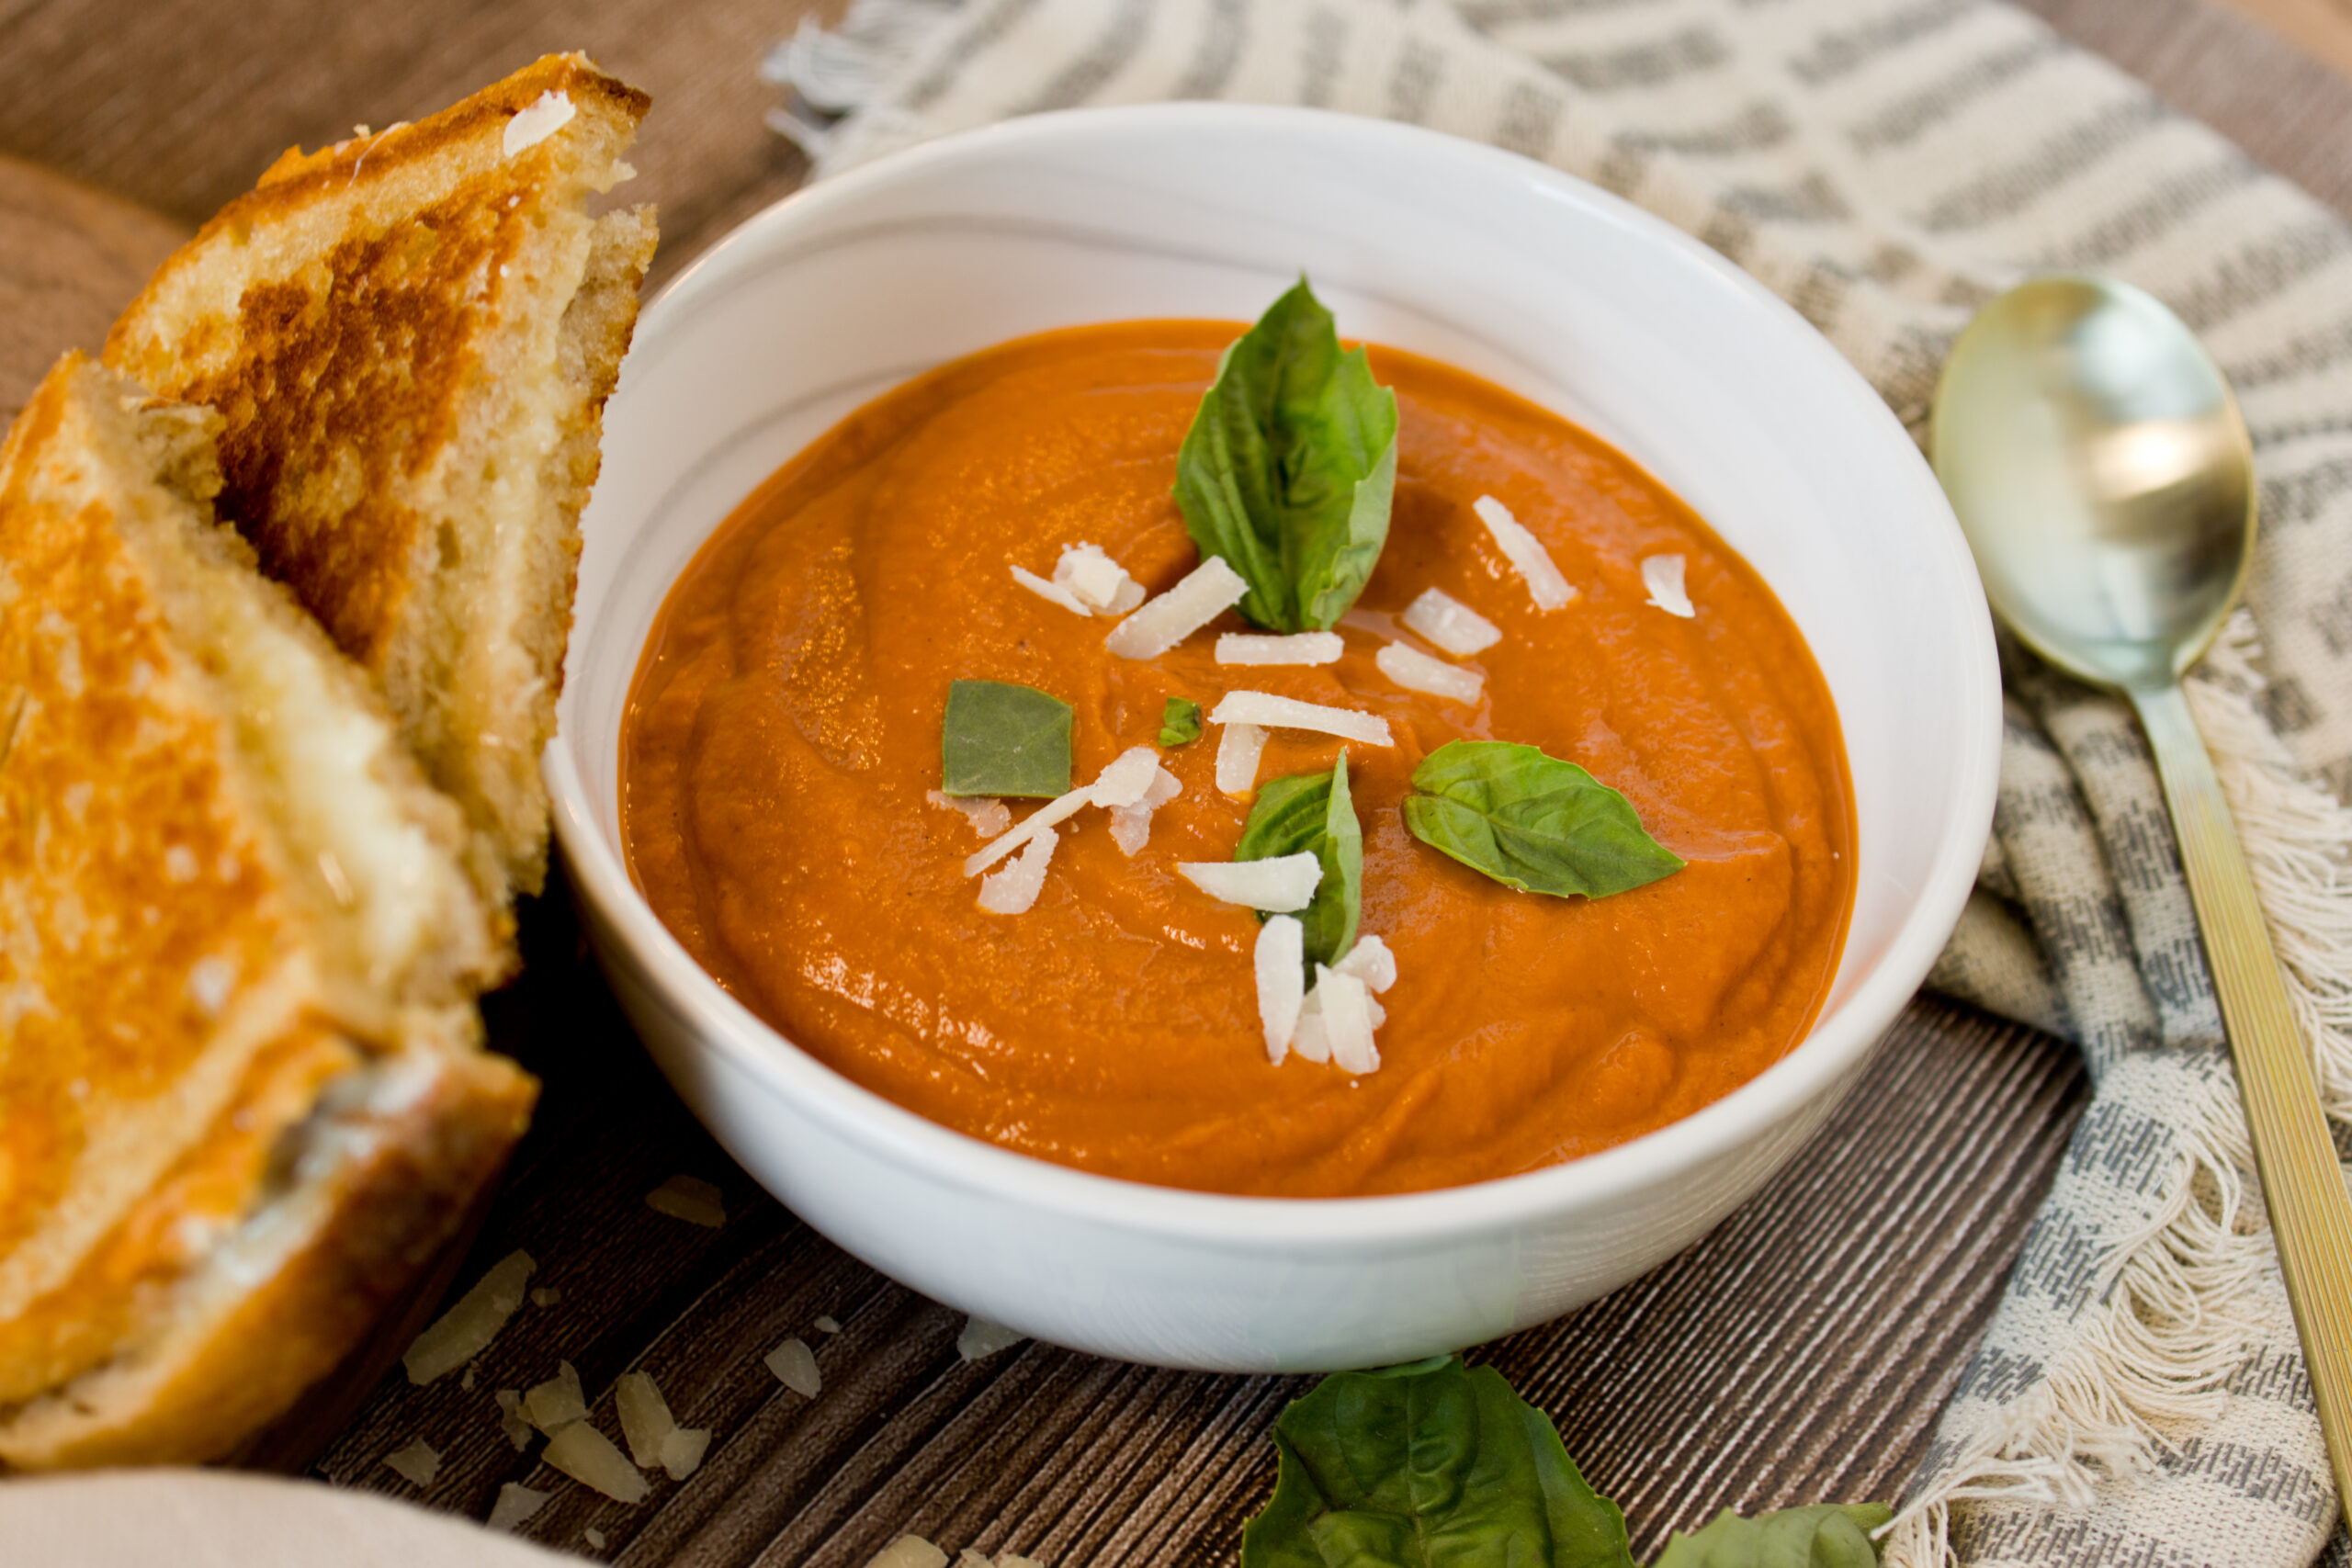


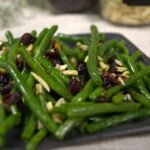


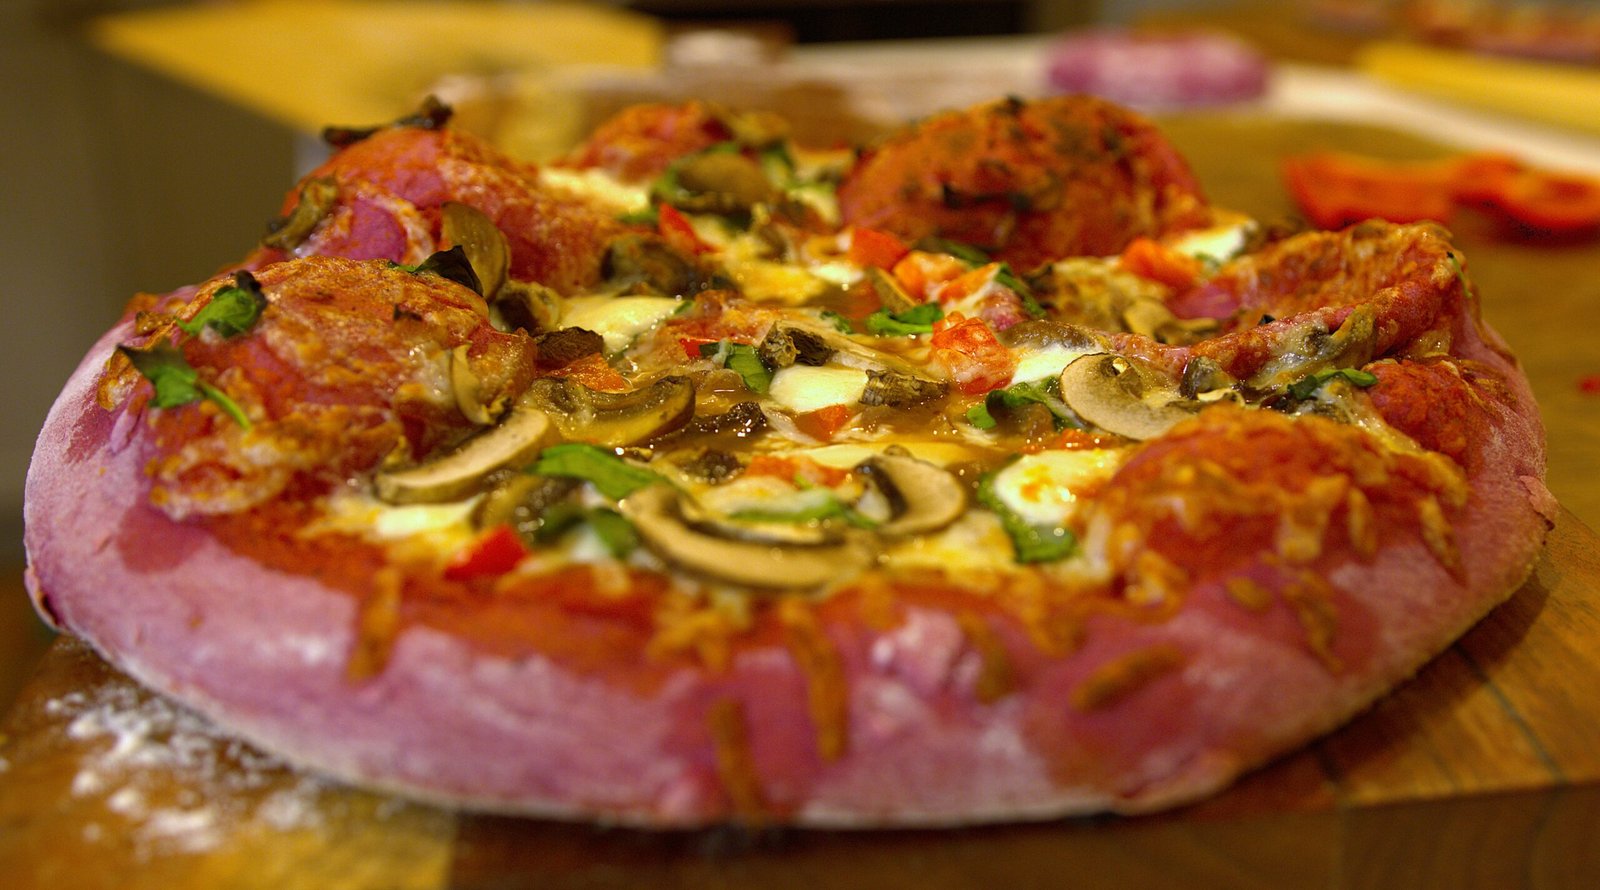


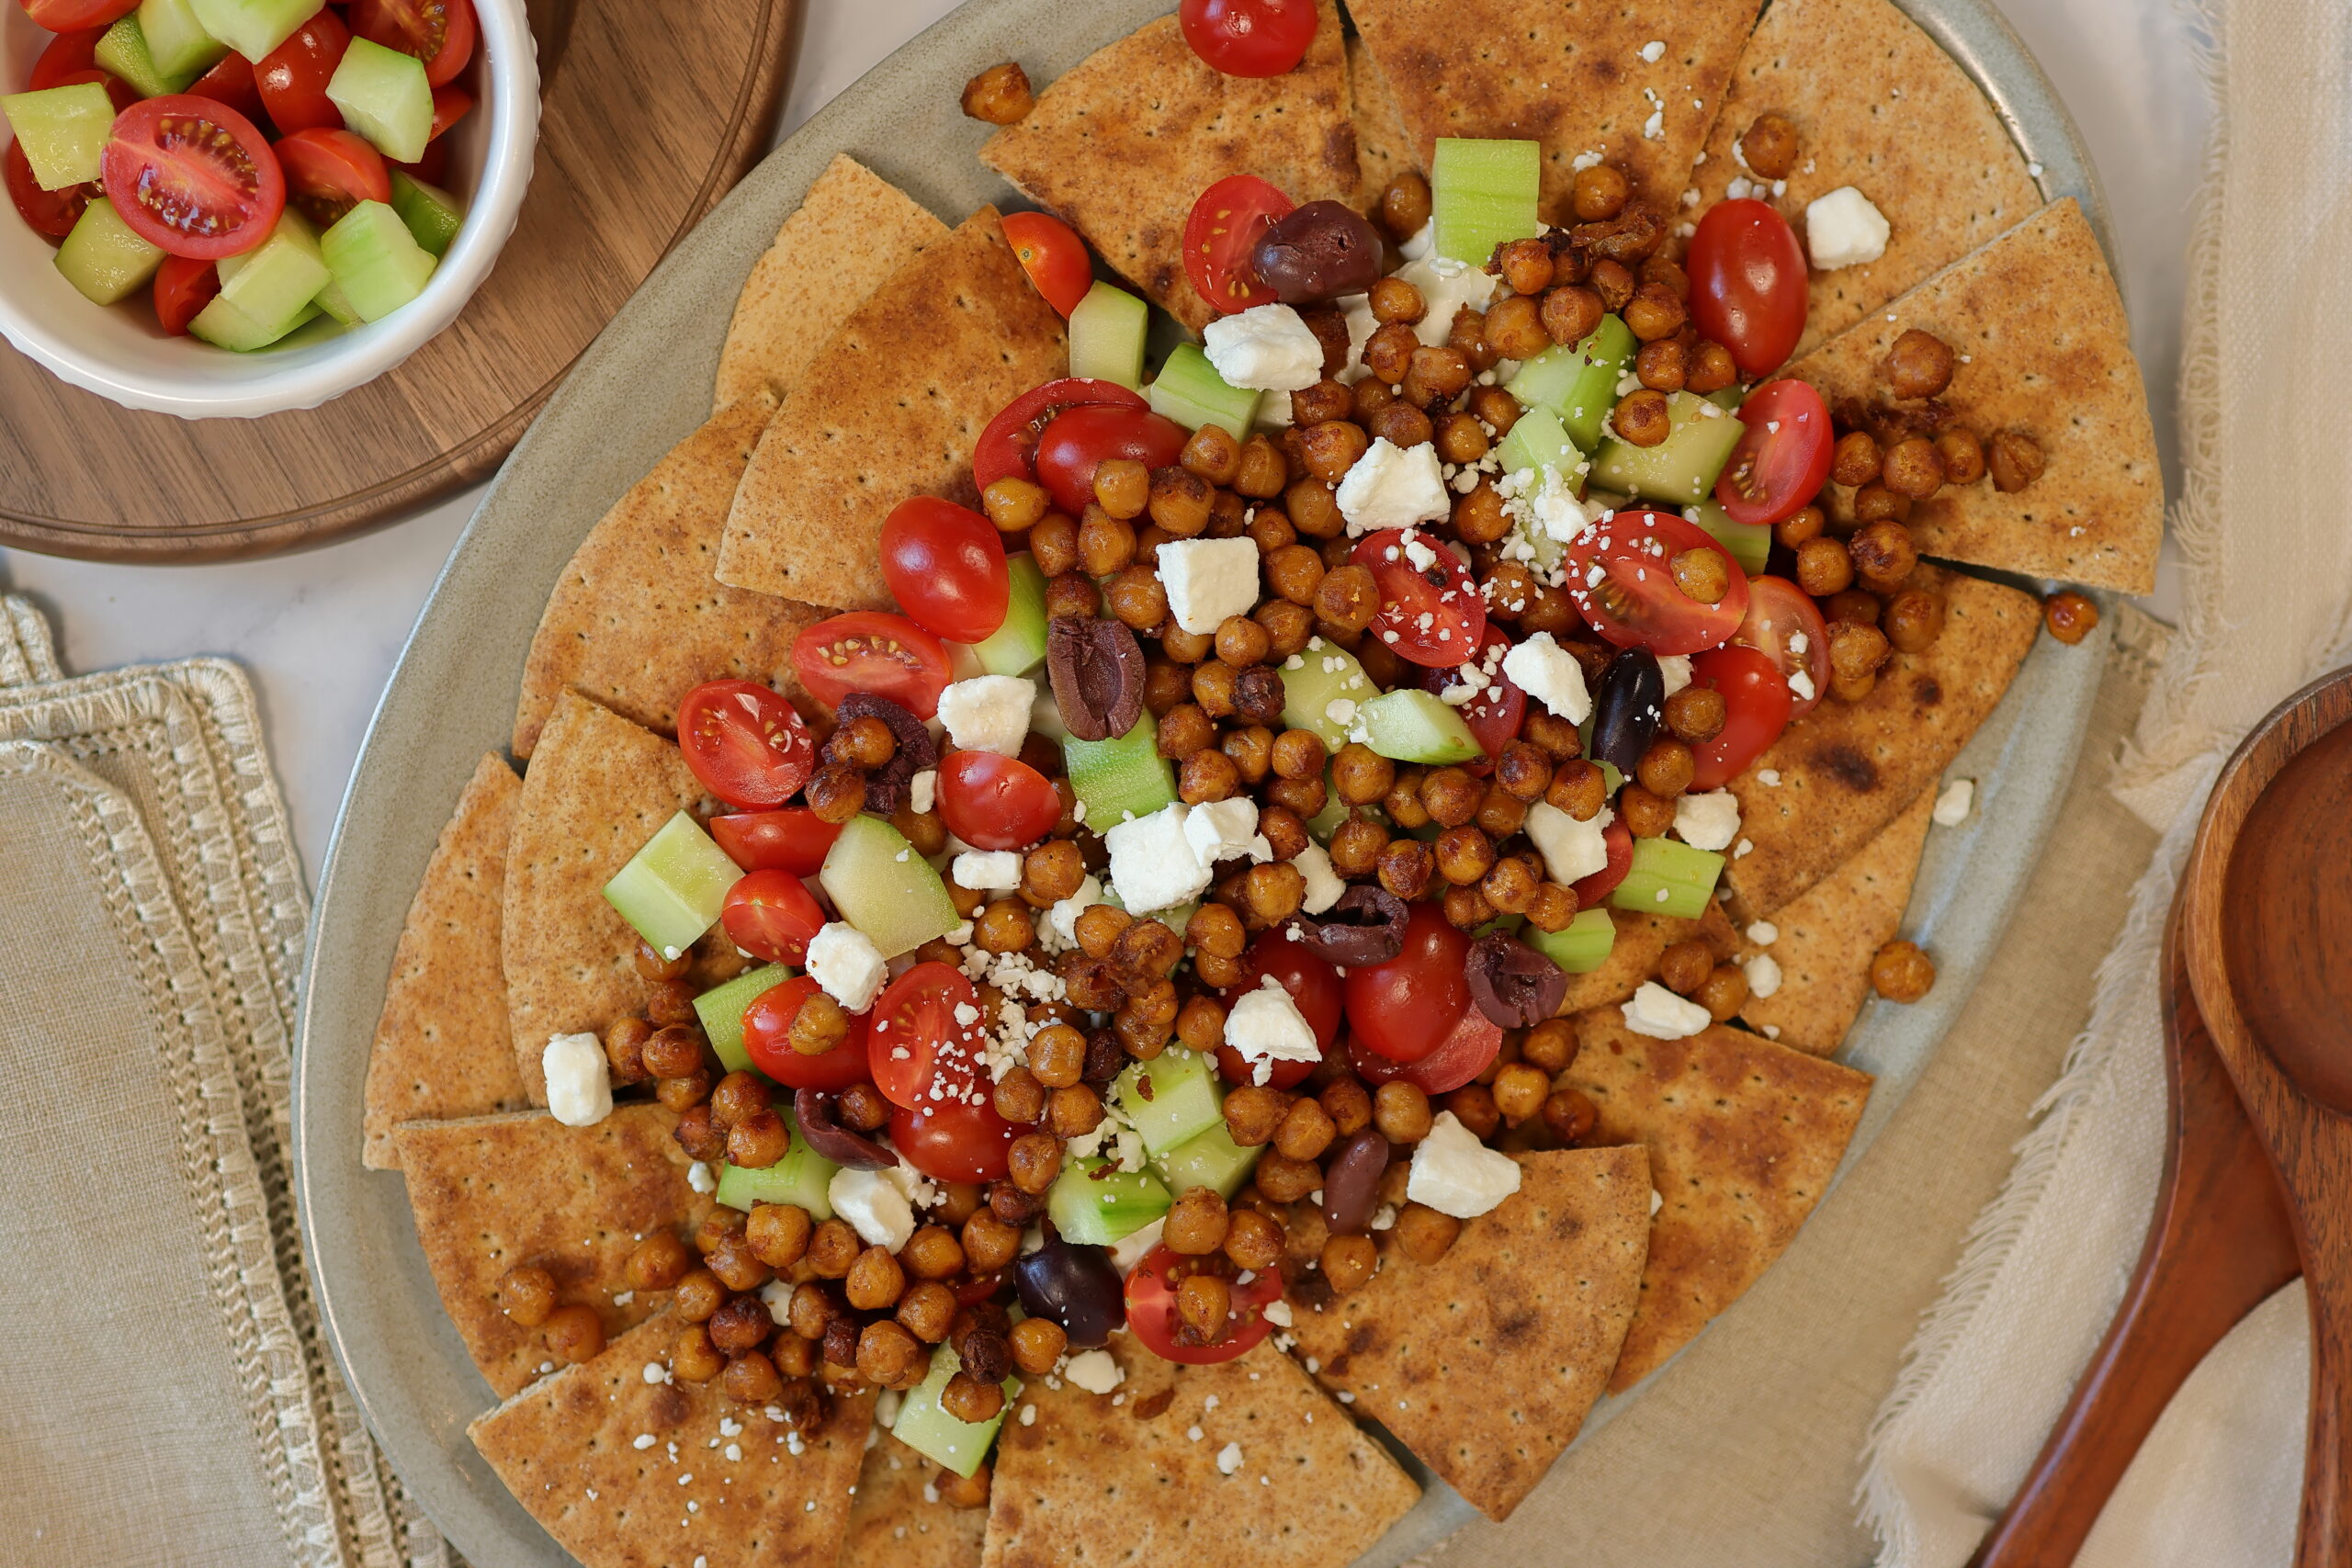


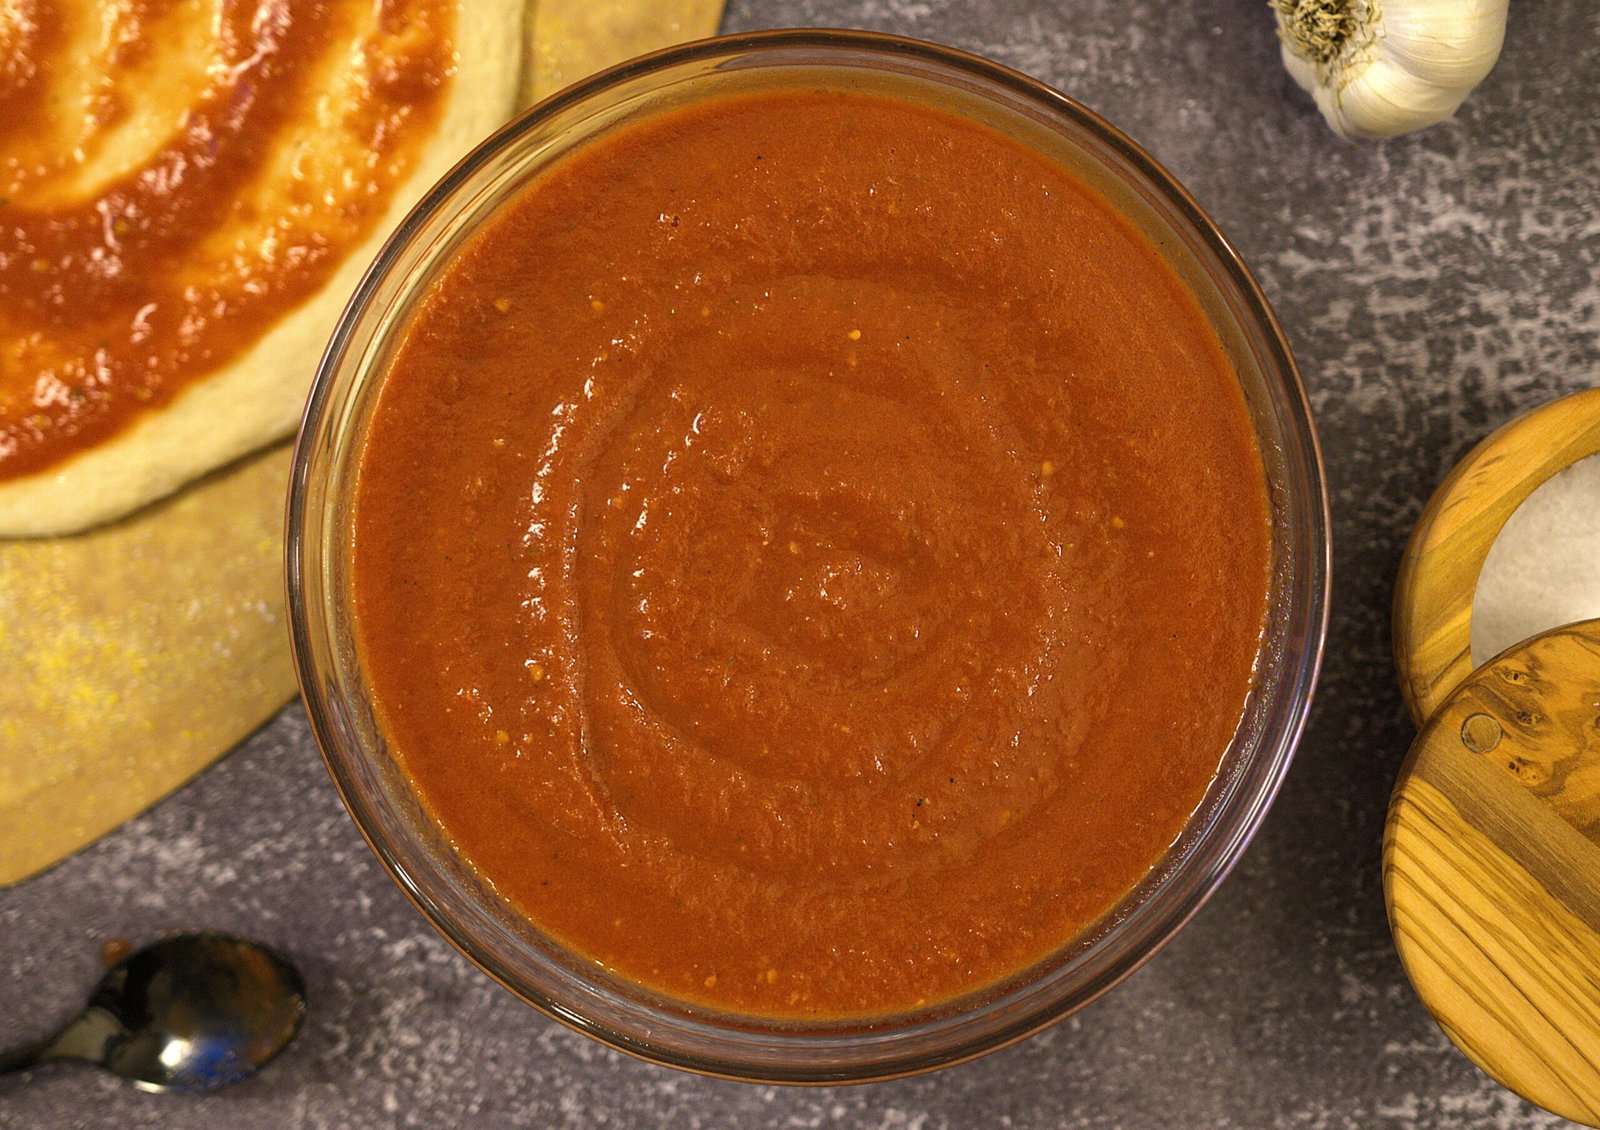


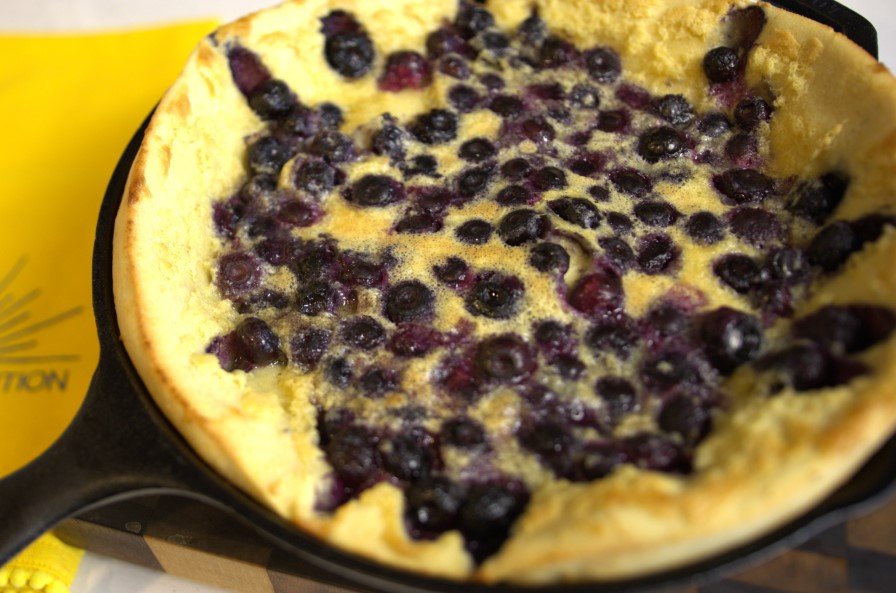

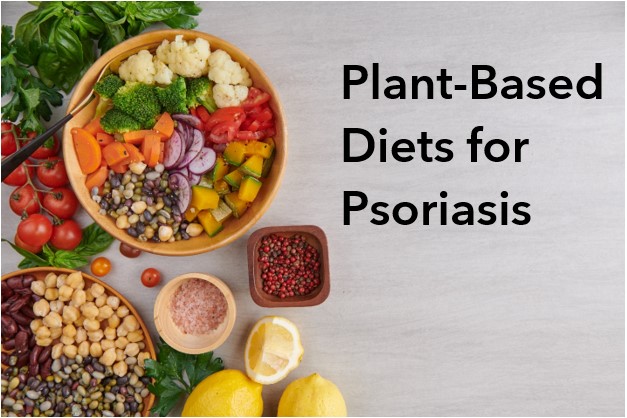