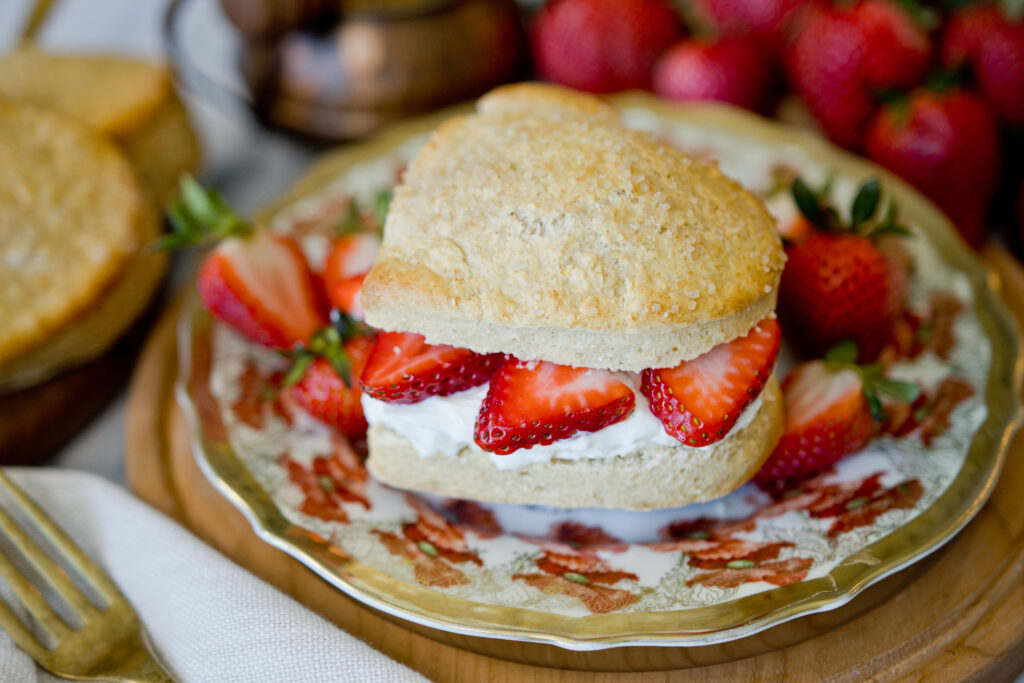
These strawberry shortcakes are incredibly soft, satisfying, and designed to let those juicy summer berries be the star. I wanted a recipe that hits all the nostalgic flavor notes while also giving some fiber and protein.
Using Greek yogurt is the secret to getting that perfectly tender, pillowy crumb. It adds a protein boost and creates a balanced treat that won’t weigh you down like a traditional butter-heavy biscuit. The slight tang from the yogurt cuts through the sweetness of the fruit for a bright, refreshing finish. It’s a simple, nourishing way to enjoy dessert or snack!
Ingredients
UnitsScale
2cupsAll Purpose Flour
2cupsWhite Whole Wheat Flour
2 tsp Baking Powder
1 tsp Ground Cinnamon
1/2 tsp Baking Soda
1/2 tsp Kosher Salt
1 1/2cupsGreek Yogurt
2/3cupHoney
2 Eggs
2 tsp Vanilla Extract
Topping:
1 Egg
1 Tbsp Water
2 Tbsp Turbinado Sugar
To Serve:
Fresh Strawberries, sliced
Greek Yogurt
Honey
Instructions
Preheat oven to 425° F. Line a baking sheet with parchment paper or lightly grease.
In a large bowl, whisk together all-purpose flour, white whole wheat flour, baking powder, baking soda, cinnamon and salt.
In a separate bowl, whisk together Greek yogurt, eggs, vanilla, and honey until smooth.
Next, add the wet ingredients into the dry ingredients and stir with a spatula until a soft dough forms.
Turn the dough out onto a lightly floured surface and gently roll or pat out to about 1/2-inch thick.
Use a large biscuit cutter, or upside down glass to cut the shortcakes out. Reforming the dough and cutting again as needed.
Place the shortcakes on to your prepared baking sheet.
In a small bowl, whisky together the egg and water, then brush over the tops. Sprinkle with turbinado sugar.
Bake for 20-25 minutes until the tops are just golden brown.
Allow to cool on a wire rack for 10-15 minutes.
To Serve:
In a small bowl mix 1/2 cup Greek Yogurt and 1-2 tsp honey.
When ready to serve. slice the shortcakes length wise, or use a fork to prick around the edge and then pull the shortcake apart.
To the bottom portion spread the Greek Yogurt honey mixture, top with strawberries and enjoy!
These Healthy Lemon Poppyseed Muffins are the perfect lemon poppy seed muffins—light, zesty, and made with wholesome ingredients. I used a blend of white whole wheat and oat flour for a fluffy texture, and sweetened them naturally with honey and unsweetened applesauce.
The combination of Greek yogurt and olive oil keeps them incredibly moist, while a triple-hit of lemon zest and juice gives them a bright, fresh flavor. They’re a simple, nutrient-dense option that’s great for a quick breakfast or a light snack.
Ingredients
UnitsScale
1cupWhite Whole Wheat Flour
1/2cupOat Flour
1 Tbsp Ground Flaxseed
2 tsp Baking Powder
1/2 tsp Baking Soda
1/2 tsp Kosher Salt
1 1/2 Tbsp Poppy Seeds
Zest of 3 Lemons
2 Tbsp Lemon Juice
2 Eggs
1/2cupGreek Yogurt
1/2cupHoney
1/4cupUnsweetened Applesauce
1/4cupOlive Oil
2 tsp Vanilla Extract
Optional Glaze Topping:
1/3cupPowdered Sugar
2–3 tsp Milk
Instructions
Preheat oven to 350°F. Grease a 12-cup muffin tin or line with muffin liners. Set aside.
In a large bowl, whisk together the flours, flaxseed, baking powder, baking soda, salt and poppy seeds.
In a separate bowl whisk together the lemon zest, lemon juice, eggs, Greek yogurt, honey, applesauce, olive oil, and vanilla extract until smooth.
Pour the the wet ingredients into the dry ingredients and gently stir with a spatula until just combined (don’t over mix here!).
Scoop the batter evenly into the prepared muffin pan.
Bake for 20-25 minutes, until just golden brown.
Let the muffins cool in the pan for a few minutes, then transfer to a wire rack to cool completely.
Optional Glaze:
Whisk together the powdered sugar and milk until smooth, Drizzle over cooled muffins. Enjoy!
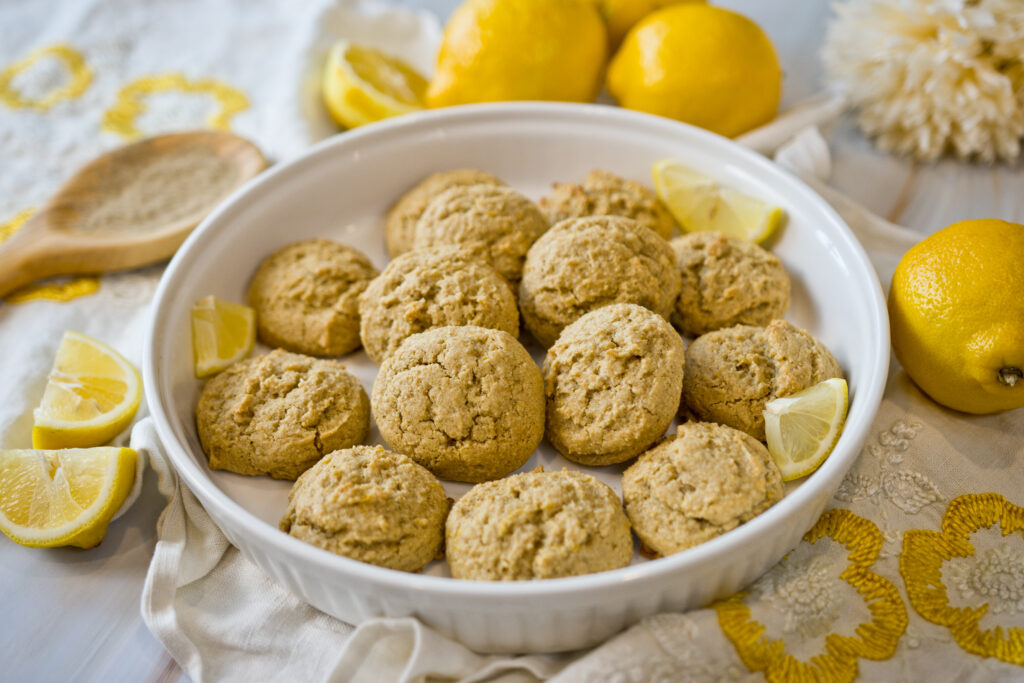
These Lemon Cardamom Tea Cookies are soft, lightly sweetened, and full of fresh, bright flavor from real lemon zest and warm cardamom. Made with a mix of whole grain and almond flours, and sweetened with honey and a touch of brown sugar, they strike that perfect balance—just enough sweetness with a cozy hint of spice. Perfect with your afternoon coffee or tea when you want something that feels a little special, and still nourishing.
Ingredients
UnitsScale
2 Tbsp Olive Oil
2 Tbsp Unsalted Butter, softened
1/4cupHoney
1/4cupBrown Sugar
1 Lemon, Zested + 1 tsp Lemon Juice
1 Egg
1/2 tsp Vanilla Extract
1cupWhite Whole Wheat Flour
1/2cupAlmond Flour
1/4cupOat Flour
3 tsp Cardamom
1 1/2 tsp Baking Powder
1/4 tsp Kosher Salt
Instructions
Preheat the oven to 350°F. Line a sheet pan with parchment paper or a silpat mat and set aside.
In a large bowl, whisk together the olive oil, softened butter, honey, brown sugar, lemon zest, lemon juice, egg, and vanilla extract until smooth.
Next, combine the dry ingredients. In a medium bowl, whisk together the white whole wheat flour, almond flour, oat flour, cardamom, baking powder, and salt.
Then, add the dry ingredients to the wet ingredients and stir with a spatula until a soft dough forms. The dough will look like thick wet sand.
Using a 1½-inch cookie scoop, portion the dough onto the prepared sheet pan, spacing the cookies a couple inches apart, they won’t spread very much.
Place into the oven and bake for 10-12 minutes until the cookies are slightly golden brown. Take care to not overcook here, we want a soft center.
Move cookies to a wired rack and allow to cool slightly before serving. Enjoy!
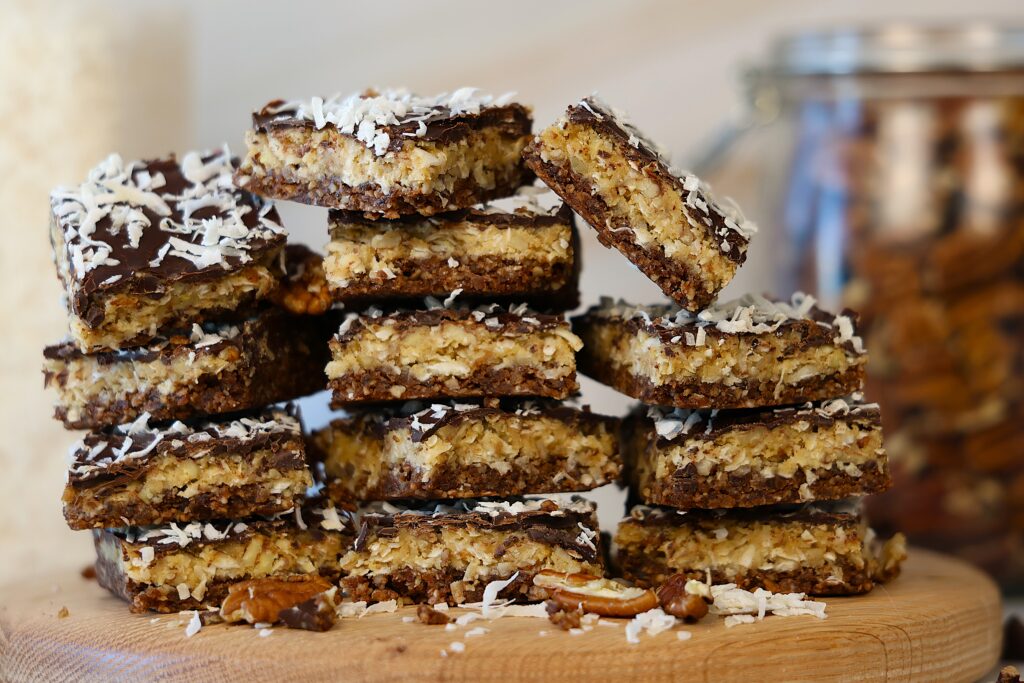
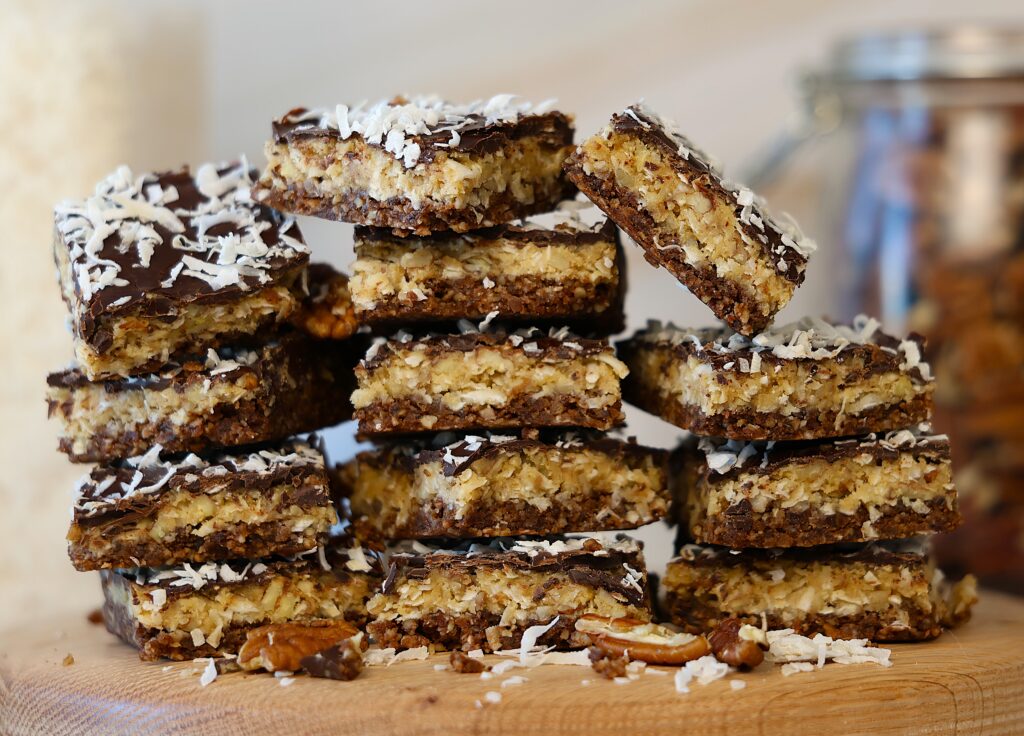
These no-bake German Chocolate Cake Bars have a rich chocolatey base, a coconut-pecan layer, and a simple dark chocolate topping. They’re so good, have all the classic German chocolate cake flavors, and are naturally sweetened with dates and maple syrup for a healthier take on a favorite.
Ingredients
UnitsScale
1cup Pitted Dates
1cup + 1/2 Pecans, Chopped
1cup + 2/3 cup Unsweetened Shredded Coconut
1 + 1/2 tsp Vanilla Extract
Pinch Salt
1/2cupCashew Butter
1/4cupMaple Syrup
1/3cupDark Chocolate Chips
1/2 tsp Coconut Oil
Instructions
Chocolate Base Layer:
Line an 8 x 8-inch pan with parchment paper, set aside.
Place 1 cup pitted dates into a food processor. Process until the dates are broken down into small pieces
Then, add the pecans 2/3 cup coconut, 1 tsp vanilla and pinch of salt.
Process the mixture until it is combined and sticks together but still has some texture to it.
Pour the mixture into your prepared pan and using a measuring cup or bottom of a cup, press the mixture firmly and evenly into the pan. Set aside while you make the “frosting” layer.
Coconut “Frosting” Layer
In a medium sized bowl, combine 1 cup coconut, 1/2 cup chopped pecans, 1/2 cup cashew butter, 1/4 cup maple syrup and 1/2 tsp vanilla extract.
Stir together with a spatula until well combined.
Then, spread the mixture evenly over the chocolate base layer, pressing with your spatula as needed.
Chocolate Topping
In a small, microwave-safe bowl, add the 1/3 cup dark chocolate chips and 1/2 tsp coconut oil.
Microwave on 25 second intervals, stirring in between each one, until the chocolate is melted.
Next, pour the melted chocolate over top of the coconut layer and spread evenly with a spatula.
Top with an extra tablespoon of coconut to make them extra pretty!
Chill and Serve
Refrigerate the bars for at least 1-2 hours until firm.
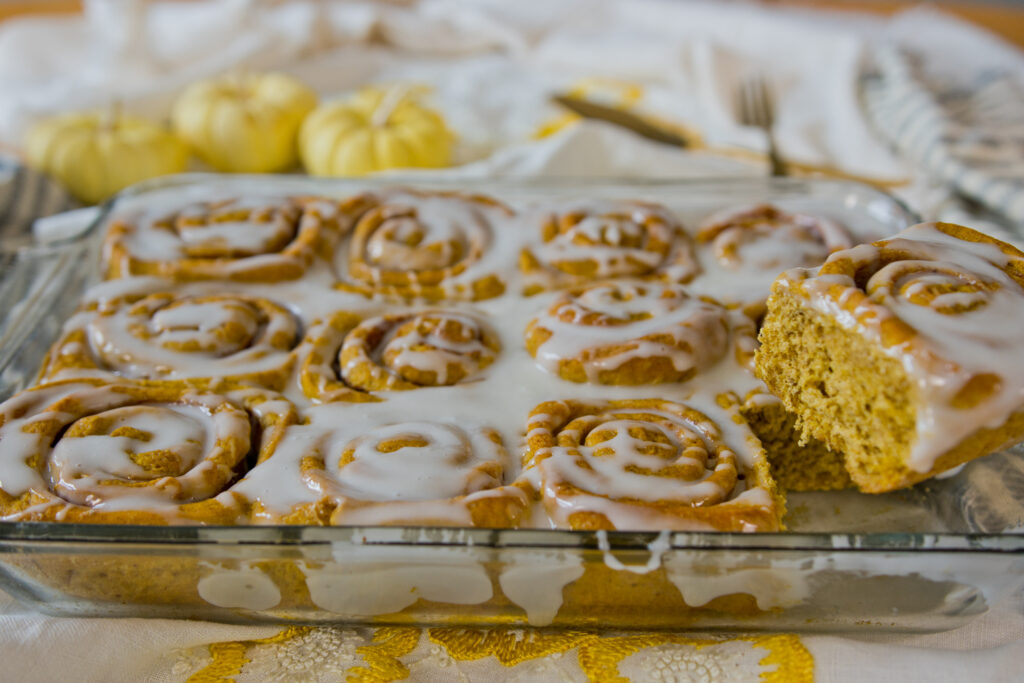
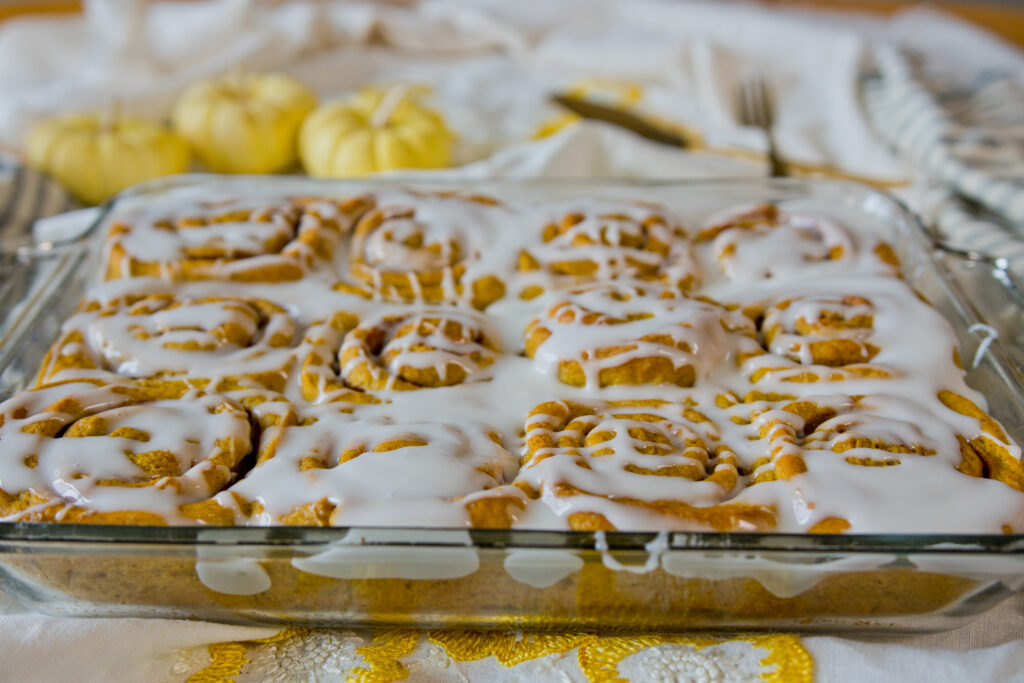
Soft, fluffy pumpkin sourdough cinnamon rolls loaded with warm spices and a sweet, cozy filling. The pumpkin keeps them extra tender, the sourdough adds great flavor, and the whole pan makes your kitchen smell incredible. Perfect for slow weekends, fall brunch, or anytime you want a homemade treat that feels a little special.
Ingredients
UnitsScale
Dough:
1/2cupSourdough Starter
1/2cupMilk
3/4cupPumpkin Puree
2 Tbsp Melted Butter
1 Egg
1/2cupMaple Syrup
1 1/4 tsp Yeast
2 tsp Vanilla Extract
3cupsAll Purpose Flour
1/2cupWhole Wheat Flour
2 Tbsp Pumpkin Pie Spice
1 tsp Kosher Salt
1/2 tsp Baking Soda
Filling:
2 Tbsp Melted Butter
1/4cupBrown Sugar
1 tsp Cinnamon
1/2 tsp Pumpkin Pie Spice
Glaze:
1 1/2cupPowdered Sugar
1 1/2 – 2 tbsp Milk
Instructions
Prepare the Dough: To the bowl of a stand mixer add the starter, milk, pumpkin puree, melted butter, egg, maple syrup, vanilla extract and yeast. Mix together until fully incorporated.
Add Dry Ingredients: In a separate bowl, whisk together the all purpose flour, whole wheat flour, pumpkin pie spice, salt and baking soda. Then, slowly and gradually add the dry ingredients into the we mixture, stirring in between, until a soft dough forms.
Knead the Dough: Using the dough hook, knead the dough for 2-3 minutes until it becomes smooth and elastic. Cover your stand mixer bowl and allow the dough to rise in a warm place for 1-2 hours, or until doubled in size.
Roll and Fill: Roll out the dough on a lightly floured surface into a rectangle about 8″ x 16″. Spread the melted butter over the dough, then sprinkle evenly with the filling mixture.
Shape the Rolls: Starting from the top, long side, roll up the dough into a tight log roll. Pinch the seam to seal the rolls. Next, cut the log into 12 equal pieces. (Tip: Cut the log in half, then cut each half, in half again, then cut into 3.)
Place the rolls into a greased 9×13″ baking pan, cover with aluminum foil, and allow to rise for an additional 45-60 minutes. The rolls should be nice and puffy and fill your pan.
Bake the Rolls: Preheat your oven to 375°F. Place the rolls into the oven and bake for 25-30 minutes until golden on top and cooked through.
Make the Glaze: While the rolls bake, mix up the glaze. In a small bowl whisk together the powdered sugar and milk.
Glaze the Rolls: Let the rolls cool slightly for 5 minutes. Then drizzle the glaze over top.
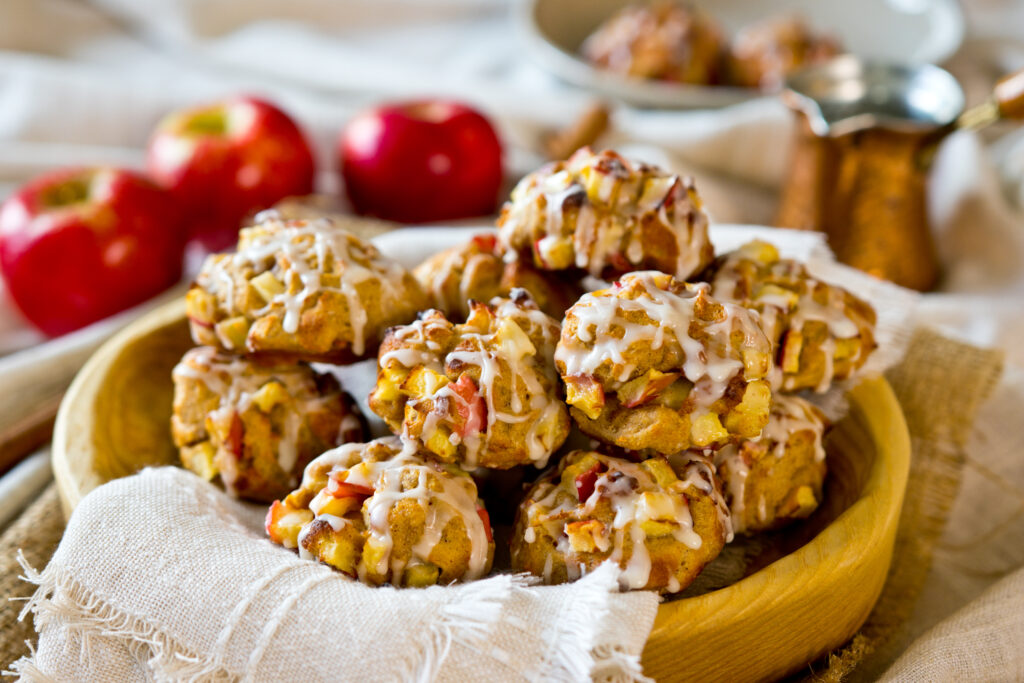
These air fryer apple fritters are everything you love about the classic fall treat, without the deep fryer. Crispy on the outside, soft and fluffy on the inside, and drizzled with a simple glaze, this easy apple fritters air fryer recipe comes together in just 20 minutes.
Made with Greek yogurt and whole wheat flour, each fritter delivers 5 grams of protein and a solid boost of fiber. Whether you are craving a cozy breakfast, a weekend brunch treat, or a lighter dessert, this recipe checks every box.
Why You Will Love This Recipe
Ready in 20 minutes. This apple fritters air fryer recipe is a true weekday-friendly win.
No deep fryer needed. You get a golden, crispy exterior without a pot of oil in sight.
Packed with nutrition. Greek yogurt and whole wheat flour bring 5g of protein and 2g of fiber to every single fritter.
Crowd pleaser. Kids and adults both love these, making them perfect for brunch, snack time, or a cozy fall dessert.
Ingredients
Fritters:
1 cup Greek yogurt
1 cup white whole wheat flour
1 1/2 tsp baking powder
1/4 tsp salt
1/2 tsp vanilla extract
1 1/2 tsp cinnamon
1/2 tsp cardamom
3 tbsp maple syrup
2 large apples, diced small
Glaze:
1/2 cup powdered sugar
1 tbsp milk
How to Make Air Fryer Apple Fritters
In a large mixing bowl, whisk together the flour, baking powder, cinnamon, cardamom, and salt.
Add the Greek yogurt and maple syrup. Using a spatula, stir together to combine.
Fold in the diced apples to form a thick fritter dough.
Preheat your air fryer to 350°F and lightly spray the basket with oil to prevent sticking.
Scoop about 1/4 cup mounds of batter into the air fryer basket, about 5 to 6 at a time depending on the size of your air fryer.
Air fry for 8 minutes. Then increase the temperature to 400°F and air fry for an additional 1 to 2 minutes until the tops are deep golden brown.
While the fritters cook, make the glaze. In a small bowl, whisk together the milk and powdered sugar until smooth.
Once the fritters are cooked, drizzle the glaze over warm fritters and enjoy!
Variations and Substitutions
Flour: All-purpose flour works just as well if you do not have white whole wheat on hand.
Sweetener: Swap the maple syrup for honey in equal amounts.
Spices: Add a pinch of nutmeg alongside the cinnamon and cardamom for a little extra warmth.
Glaze: Stir a tiny splash of vanilla extract into the glaze for added depth of flavor.
Apples: Any baking apple works here. Honeycrisp, Fuji, and Gala are naturally sweet, while Granny Smith gives you a slightly tarter fritter.
Dairy free: Use a plain coconut or almond milk yogurt in place of Greek yogurt and a splash of non-dairy milk in the glaze.
How to Store Air Fryer Apple Fritters
Store leftover fritters in an airtight container in the refrigerator for up to 3 days. For best results, keep the glaze separate and drizzle it on after reheating. To freeze, place unglazed fritters in a single layer on a baking sheet until frozen solid, then transfer to a freezer bag for up to 2 months.
To reheat, pop them back in the air fryer at 350°F for 2 to 3 minutes straight from the fridge, or 5 to 6 minutes from frozen. They crisp right back up like fresh.
How to Serve Air Fryer Apple Fritters
These air fryer apple fritters are best served warm, right after glazing. A few ways to enjoy them:
As a fall breakfast or brunch alongside scrambled eggs and coffee
As a lighter dessert with a small scoop of vanilla yogurt or ice cream
As an after-school snack the whole family will reach for
On a holiday brunch spread next to other seasonal favorites
A dusting of cinnamon sugar on top right before serving takes them over the top if you want to skip the glaze entirely.
Frequently Asked Questions
Can you air fry apple fritters?
Absolutely. Air frying apple fritters works beautifully and is actually one of the best ways to make them at home. The hot circulating air creates a crispy, golden exterior while keeping the inside soft and fluffy, no deep fryer or pot of oil required.
How long do you air fry apple fritters?
These air fryer apple fritters cook for 8 minutes at 350°F, then 1 to 2 more minutes at 400°F to get the tops deep golden brown. Total cook time is about 10 minutes per batch.
Can you bake or air fry apple fritters?
You can do both, but the air fryer gives you a much crispier result than the oven in less time. Baking tends to produce a softer, more cake-like texture. If you have an air fryer, it is the way to go for that classic fritter finish.
How do you make air fryer apple fritters?
Mix your dry ingredients, fold in Greek yogurt, maple syrup, and diced apples to form a thick batter, then scoop into a preheated air fryer and cook at 350°F for 8 minutes followed by 1 to 2 minutes at 400°F. Drizzle with a simple powdered sugar glaze and serve warm. Full instructions are in the recipe card above.
Is an apple fritter considered a donut?
Technically yes, apple fritters are a type of donut. Traditional versions are made from a yeasted or batter-based dough mixed with apple pieces and deep fried, just like a donut. This version skips the deep fry and uses Greek yogurt for a lighter, higher-protein take on the classic.
Can an air fryer make food taste like it has been fried?
It gets pretty close, especially with recipes like these air fryer apple fritters that are designed for the appliance from the start. The key is finishing at a higher temperature, not overcrowding the basket, and using a light spray of oil so the exterior gets that satisfying crisp.
Air Fryer Apple Fritters are a lightened-up twist on the classic fall favorite—crispy on the outside, soft and fluffy inside, and made with wholesome ingredients. Each fritter packs 5g of protein and a boost of fiber for a more nourishing sweet treat. Perfect for a cozy breakfast, brunch, or healthier dessert made right in your air fryer!
Ingredients
UnitsScale
1cupGreek Yogurt
1cupWhite Whole Wheat Flour
1 1/2 tsp Baking Powder
1/4 tsp Salt
1/2 tsp Vanilla extract
1 1/2 tsp Cinnamon
1/2 tsp Cardamom
3 tbsp Maple Syrup
2 Large Apples, diced small
Glaze
1/2cupPowdered Sugar
1 tbsp Milk
Instructions
In a large mixing bowl, whisk together the flour, baking powder, cinnamon, cardamom, and salt.
Next, add the Greek Yogurt and maple syrup. Using a spatula, stir together to combine.
Fold in the diced apples to form a thick fritter dough.
Preheat your air fryer to 350°F and lightly spray the basket with oil to prevent sticking.
Scoop about ¼ cup mounds of batter into the air fryer basket (about 5–6 at a time, depending on the size of your air fryer).
Air fry for 8 minutes. Then increase the temperature to 400 F and air fry for an additional 1-2 minutes until the tops are deep golden brown.
While the fritters cook, make the glaze. In a small mixing bowl whisk together the milk and powdered sugar until smooth.
Once the fritters are cooked, drizzle the glaze over warm fritters and enjoy!
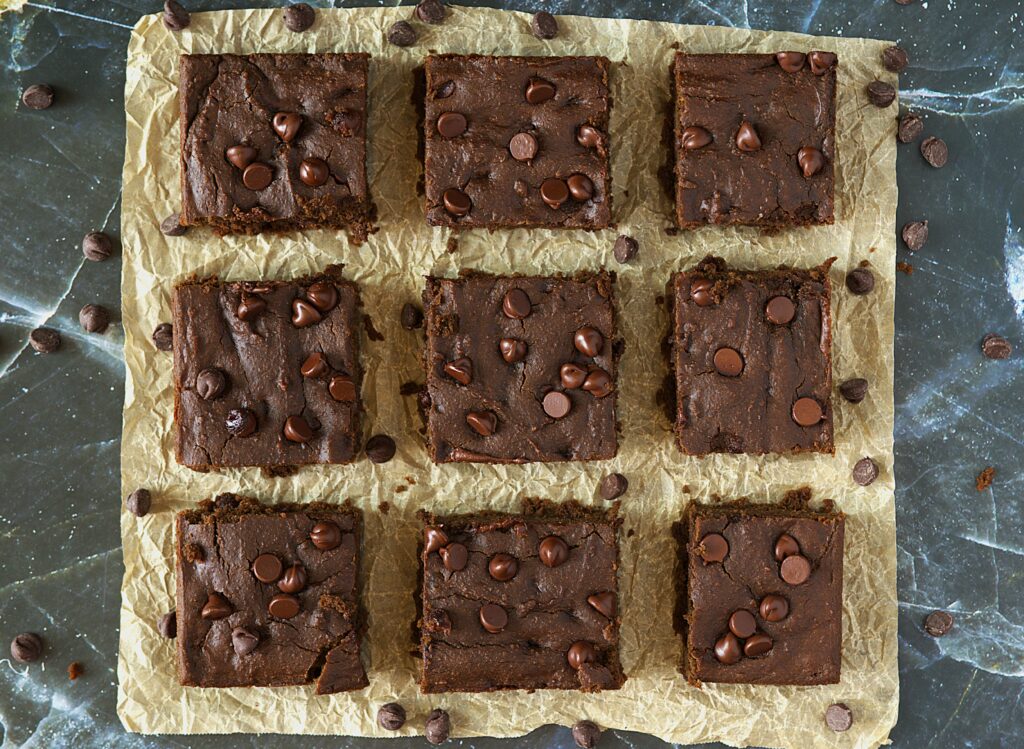
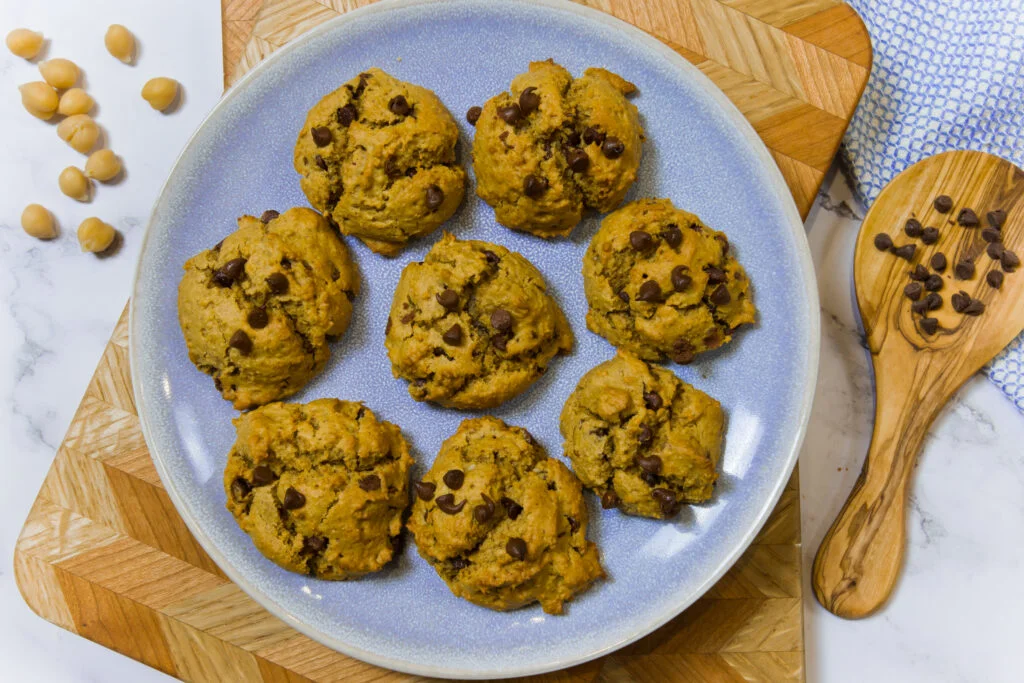
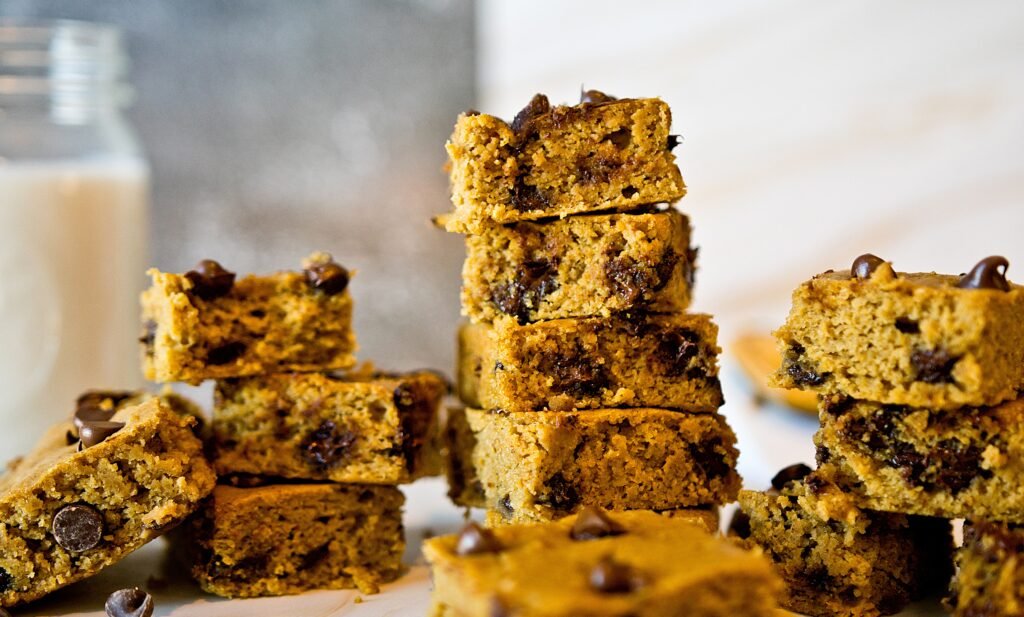
These fudgy Chickpea Brownies are packed with protein and made with simple ingredients like chickpeas, almond butter, and cocoa powder, naturally sweetened with maple syrup. Perfect for chocolate cravings, or when you want something delicious and good for you too—they’re easy to make, gluten-free, and loaded with chocolate chips.
Ingredients
UnitsScale
1 can, 15ozChickpeas, drained and rinsed
1/3cup Almond Butter
1Egg
1/2cupMaple Syrup
2 tbsp Brewed Coffee
1/2tspVanilla Extract
1/4cupAlmond Flour
1/4 Cocoa Powder
1/2tspBaking Powder
1/4tspBaking Soda
1/2tspKosher Salt
1/3cupChocolate Chips +2 tablespoons for top
Instructions
Preheat the oven to 350°F. Lightly spray an 8×8-inch baking pan with nonstick cooking spray and set aside.
In a food processor, combine all ingredients except the chocolate chips. Process until the batter is completely smooth, about 2–3 minutes.
Gently fold in ⅓ cup of chocolate chips using a spatula.
Spread the batter evenly in the prepared pan, tapping the pan lightly on the counter to level it. Sprinkle the remaining 2 tablespoons of chocolate chips on top.
Bake for 20–22 minutes, or until a toothpick inserted in the center comes out clean and the edges are lightly browned.
Allow the brownies to cool in the pan for at least 10 minutes before cutting into squares. Serve and enjoy.
This creamy pineapple coconut sorbet is bursting with tropical flavor—naturally sweetened with maple syrup and made with just four simple ingredients. It’s the perfect refreshing treat for hot days, no ice cream maker required!
Ingredients
UnitsScale
16oz Frozen Pineapple
1 Can, 14oz Canned Coconut Milk
2 tbsp Maple Syrup
1 tbsp Lime juice
Instructions
In the bowl of a food processor or blender, add the pineapple, coconut milk, maple syrup and lime juice.
Process for 1-2 minutes until the fruit mixture becomes smooth.
After the mixture becomes smooth and cohesive, put the sorbet into a freezer container and place into the freezer 5-6 hours to fully freeze.
When you are ready to serve, remove from the freezer, scoop into a pretty bowl and enjoy!
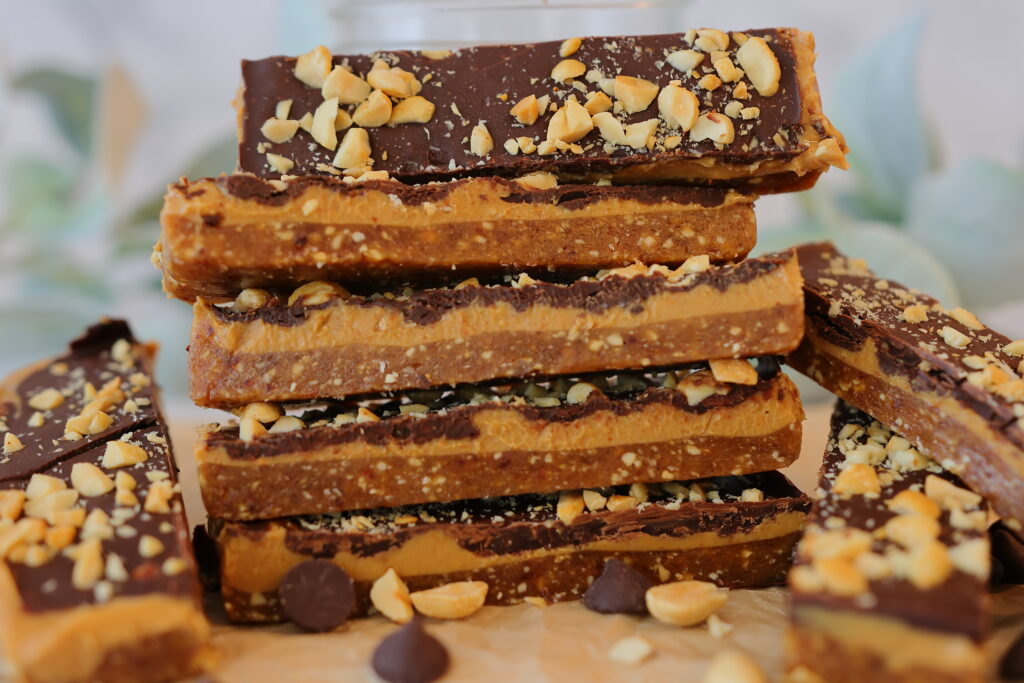
Healthy Date Snickers Bars are made with just 4 wholesome ingredients—dates, peanuts, peanut butter, and dark chocolate—for a naturally sweet, chewy, and satisfying treat. No baking, no added sugar, and no fuss. They’re the perfect better-for-you version of a classic favorite—great for meal prep, lunchbox treats, or an afternoon pick-me-up!
Ingredients
UnitsScale
1cup Pitted Dates
1/2cup + 2tbspPeanuts
2/3cupNatural Peanut Butter
1/2cupChocolate Chips
Instructions
Line a 9×5-inch loaf pan with parchment paper, leaving some overhang on the sides. Set aside.
Add the dates to a food processor and plus until broke down into small, pea-size pieces.
Add 1/2 cup of peanuts and process for 30 seconds to 1 minute until the mixture starts to stick together when pressed between your fingers. (Careful not to touch the blade!)
Transfer the mixture to the prepared pan and press it firmly and evenly into the bottom using your hands or the bottom of a measuring cup.
Spread the peanut butter evenly over the date layer.
In a microwave safe bowl, melt the chocolate chips in 25-second intervals, stirring between each, until smooth.
Pour the melted chocolate over the peanut butter layer and spread evenly with a spatula.
Finely chop the remaining 2 tbsp peanuts and sprinkle over the chocolate.
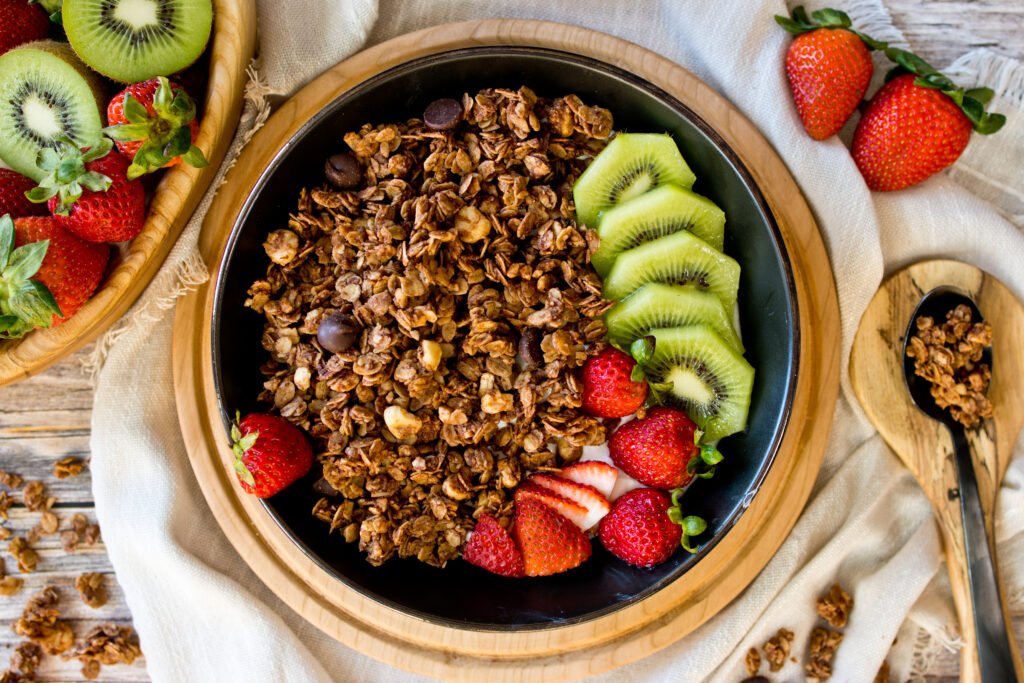
This Chocolate Hazelnut Protein Granola is made with hearty oats, crunchy hazelnuts, rich cocoa, and naturally sweetened with maple syrup. Packed with protein and simple, wholesome ingredients, it’s the perfect easy recipe for a healthy breakfast or snack.
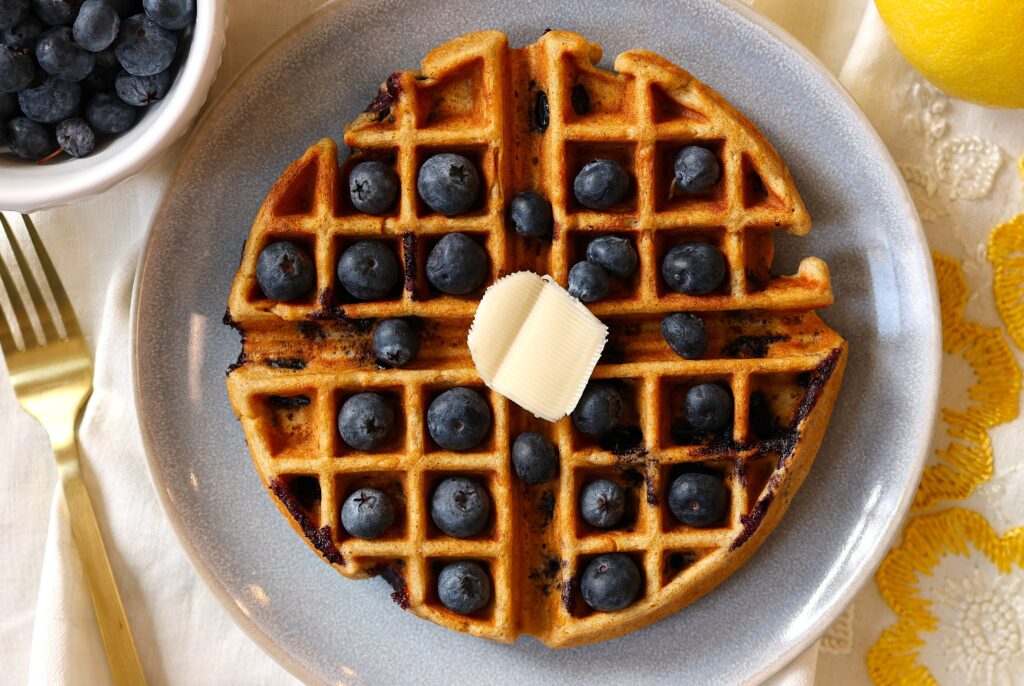
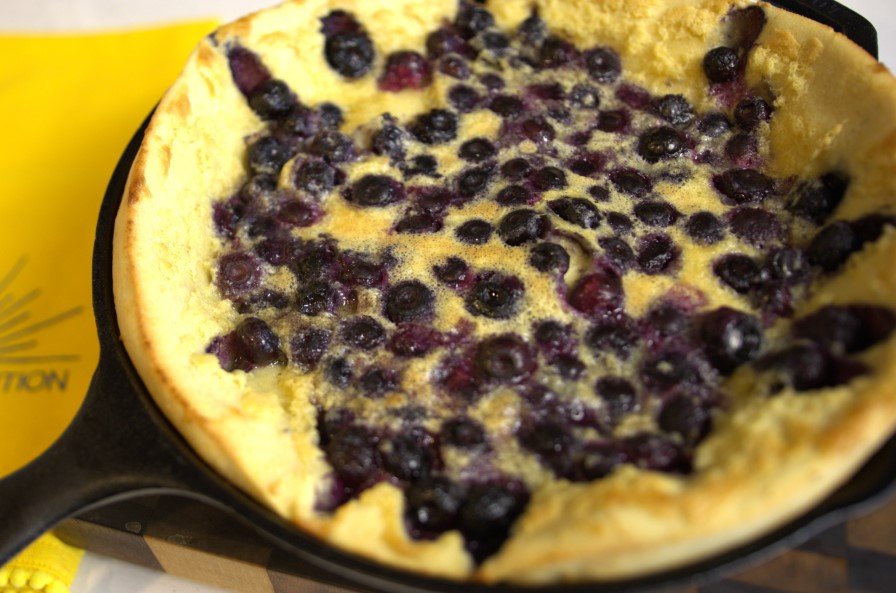
Protein-Packed Waffles are bursting with fresh blueberry and lemon flavor, delivering 21g of protein per waffle to keep you full and energized. These freezer-friendly waffles are perfect for meal prep and made with wholesome ingredients.
Preheat waffle iron, then move on to mixing up the waffle batter.
In a large bowl, add the eggs, Greek Yogurt, maple syrup, 1 tbsp milk, vanilla extract, lemon zest and lemon juice. Whisk together until combined and slightly frothy.
Then add in the dry ingredients. Oat flour, protein powder, baking powder, salt, cinnamon and cardamom. Whisk together until just combined.
Next, fold in the blueberries and add stir together with a spatula.
Cook the waffles according to your waffle maker settings. This batter will make 4 large Belgian-style waffles. Enjoy!
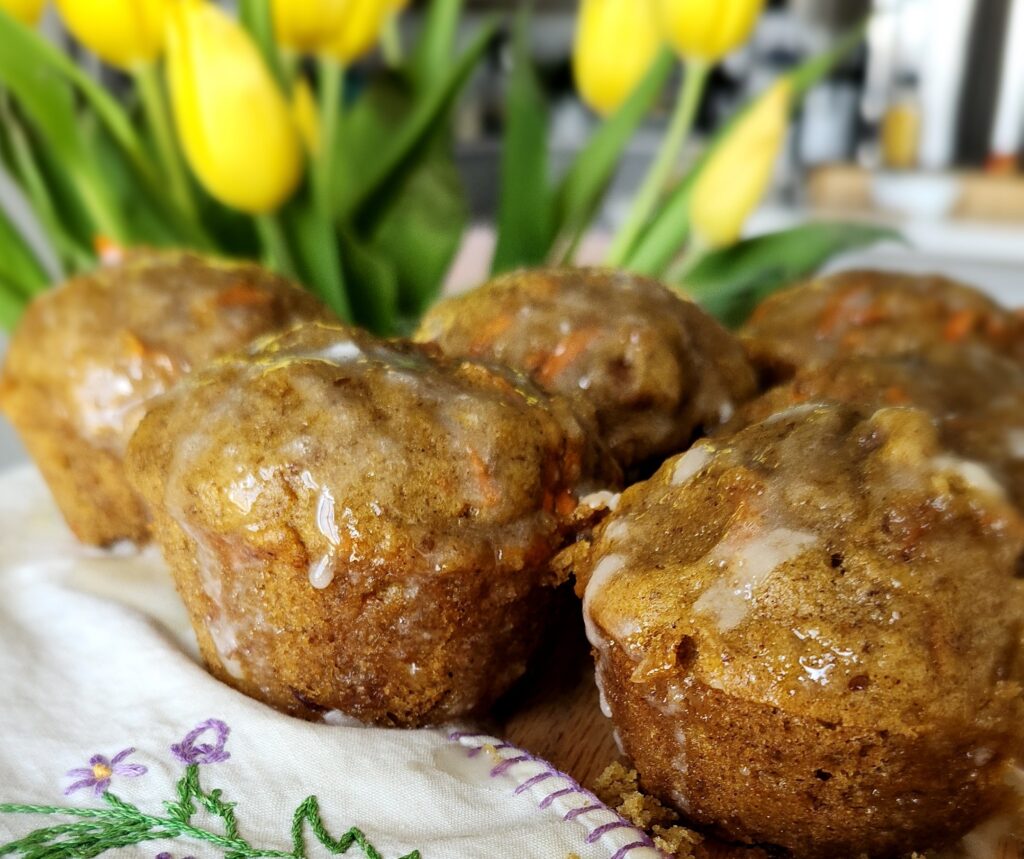
Whole Grain Carrot Cake Muffins are naturally sweetened and made with wholesome ingredients like oats, whole wheat flour, carrots, and olive oil. Perfect for breakfast, snacks, or lunchboxes, they deliver all the cozy flavors of carrot cake in a healthy, meal-prep-friendly muffin.
Ingredients
UnitsScale
Muffins:
3/4cupAll Purpose Flour
1/2cupOat Flour
1/2cupWhole Wheat Flour
2 tbsp Ground Flaxseed
1 tsp Baking Powder
1/2 tsp Salt
1 1/2 tsp Ground Cinnamon
1/2 tsp Cardamom
1/2cupOlive Oil
1/2cupHoney
1/2cupUnsweetened Applesauce
1cup Grated Carrot
2 Eggs
1 tsp Vanilla Extract
1/3cupWalnuts, chopped
Icing Glaze:
1/4cupPowdered Sugar
2 tsp Milk
Instructions
Preheat oven to 325° F. Spray a muffin pan with nonstick cooking spray and set aside.
In a large mixing bowl, add all the dry ingredients and whisk together (Oat Flour, AP Flour, Wheat Flour, Baking Powder, Baking Soda, Salt, Cinnamon, Nutmeg, Cardamom, Flaxseed).
In a medium mixing bowl add the wet ingredients and whisk to combine (Olive Oil, Honey, Applesauce, Carrot, Eggs, Vanilla Extract).
Next, pour the wet ingredients into the dry ingredients and mix together with a spatula. Take care to not over mix!
Add the chopped walnuts to the batter and stir to combine.
Spoon the batter evenly into 12 muffin cups.
Place muffin tray into the oven and bake for 20-25 minutes until the tops are golden brown and a toothpick inserted in the center of a muffin comes out clean.
Allow muffins to cool on a wire rack for 10 minutes.
While the muffins cool, prepare the glaze icing. In a small bowl whisk together the powdered sugar and 2 tsp milk. Using a spoon, drizzle the icing over top of each muffin. Enjoy!
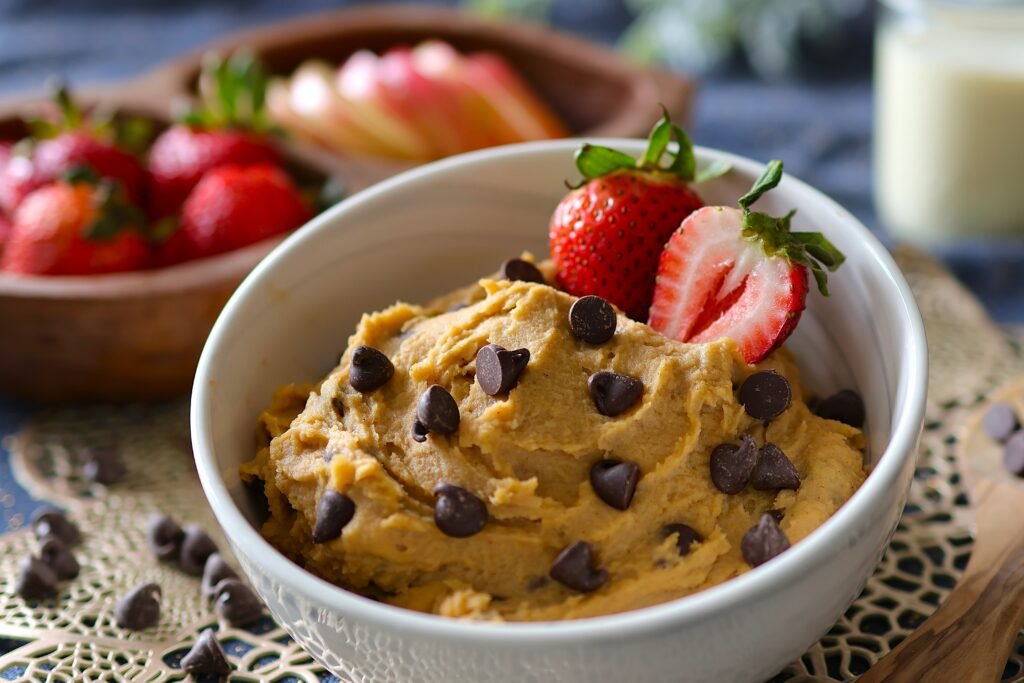
Chickpea Cookie Dough Dip is a deliciously creamy treat that tastes just like cookie dough—but with a nutritious twist! Made with chickpeas, nut butter, maple syrup, and vanilla, it’s naturally sweetened and packed with fiber. Enjoy it as a dip for fruit, spread it on toast, or grab a spoon and eat it straight from the bowl.
Ingredients
UnitsScale
1 Can, 15oz Chickpeas, drained and rinsed
1/4cupCashew Butter
1/4cupMaple Syrup
2 tsp Vanilla Extract
1/4 tsp Cinnamon
Pinch Kosher Salt
2 tbsp Almond Flour (or may sub oat flour)
1/3cupChocolate Chips
Instructions
Add all the ingredients except the chocolate chips to a food processor or blender. Process until smooth, about 2-3 minutes.
Remove the blade from your food processor.
Add the chocolate chips and stir into the dip with a spatula.
Transfer the dip to a serving dish.
Serve with your favorite fruit or crackers, enjoy!
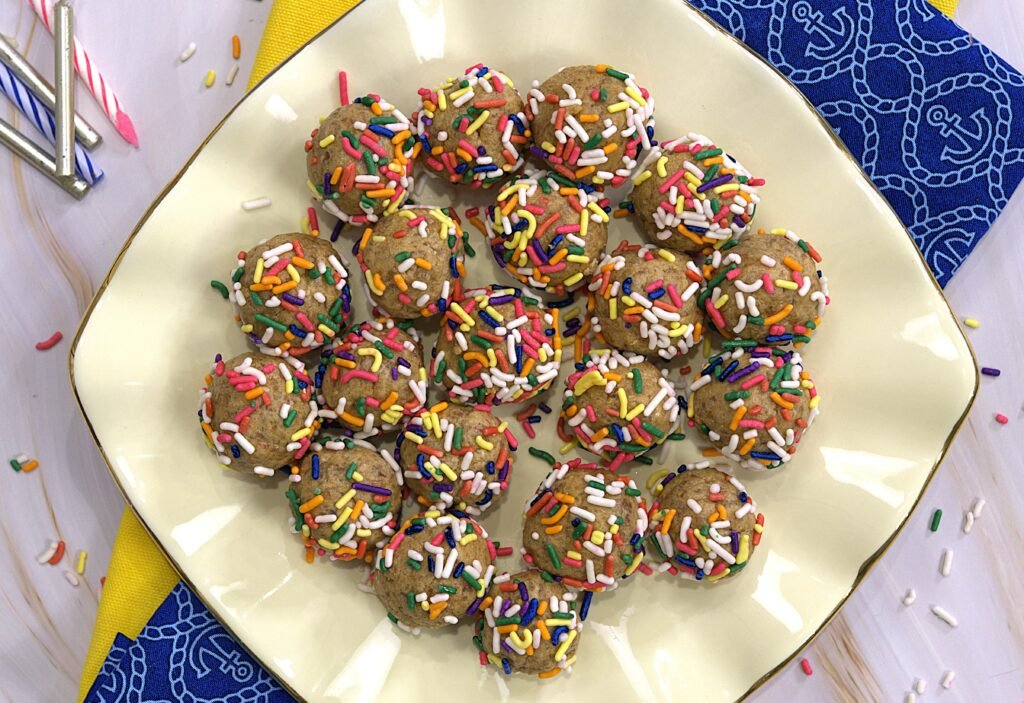
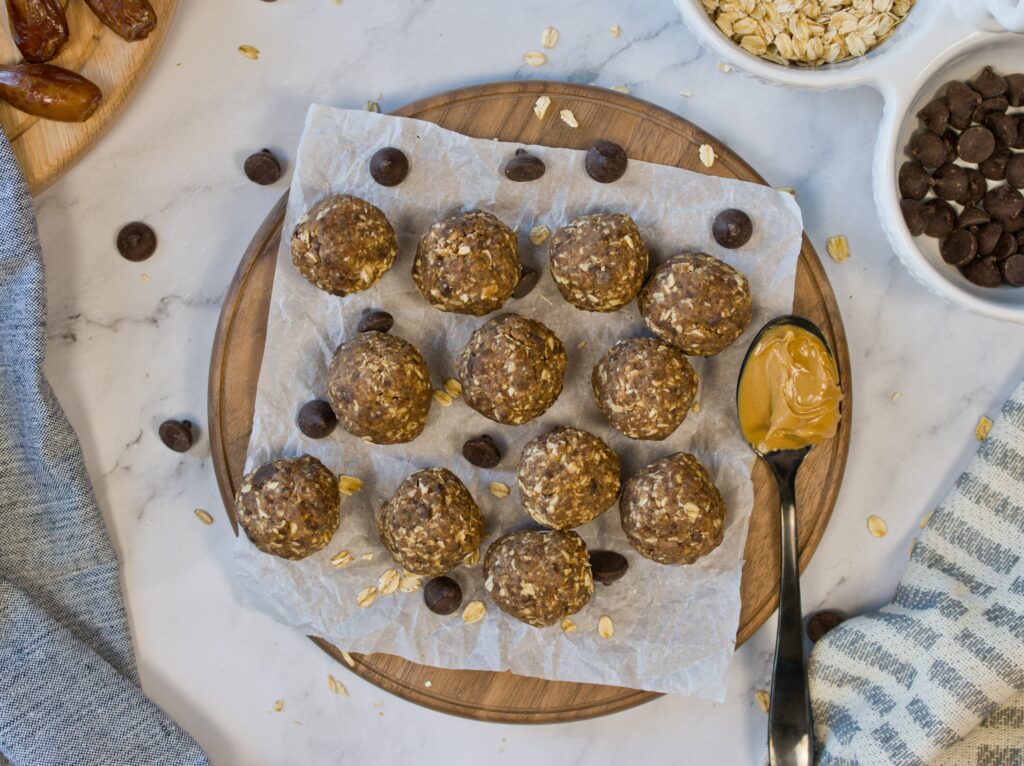
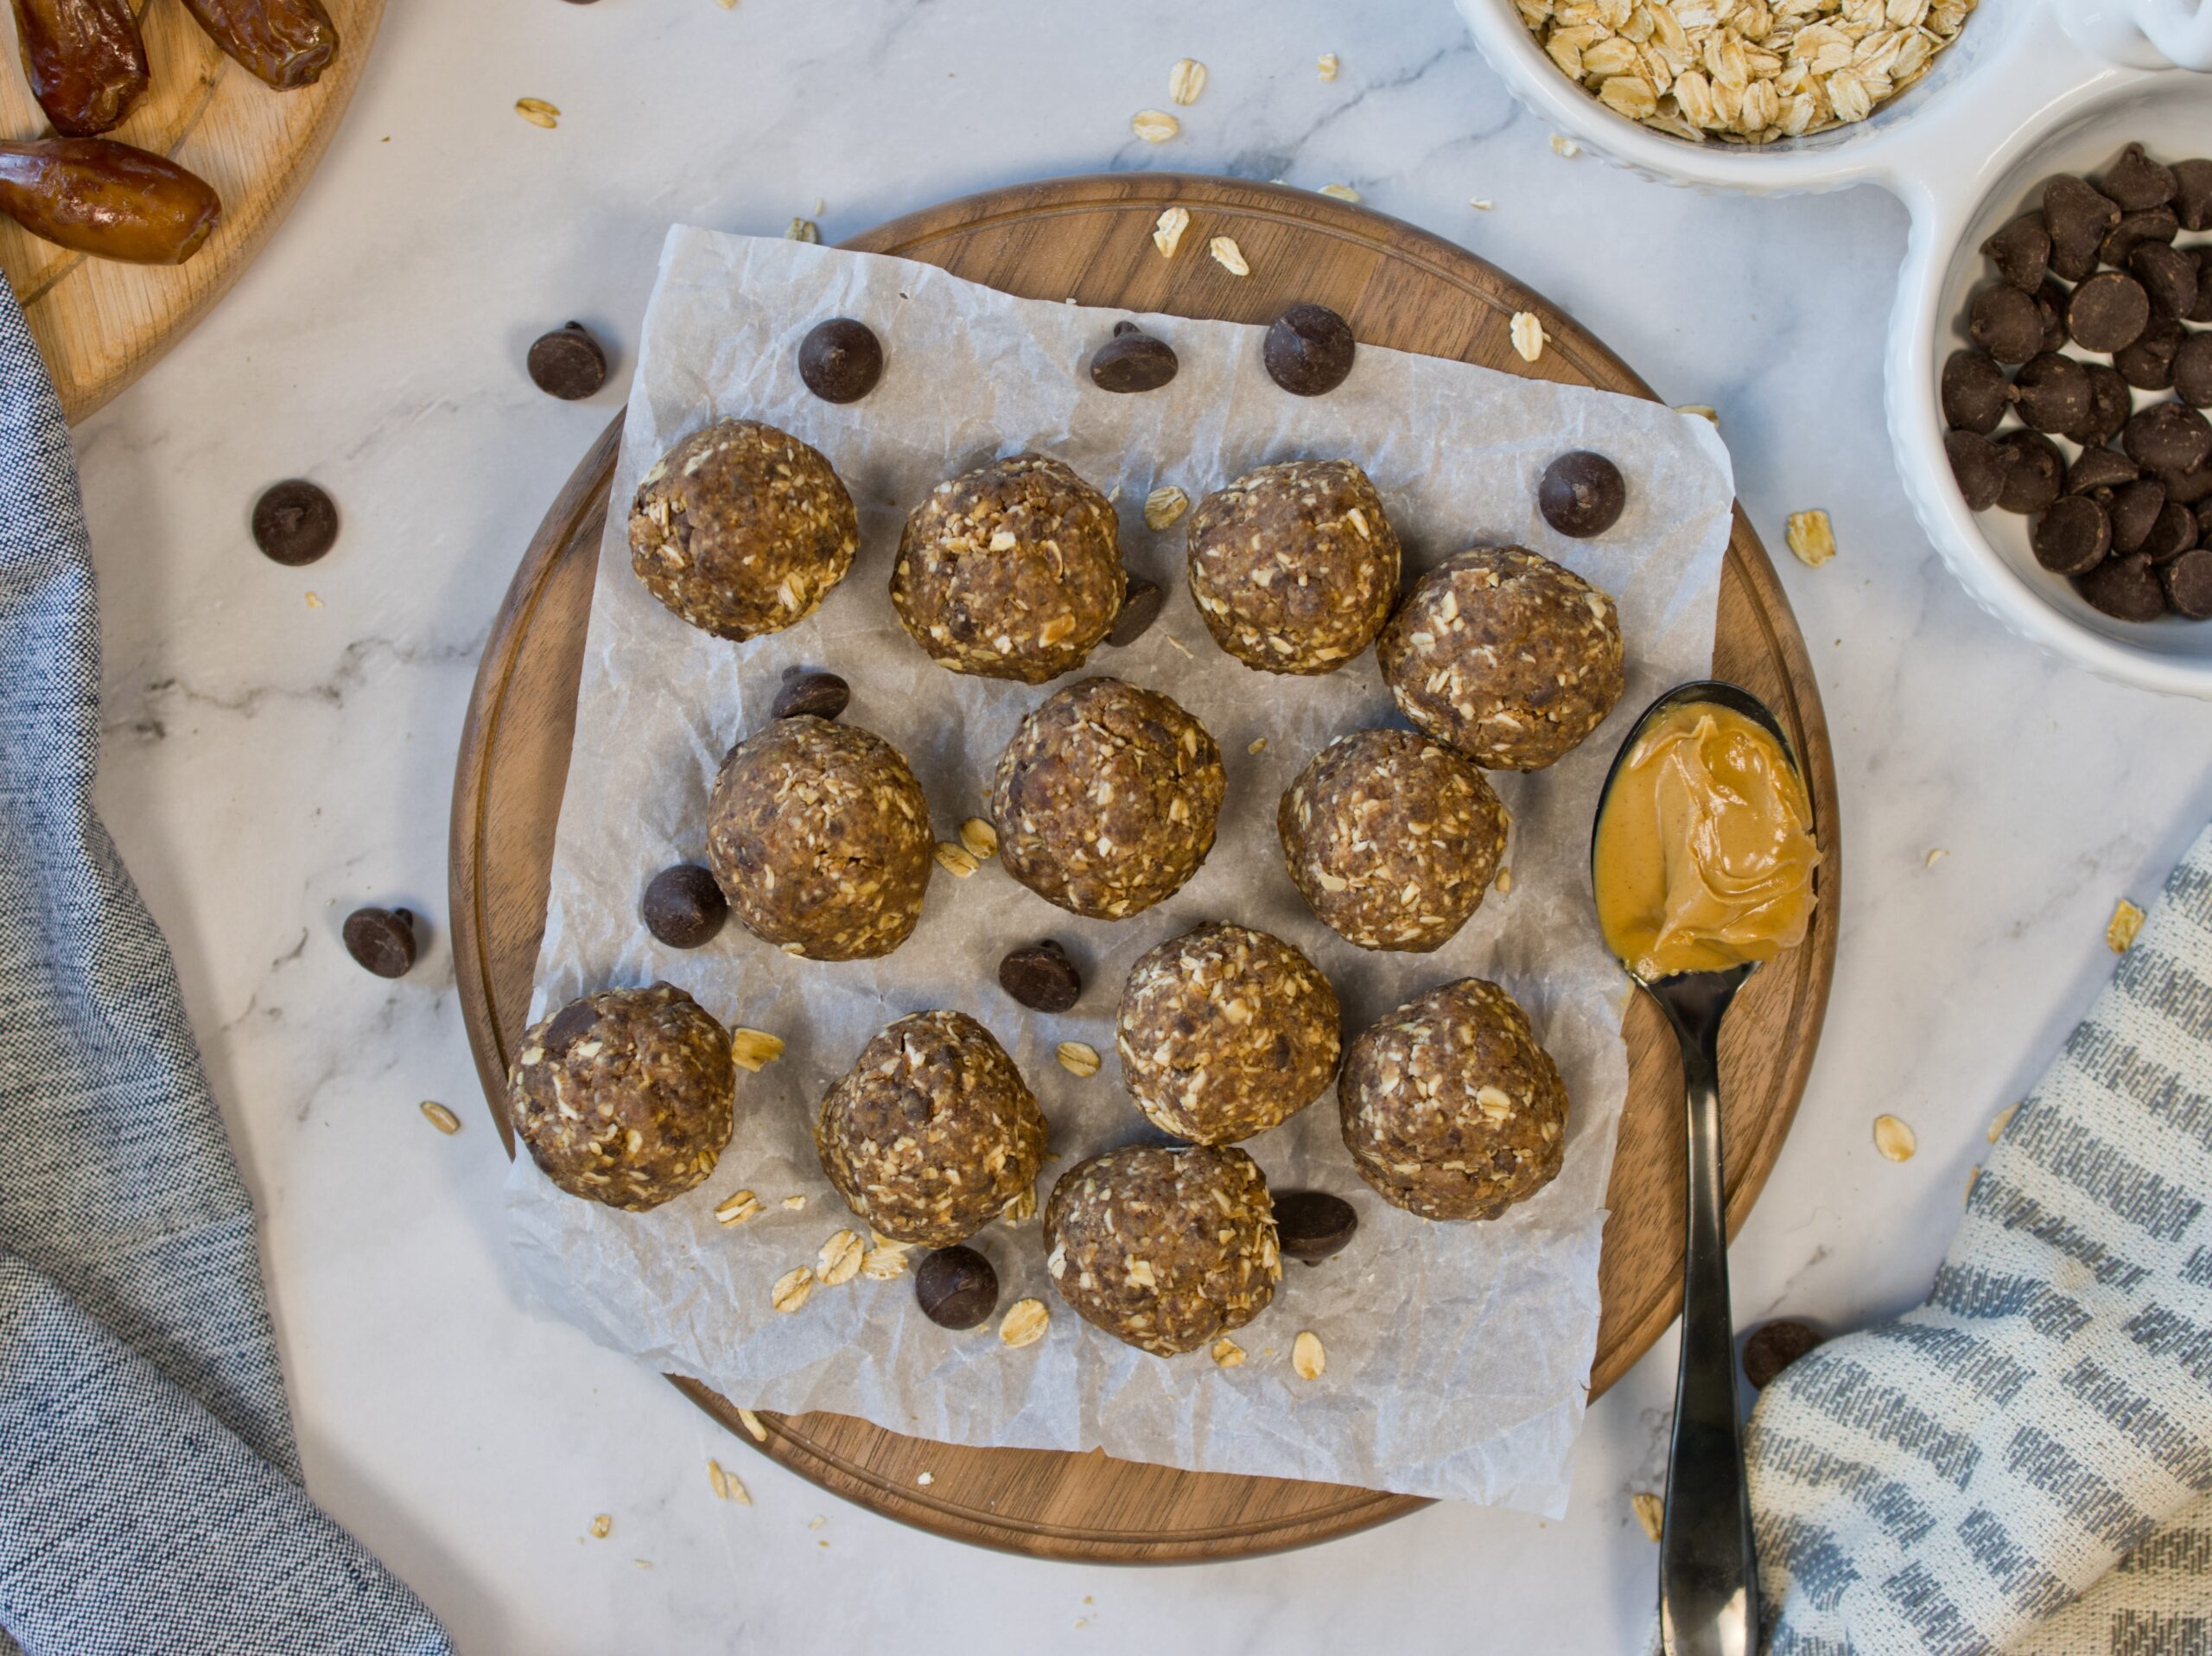
These Birthday Cake Energy Bites are a no-bake, high-protein snack made with dates, oats, nut butter, vanilla, and sprinkles for a healthy, funfetti-inspired treat. Perfect for meal prep, these gluten-free bites are quick, easy, and naturally sweetened!
Ingredients
UnitsScale
1cup Pitted Dates
1/2cupCashew Butter
1/4cupOat Flour
1/4cupVanilla Protein Powder
2 tsp Vanilla Extract
1/4cupSprinkles
Instructions
Add the dates to the bowl of a food processor. Process for 1-2 minutes until the dates are broken down into small pieces or form a ball.
Add the remaining ingredients (except for sprinkles) to the food processor. Blend until fully combined.
Using a 1-inch scoop or tablespoon, scoop out the mixture and then roll gently in your hands to form them into ball shape. This should yield about 14-16 energy bites.
Soft, spiced, and perfectly festive, these pumpkin roll-out cookies are a family favorite! Easy to cut into fun shapes and topped with a sprinkles for even more fun, they’re perfect for holiday baking or a cozy weekend treat.
Ingredients
UnitsScale
1/2cupUnsalted Butter, softened
1/2cupMaple Syrup
1/4cupBrown Sugar
1/2cupPumpkin Puree
1 tsp Vanilla Extract
1cupWhite Whole Wheat Flour
1 1/4cupAll Purpose Flour
3/4 tsp Baking Powder
2 1/2 tsp Pumpkin Pie Spice
1/4 tsp Kosher Salt
Instructions
In a medium sized mixing bowl, add the flours, baking powder, pumpkin pie spice and salt. Whisk together and set aside.
In the bowl of a stand mixer, add the wet ingredients: butter, maple syrup, brown sugar, pumpkin puree and vanilla extract. Mix on low, then increase the speed to medium and cream together the ingredients until light and fluffy.
Next, turn the mixer to low and slowly add the dry ingredients. Mix until the dough comes together.
Cover the dough with plastic wrap and refrigerate for at least 30 minutes.
Preheat your oven to 350 F.
Roll the dough out to about 1/4 inch thick. Using your cookie cutters, cut the cookies into your favorite shapes. (Top with sprinkles to jazz them up if you’d like!)
Place the cookies onto a silpat lined sheet tray.
Bake for 12-15 minutes until the cookies are set.
Remove from the oven and allow to cool on a wire rack. Enjoy!
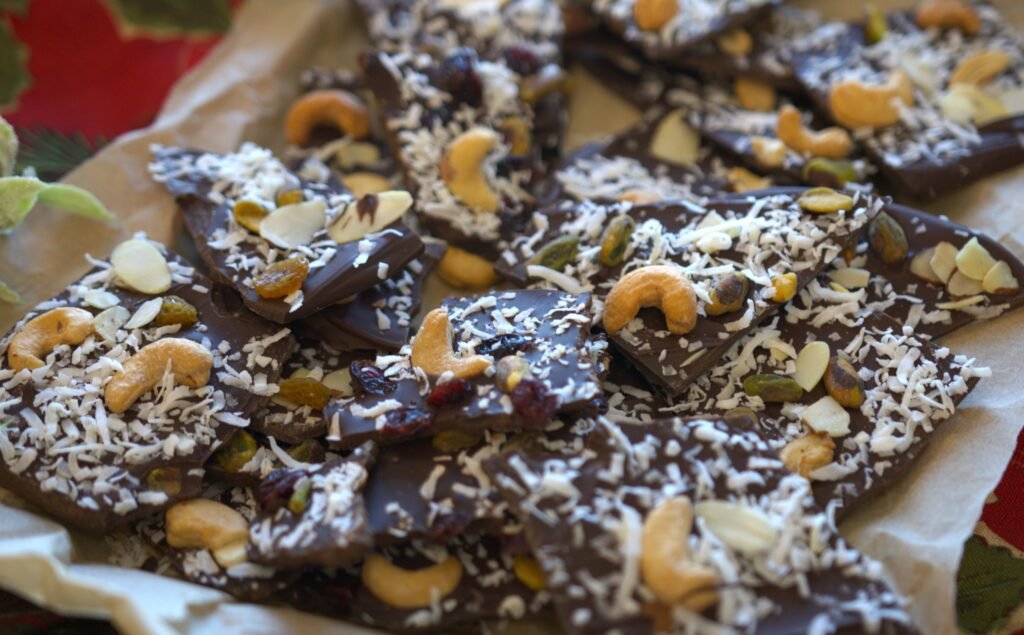
This chocolate bark is loaded with crunchy nuts and sweet dried fruit, it’s the perfect mix of sweet, salty, and satisfying. Easy to make, totally customizable, and a hit at any holiday gathering—or just for you with a cozy cup of cocoa.
Ingredients
UnitsScale
12ozChocolate Chips (choose your favorite, dark, semi-sweet or milk chocolate)
3/4cupNuts and/or Seeds (I like cashews, pistachios, slivered almonds, pepitas)
1/4cup Dried Cranberries or Cherries
1/4cupUnsweetened Shredded Coconut
Pinch Flaky Sea Salt
Instructions
Cover a large sheet tray with a silpat or parchment paper, set aside.
Melt the chocolate in a microwave safe bowl, on 30-second intervals, stirring in between each one. (You can also melt the chocolate in a heat-proof bowl over a saucepan of simmering water.)
Using a rubber spatula, pour the chocolate onto the center of the tray and spread it out evenly until it is about 1/4″ thick. It will likely not reach the edges of your sheet tray.
Sprinkle your toppings over top, the nuts/seeds, dried fruit, coconut and finally sea salt. Give the toppings a little press into the chocolate with the palms of your hands or back of a spatula.
Place the sheet tray into the fridge so that the chocolate can set for 15 minutes.
Once the chocolate has hardened, use your hands to break it into pieces. Enjoy!
Air Fryer Cookie Dough Chickpea Bites are a healthier, delicious twist on traditional cookie dough treats. Made with chickpeas for added protein and fiber, they’re crispy on the outside and soft on the inside, making them a great snack, or fiber-filled dessert treat!
Ingredients
UnitsScale
1 can, 15 oz Chickpeas, drained and rinsed
1/2cupPeanut Butter
1/3cupMaple Syrup
2 tsp Vanilla Extract
1 Egg
1 tsp Ground Flaxseed
1/2 tsp Kosher Salt
1/2 tsp Baking Powder
1/2 tsp Baking Soda
1/2 tsp Cinnamon
1/2cupOat Flour
1/3cupMini Chocolate Chips
Instructions
To a food processor or high-powered blender, add all the ingredients except the chocolate chips.
Process the dough until smooth, about 1-2 minutes.
Take the blade out of the food processor, or alternatively pour the dough into a bowl, then add the chocolate chips and stir into the batter with a spatula.
Preheat your air fryer to 350° F.
Cut a piece of parchment paper to fit inside your air fryer and lightly coat it with nonstick spray.
Scoop 1-tablespoon portions of dough and place them in the air fryer, leaving about 2 inches of space between each.
Air fry on 350° F for 7-10 minutes, depending on your air fryer.
Allow to cool for 10 minutes before digging in, enjoy!
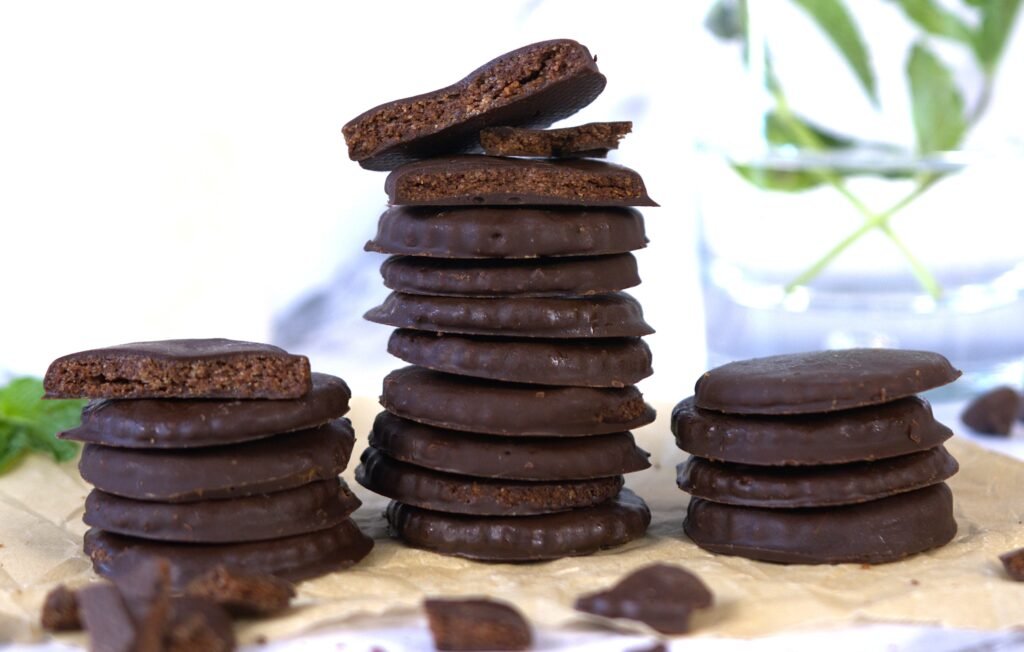
Homemade Thin Mint Cookies are even better than the Girl Scout’s version! A perfect crisp cookie center with a delicious chocolate peppermint coating, now you can have Thin Mint Cookies anytime of the year!
Ingredients
UnitsScale
Cookie Wafer:
1 1/2cupAlmond Flour
1/4cupCocoa Powder
1/2 tsp Xanthan Gum
Pinch Salt
3 tbsp Unsalted Butter
4 tbsp Maple Syrup
1 tbsp Water
3/4 tsp Peppermint Extract
Chocolate Coating:
1cupDark Chocolate Chips
2 tsp Coconut Oil
3/4 tsp Peppermint Extract
Instructions
Preheat oven to 350° F. Cover a sheet tray with a silpat or parchment paper and set aside.
In a medium-sized mixing bowl, add the almond flour, cocoa powder, Xanthan Gum and salt. Whisk to combine.
Slice the butter into small cubes and add to the dry ingredients. Using a fork or pastry cutter, cut the butter into very small pieces into the almond flour mixture (smaller than pea size!). Then add the maple syrup, water and peppermint extract and stir together with a spatula.
Form the dough into a disc, wrap in plastic wrap and place into the refrigerator for 15 minutes. This helps to make rolling the cookies out much easier!
After 15 minutes, remove the dough from the refrigerator and place onto your work surface. Place a piece of parchment paper or plastic wrap over the dough, then roll it out, this makes rolling much easier! Roll the dough out to about 1/8″ thick.
Next, use a 2″ circle cutter, cut out the cookies and place onto your prepared sheet tray.
Bake for 12-17 minutes. (Be sure to check the cookies at 12 minutes, you want them to be crispy but don’t allow them to burn!) Allow cookie wafers to cool completely.
While the cookie wafers cool, make the chocolate coating. To a microwave safe bowl add the dark chocolate chips and coconut oil.
Microwave on 25 second intervals, stirring in between each, until the chocolate is just melted. Then add in the peppermint extract and stir to combine.
Take a chocolate wafer, dip into the melted chocolate coating, turning the wafer to coat the entire cookie. Let any excess chocolate drip off into the bowl and place the cookie onto your prepared sheet tray with a silpat or parchment paper.
Continue with remaining wafers, coating each in chocolate.
Place the coated cookies into the freezer for 10 minutes or refrigerator for at least 15 minutes to allow the chocolate to set.
Store the cookies in an airtight container in the freezer or refrigerator, however you like your thin mints! Enjoy!
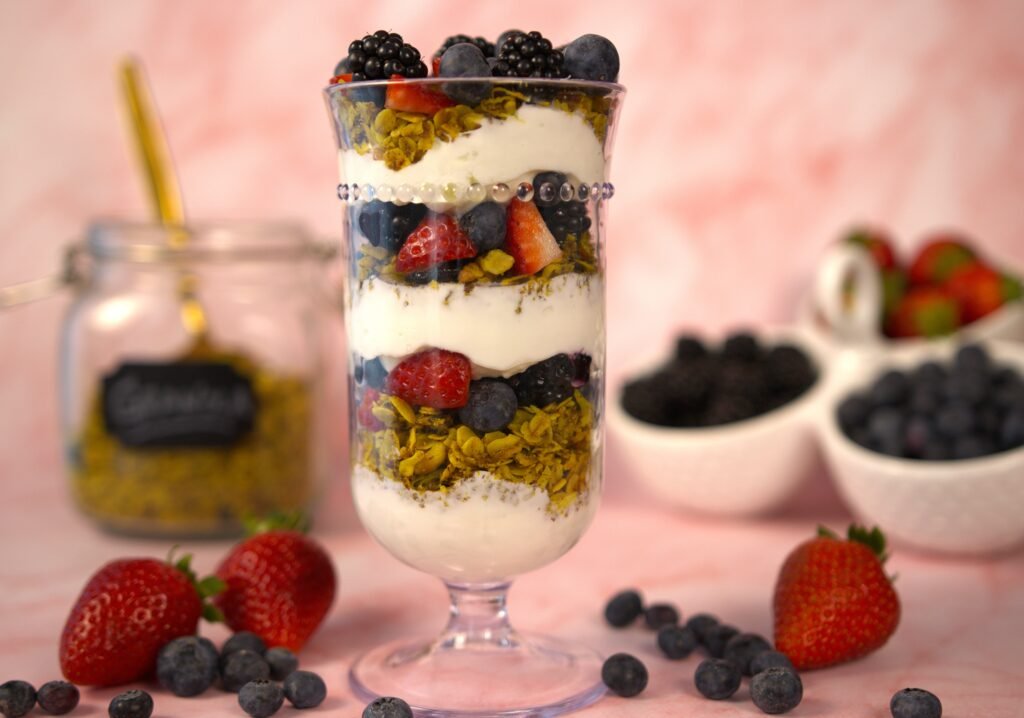
Berry Parfait is nutrient-packed breakfast, dessert or snack! This anti-inflammatory recipe is easy-to-make with layers of fresh berries, Greek yogurt, and crunchy granola.
Ingredients
UnitsScale
3/4cupGreek Yogurt
1/3cupGranola
1/2cupMixed Berries (Strawberries, Blueberries, Blackberries, Raspberries- choose your favorites!)
Instructions
To a tall glass or mason jar, add 3 spoonfuls of yogurt.
Top with 3 spoonfuls of granola.
Top with a mixture of your favorite berries, creating an even layer on top of the granola.
Repeat with remaining ingredients, finishing with berries on top. Enjoy!
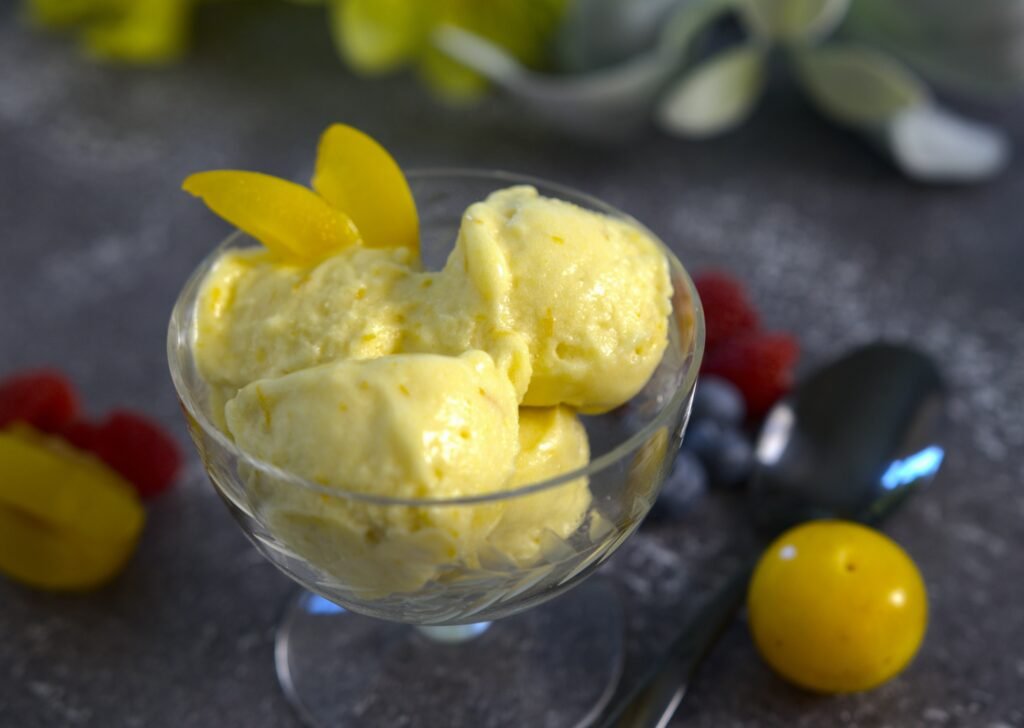
Bright and refreshing, this plum sorbet combines ripe sorriso plums with a touch of lemon juice and a hint of honey for a delicious, summer treat. This recipe was developed for the Black Forest Farmer’s Market.
Ingredients
UnitsScale
1 1/2– 2lbsRipe Sorriso Plums
2 tsp Lemon Juice
1/2cupMaple Syrup
1/2cupWater
Instructions
Halve, pit and cut plums into 1 1/2-inch dice. Place diced plums into a large sauce pan.
To the sauce pan add maple syrup and lemon juice.
Cover and bring to a simmer. Then, simmer uncovered for 8 minutes. Remove from heat and allow mixture to cool to room temperature.
In a food processor or blender, blend the mixture until smooth. Then place the mixture into a container and chill for at least 2 hours.
When the sorbet mixture is completely chilled, freeze the mixture using an ice cream maker, according to your machine’s directions.
Once frozen, scoop into bowls and enjoy! Or place the frozen sorbet into a freezer-safe container and keep in the freezer until ready to enjoy.
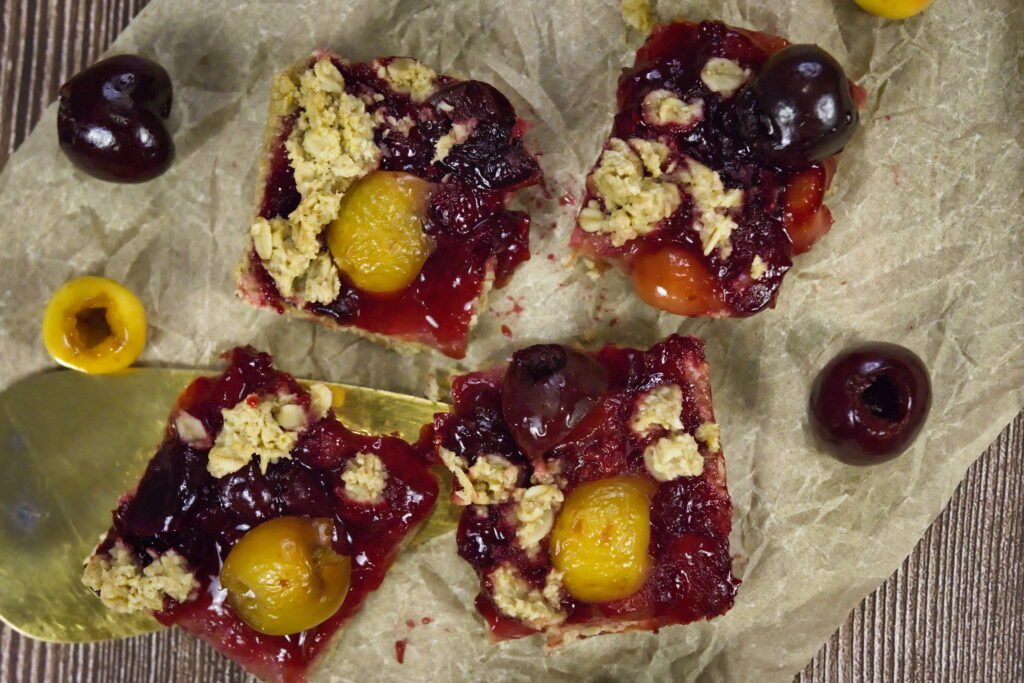
Fresh cherry and oatmeal bars. The perfect dessert or grab & go snack that is packed full of antioxidants and fiber! This recipe was developed for the Park Union Farmer’s Market.
Ingredients
UnitsScale
Oatmeal Crumb:
1 3/4cupOat Flour
1 1/4cupOld Fashioned Oats
1 1/2 tsp Cinnamon
1/4 tsp Salt
1/4 tsp Baking Powder
1/2cupCoconut Oil
1/2cupApplesauce
1/3cupMaple Syrup
1 tsp Vanilla Extract
1 tsp Lemon Zest
Cherry Filling:
3cups Pitted Cherries
2 tbsp Maple Syrup
1 tbsp Lemon Juice
2 tsp Cornstarch
Instructions
Preheat oven to 350° F. Grease a 9×13 dark pan with nonstick spray. Set aside.
In a small sauce pan, add the cherry filling ingredients, pitted cherries, maple syrup, lemon juice and cornstarch. Turn the heat to medium and bring the mixture to a low boil.
In a large mixing bowl, add the oat flour, oats, cinnamon, baking powder and salt. Whisk together to combine.
Next add the liquid ingredients, coconut oil, applesauce, maple syrup, vanilla extract and lemon zest.
Using a spatula, stir the crumb mixture together.
Set 3/4 cup of the mixture aside for the topping.
Pour the remaining mixture into your prepared pan and spread evenly, pressing down with a spatula to ensure crumb crust cooks evenly.
Par bake the crumb crust! Pop into the oven and bake for 10 minutes. This helps to get a slightly crispy bottom to your bars.
After 10 minutes, remove the pan from the oven and spread the cherry filling evenly over top of the crumb crust. Top with the remaining filling by dropping small teaspoon size bits over top the cherry filling.
Place the pan back into the oven and bake for an additional 20-25 minutes.
Remove from the oven and allow to cool fully before slicing. Enjoy!
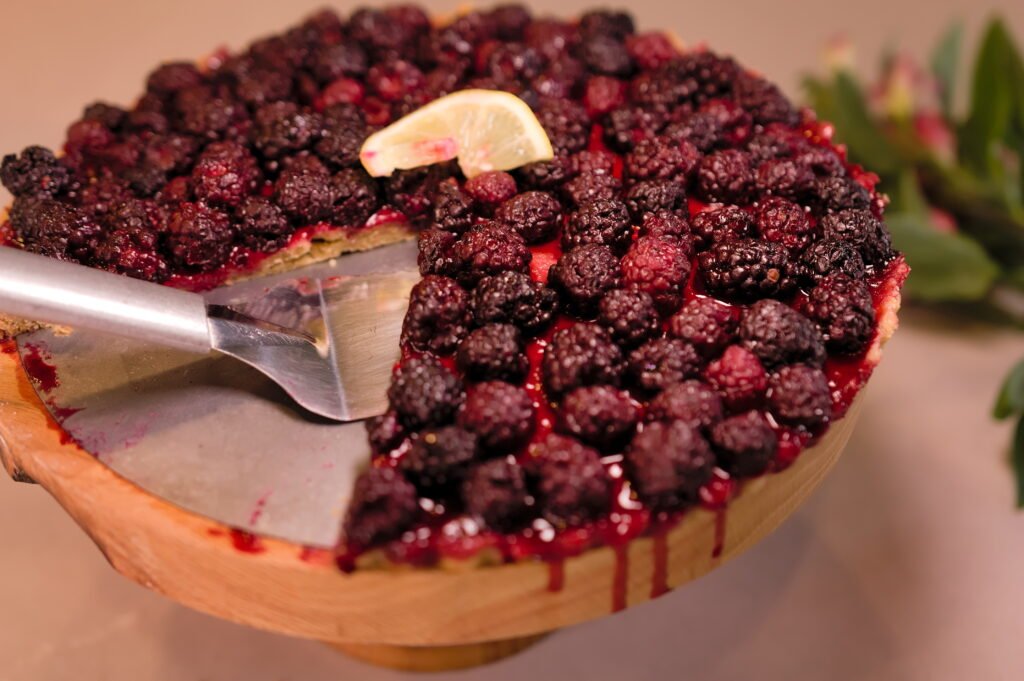
This healthy blackberry tart features a delicate olive oil crust, tart blackberries and fresh lemon for a show-stopper summertime treat!
Ingredients
UnitsScale
Tart Dough:
1/2cupWhole Wheat Flour
3/4cupAll Purpose Flour
2 tbsp Brown Sugar
2 tsp Lemon Zest (zest from 1 medium-sized lemon
1/3cupOlive Oil
1 Egg
1/4 tsp Kosher Salt
3–4 tbsp Ice Water (as needed to bring dough together)
Tart Filling:
16ozBlackberries (fresh or frozen)
5 tsp Lemon Juice
3 tbsp Sugar
1 tbsp All Purpose Flour
1 tbsp Coarse Sugar (optional for topping)
Instructions
Preheat your oven to 400°F
Spray a tart pan or pie pan with nonstick spray, set aside.
In the bowl of a food processor add all the dough ingredients except water. Pulse together for 10-15 seconds to mix the dough. If the dough seems very crumbly, add ice water, 1 tablespoon at a time to bring the dough together. It should stay together when you pinch with your fingers.
Grab you pie or tart pan and place your dough into the pan. Using your hands or the bottom of a measuring cup, press the dough evenly into the pan. Start at the center of the pan and work your way out to evenly distribute the dough around the entire pan and slightly up the edges, just as you would a pie crust. Refrigerate your dough while you mix up the filling.
In a medium size bowl, add the blackberries, lemon juice, sugar and flour. Mix together gently with a spatula.
Remove your tart crust from the refrigerator and pour the blackberry filling into the crust. Give the pan a gentle shake back and forth to evenly distribute the blackberries. Top the berries with 1 tablespoon of coarse sugar.
Place the tart pan onto a sheet tray (this is a must if you do not want to spend the next day cleaning your oven!) and place into the oven.
Bake at 400° F for 30 minutes.
Remove from the oven and allow to cool at least 10 minutes before digging in. Enjoy!
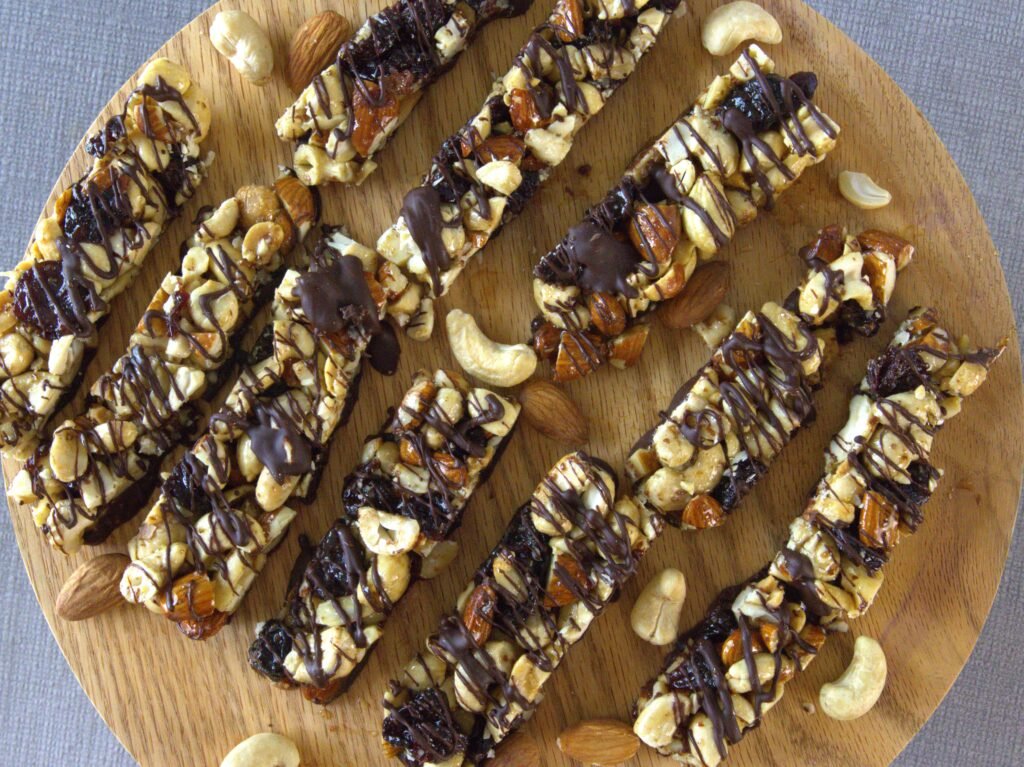
Preheat oven to 325° F. Line an 8×8 inch baking pan with parchment paper and set aside.
In a large mixing bowl, add the nuts, cherries and flaxseed and stir together with a spatula.
Set a small sauce pan over medium-low heat and add the honey and maple syrup. Cook until the liquid just starts to simmer. Remove from heat.
Pour the liquid mixture over the nuts and stir with a spatula to combine. Then pour the mixture into your prepared pan. Working quickly, press the mixture evenly into the pan. (It helps to place another piece of parchment paper over top to press evenly and avoid getting your hands sticky!)
Place into the oven and bake for 15 minutes.
Remove from the oven and allow to cool for 15 minutes on a wire rack. Then place into the refridgerator to fully cool for 15 minutes.
Just before the 15 minutes are up, make the chocolate for the bottom and deocrative topping.
In a medium sized microwave safe bowl, add the dark chocolate chips and coconut oil. Microwave on 25 second intervals, stirring in between each, until the chocolate is just melted.
Remove the bars from the refrigerator and place parchment onto a cutting board. Using a sharp knife, slice the bars into 16 equal portions.
Set a silpat out on a large sheet tray.
Using an spatula or spoon, spread a thin layer of chocolate onto the bottom of each bar. Place onto the silpat. Continue with remaining bars.
Using the remaining chocolate, drizzle chocolate over top of the bars for a decorative finish.
Place the bars back into the refrigerator for the chocolate to fully harden. Bars will keep in an airtight container for 5-7 days. Enjoy!
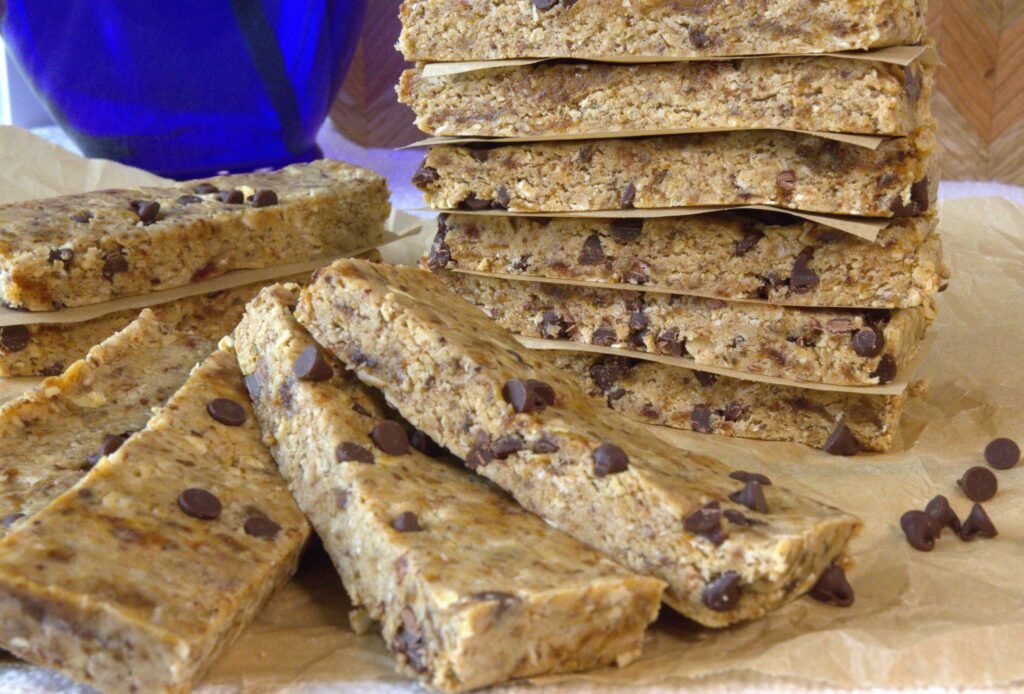
Make your own homemade, no-bake Chocolate Chip Clif Bars!
Ingredients
UnitsScale
1cup Pitted Dates
1cupOld Fashioned Oats
1cupCrisp Rice Cereal
2 Scoops Vanilla Protein Powder
2 tbsp Ground Flaxseed
1/2 tsp Ground Cinnamon
1/8 tsp Salt
1/2cupCashew Butter
1/4cupHoney
1 tsp Vanilla Extract
1/4cupMini Chocolate Chips
Instructions
Set out an 8×8 baking pan and line with parchment paper, set aside.
In the bowl of a food processor, add the dates and process until they are broken down into very small pieces.
Next, add the remaining ingredients (except chocolate chips) the oats, rice cereal, protein powder, flaxseed, cinnamon, salt, cashew butter, honey, vanilla. Process again for 20 seconds.
Remove the blade from the food processor. Add in the mini chocolate chips and stir with a spatula.
Pour the mixture into your prepared pan and press evenly with your hands or the back of a measuring cup.
Place the pan into the refrigerator to set for at least 30 minutes.
After 30 minutes, remove the pan from the refrigerator. Lift out the parchment paper and place onto a cutting board.
Cut the bars into 12 equal sections. Store in an airtight container in the refrigerator. Enjoy!
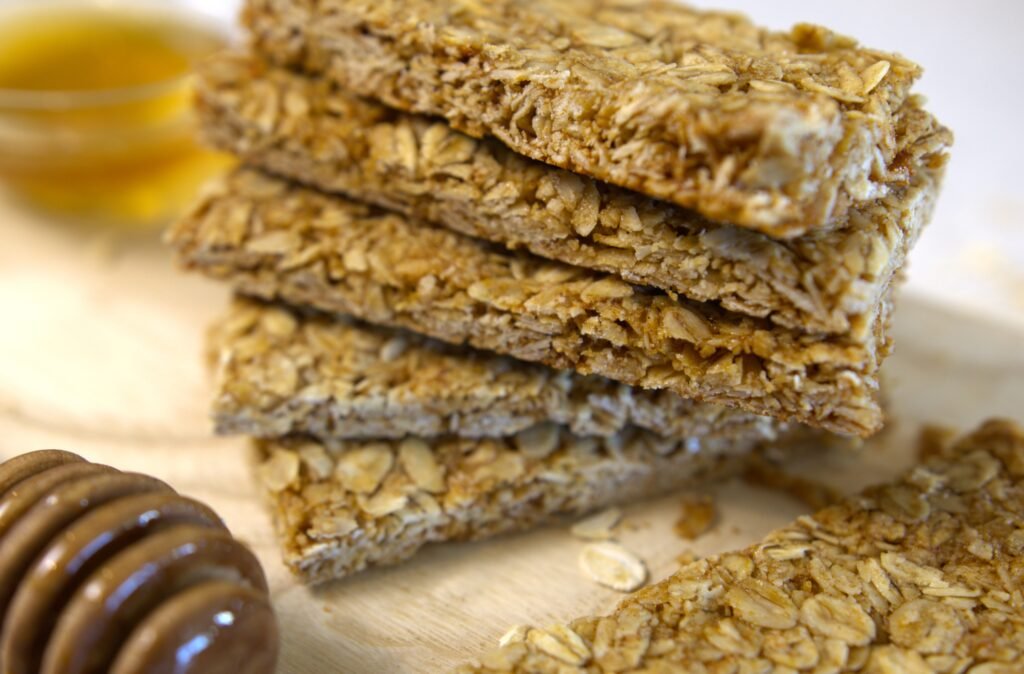
These bars are a homemade version of Nature Valley Oats ‘n Honey Bars made with wholesome oats, honey and simple pantry ingredients.
Ingredients
UnitsScale
1 1/2cupsOld Fashioned Oats
1/3cupOat Flour
1/2 tsp Ground Cinnamon
1/4 tsp Baking Soda
1/8 tsp Salt
3 tbsp Coconut Oil
3 tbsp Honey
2 tbsp Brown Sugar
1 tsp Vanilla Extract
Instructions
Preheat oven to 350 F. Line an 8×8 inch baking dish with parchment paper. Set aside
In a small sauce pan, add the coconut oil, honey and brown sugar. Heat on medium low until the coconut oil has melted and the brown sugar dissolves into the mixture. Remove from heat.
In a large mixing bowl, add the oats, oat flour, cinnamon, baking soda and salt.
Next, pour the liquid ingredients into the bowl with the oats and stir with a spatula to combine.
Pour the mixture into your prepared pan and spread evenly with a spatula.
Bake for 15-18 minutes until the bars are slightly browned.
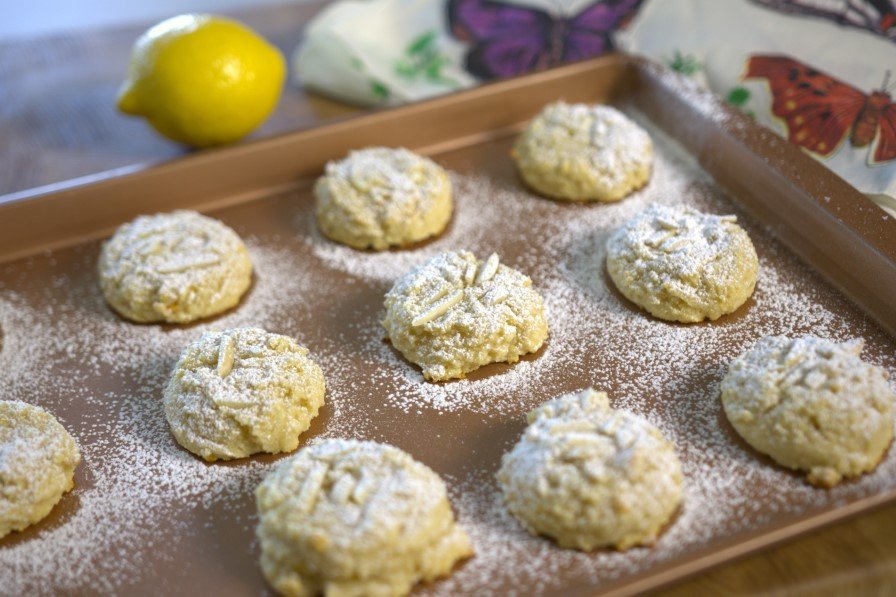
Almond lemon cookies are moist, light and gluten-free goodness!
Ingredients
UnitsScale
1 1/2cupsAlmond Flour
1/3cupHoney
1/8 tsp Baking Soda
1 Medium Sized Lemon, Zested and Juiced
1 Large Egg White
2 tbsp Powdered Sugar
2 tbsp Slivered Almonds (optional)
Instructions
Preheat oven to 350° F. Get out a baking sheet and set aside.
Place the egg white into a small bowl and beat with a fork until slightly frothy. Set aside.
In a medium-sized mixing bowl add the almond flour, lemon zest, lemon juice, honey, baking soda, and egg white. Stir together with a spatula. The mixture should resemble wet sand.
Using a 1 1/2 inch scoop, scoop the dough and place onto the baking sheet. Continue until all dough has been used.
Sprinkle each raw cookie with a few slivered almonds and gently press the cookies with your hands to flatten them every so slightly.
Place the tray into the oven and bake the cookies for 12 minutes until just golden on the edges. You do not want to over cook!
After 12 minutes, allow the cookies to cool on a wire rack for at least 10 minutes.
These protein granola bars are a great snack or pre-workout boost. Plus they are nut-free!
Ingredients
UnitsScale
1 1/2cupsOld Fashioned Oats
1/4cupOat Flour
1/3cupProtein Powder
2 tbsp Flaxseed + 2 tbsp water
1/4 tsp Salt
1/2 tsp Ground Cinnamon
3 tbsp Mini Chocolate Chips
1/4cupCoconut Oil
1/4cupHoney
1 tsp Vanilla Extract
Instructions
Preheat oven to 350 F. Line a 10×4″ pan (bread/loaf pan) with parchment paper and set aside.
In a small bowl, mix together the flaxseed and water. Allow the flaxseed to soak up the water while you mix the remaining ingredients.
To a large mixing bowl add the oats, oat flour, protein powder, and salt. Mix together with a wooden spoon or spatula.
To a microwave safe bowl, add the coconut oil and heat on 20 second internals until melted. Then add the honey and vanilla extract and stir to mix. Then add the flaxseed water mixture and stir together.
Next, pour the coconut oil mixture into the oat mixture and stir together. Add the mini chocolate chips and stir again. The mixture should resemble wet sand.
Using a spatula, scoop the mixture into your prepared pan, spreading it evenly throughout the pan. Then, using your hands, the spatula or the bottom of a measuring cup press the dough firmly and evenly into the pan.
Place into the oven and bake for 10-12 minutes until slightly browned on top.
Allow the pan to cool on a wire rack for at least 10 minutes. Remove the parchment paper from the pan and allow the granola bars to cool on the wire rack for another 15 minutes until fully cooled.
Using a knife, cut the bars into 8 servings. Enjoy!
Optional Topping:
In a microwave safe bowl add 1 tbsp chocolate chips and 1/2 tsp coconut oil. Microwave on 20 second intervals until melted.
Using a spoon, drizzle the melted chocolate across the tops of the bars. Allow to cool for the chocolate to set.
Carrot Cake Quick Bread combines the flavors of classic carrot cake with a healthy twist. Packed with shredded carrots, warm spices, and a touch of sweetness, it’s the perfect treat for breakfast, snack time, or a light dessert!
Ingredients
UnitsScale
Carrot Cake Bread:
3/4cupAll Purpose Flour
1/2cupOat Flour
1/2cupWhole Wheat Flour
1 tsp Baking Powder
1/2 tsp Baking Soda
1/2 tsp Salt
1 1/2 tsp Ground Cinnamon
1/2 tsp Nutmeg
1/2 tsp Cardamom (Optional)
2 Tbsp Ground Flaxseed
1/2cupOlive Oil
1/2cupHoney
1/2cupUnsweetened Applesauce
1cup Grated Carrot
2 Eggs
1 tsp Vanilla Extract
1/3cupWalnuts, chopped
Icing Glaze:
1/4cupPowdered Sugar
2 tsp Milk
Instructions
Set out all ingredients and equipment needed for happy baking!
Preheat oven to 325° F. Spray a bread pan with nonstick cooking spray and set aside.
In a large mixing bowl, add all the dry ingredients and whisk together (Oat Flour, AP Flour, Wheat Flour, Baking Powder, Baking Soda, Salt, Cinnamon, Nutmeg, Cardamom, Flaxseed).
In a medium mixing bowl add the wet ingredients and whisk to combine (Olive Oil, Honey, Applesauce, Carrot, Eggs, Vanilla Extract).
Next, pour the wet ingredients into the dry ingredients and mix together with a spatula. Take care to not over mix!
Add in the chopped walnuts to the batter.
Pour the batter into prepared bread pan and bake for 40-50 minutes, until just browned around the edges and a toothpick comes out clean from the center. *Note! Keep an eye on your quick bread. If it starts to brown too much before the 50 minutes, cover your bread pan with foil and place back into the oven to finish cooking.*
Remove from the oven and allow to cool on a wire rack for 5 minutes. Then, run a butter knife along the edges of the pan and carefully remove the bread from the pan.
While the bread cools, prepare the glaze icing
In a small bowl whisk together the powdered sugar and 2 tsp milk.
Using a spoon, drizzle the icing over top of the bread.
Keep an eye on your quick bread. If it starts to brown too much before the 50 minutes, cover your bread pan with foil and place back into the oven to finish cooking.
Homemade granola cups are a wholesome and nutritious breakfast or snack. Fill them with Greek Yogurt and berries for more protein, antioxidants and flavor.
Ingredients
UnitsScale
2cupsOld Fashioned Oats
1/4cupGround Flaxseed
3/4 tsp Ground Cinnamon
1/4cupMaple Syrup
1/4cup + 1tbspPeanut Butter
1 Egg White
Instructions
Preheat oven to 350° F. Grease a muffin tin with nonstick spray or coconut oil, set aside.
In a large bowl, combine the oats, flaxseed and cinnamon and stir together with a spatula.
To a small microwave safe bowl, add the maple syrup and peanut butter. Microwave for 20-25 seconds just to soften the peanut butter so it is easy to stir.
Next, pour the peanut butter mixture into the oat mixture. Stir together with a spatula, making sure that all dry ingredients are coated in the wet ingredients.
Whisk the egg white with a fork until slightly frothy then pour into the oat mixture and stir together.
Divide the oat mixture into 8 muffin cups. Using your fingers, press the the mixture into the muffin tin to form cup shapes. Continue with the remaining granola cups.
Place muffin tin into the oven and bake for 15-18 minutes until the granola cups just start to turn golden brown.
Allow the cups to cool in the muffin tin for at least 15 minutes. This is KEY, otherwise they will fall apart! Then, run a spatula or butter knife around the edge of each cup to gently release from the muffin tin.
To serve, fill each cup with a spoonful of Greek Yogurt and top with fresh berries. Enjoy!
Zesty Key Lime Energy Bites: Tangy citrus bliss meets wholesome energy in these no-bake bites! Perfect for a refreshing snack boost anytime.
Ingredients
Scale
1cup Pitted Dates
1/2cupRaw Cashews
1 Scoop Vanilla Protein Powder
1/2cupUnsweetened Shredded Coconut (Plus 1/4 cup for optional topping)
Zest from 1 Lime
2 tsp Lime Juice
1/2 tsp Vanilla Extract
1–3 tsp Water (if needed)
Instructions
Add the dates and cashews to the bowl of a food processor. Process for 1-2 minutes until the dates and nuts are broken down into small pieces.
Add remaining ingredients (except for water). Blend until fully combined and the mixture forms into a ball.
Add 1-3 tsp of water to the mixture if needed to bring together.
Using a 1-inch scoop or tablespoon, scoop out the mixture and then roll gently in your hands to form them into ball shape. This should yield about 14-16 energy bites.
To make them extra pretty, roll them in the extra 1/4 cup unsweetened shredded coconut.
In a heat-proof bowl, add the dates and cover with hot water. Let the dates soak for 5 minutes to help them soften.
Drain the dates then add them to the bowl of your food processor, along with the 2 tbsp brewed coffee.
Process until the dates are broken down into small pieces.
Next, add the coconut oil and vanilla extract. Process again until the date mixture becomes slightly smooth.
Now, add the cocoa powder and process again! Stop and scrape down your bowl and then process again. This make take 2-4 minutes depending on your food processor. You are looking for a fairly smooth mixture.
Now it’s time to roll our truffles! Prep a sheet tray with parchment paper and set out on your work surface. Also, grab a bowl and fill it with water to help keep the filling from sticking to your hands.
Scoop out 1/2 tbsp of filling, wet your hands with the water and roll into ball shape, then place onto your parchment paper tray. Continue until all the truffle filling has been rolled.
Next, pop the tray of truffle balls into the freezer to firm up for 15 minutes.
Before you get the truffles out of the freezer, make the chocolate coating
In a microwave safe bowl, add the chocolate chips and coconut oil. Microwave for 25 second intervals, stirring in between each interval, until the chocolate is melted.
Get your toppings ready and set out next to the melted chocolate
Pull the tray of truffle balls out of the freezer.
Dip each truffle ball into the melted chocolate and using a fork, roll the chocolate around and then let some of the chocolate drip off before popping back onto the parchment paper. While the chocolate is still melty, add a sprinkle of your topping of choice.
Continue with the remaining truffles until they are all coated and topped!
Pop the truffles into the fridge to let the chocolate set up and harden for at least 10 minutes.
Black Bean Brownies are fudgy and rich with a hint of peanut butter, a delicious dessert!
Ingredients
UnitsScale
Brownie Batter:
1 Can, 15 oz Black Beans, Drained and Rinsed (no, or low-sodium if you can find it)
1/2cupMaple Syrup
2 Eggs
2 Tbsp Olive Oil
1/4 tsp Espresso Powder
1/4 tsp Kosher Salt
1 tsp Baking Powder
1/4cupCocoa Powder
1/4cupOat Flour
1/2cupChocolate Chips
Peanut Butter Swirl:
1/2cupPBFit Peanut Butter Powder
4–5 tbsp Soy Milk (or milk of your preference)
Instructions
Preheat your oven to 350° F and spray an 8×8 inch pan with nonstick spray, then set aside.
To the bowl of a food processor, add the black beans and maple syrup. Process until smooth.
Next, add the two eggs and process again.
Then, add the olive oil, espresso powder, salt, baking powder, cocoa powder and oat flour and process again to combine all ingredients.
Next, remove the blade from the food processor, scrape down the batter and add the chocolate chips, stirring with a spatula.
Then, pour the batter into your prepared pan and set aside while you make the peanut butter swirl.
To a medium size bowl, add the PBFit and 5 tablespoons of milk. Whisk together. The consistency should be a little thinner than regular peanut butter. If it is too thick, add another tablespoon of milk.
To make the swirl, drop dollops of the PBFit mixture onto the brownie batter, spreading them evenly over top of the batter. Then, using a butter knife, start from one corner and drag the knife through the batter and PB from one end of the pan to the other. Continue going back and forth until you reach the other side of the pan. Then, rotate the pan 90 degrees to create swirls in the other direction. Again, start from one corner and go up and back, snaking your way across the batter. Continue until you get the look that you like.
Place the brownies into the oven and bake for 20 minutes until they are set.
Allow brownies to cool for 15 minutes before digging in. Enjoy!
Sweetened with dates and a touch of honey, this hot cocoa is naturally sweet and dairy-free with no artificial ingredients, plus it’s easy on the tummy!
Ingredients
UnitsScale
1cupUnsweetened Almond Milk
2 Pitted Dates
1 tbsp Cocoa Powder
1 tbsp Honey (may also substitute Maple Syrup)
1/4 tsp Ground Cinnamon
1/4 tsp Vanilla Extract
Instructions
Place the almond milk into a microwave safe container. Microwave for 1-2 minutes to heat up.
Pour the warm milk into a blender and then add the remaining ingredients to the blender.
Blend on high for 1 minute until the mixture looks smooth.
Start by preheating your oven to 350 F. Line a sheet tray with a silpat or parchment paper, set aside.
In a large mixing bowl, add the eggs, vanilla extract, brown sugar and molasses. Whisk together until all ingredients are fully incorporated.
Next, add the oat flour, wheat flour, flaxseed, baking soda, spices and salt. Using a rubber spatula, stir the dry ingredients into the wet ingredients.
Let the dough sit for at least 5 minutes. The oats will soak up some of the moisture and the batter will get slightly thicker.
After the dough as rested, get your sheet tray and form the dough into logs. Wet your hands slightly and divide the dough in half, placing half on one side of the pan and the other on the other side.
Using your hands or a bench scraper, form the dough into two logs that are about 7-inches long and 3-inches wide. Use your hands shape the dough so it is an even thickness.
Place the sheet tray into the oven and bake for 18-20 minutes until the logs are firm to the touch.
Move the biscotti logs onto a wire rack to cool for 15 minutes.
After 15 minutes, slice the logs into biscotti! Take a sharp knife and slice the biscotti logs width-wise into 3/4-inch slices.
Reduce the oven temperature to 300 F and bake for 6 minutes. Then, remove the tray from the oven and use a spatula to turn each biscotti over to cook on the other side. Place back into the oven and bake for another 6 minutes.
Remove the biscotti to a wire rack and allow to cool fully. The biscotti will continue to harden as they cool.
Classic snowball cookies made with almond flour to be gluten-free!
Ingredients
UnitsScale
1cupAlmond Flour
1 Tbsp Arrowroot Flour or Cornstarch
1/4 tsp Baking Powder
3/4cupPecans (1/2 cup finely chopped, 1/4 cup larger chop)
3 Tbsp Butter, softened
2 Tbsp Maple Syrup
1 1/2 tsp Vanilla Extract
Pinch Salt
1/4cupPowdered Sugar
Instructions
Preheat oven to 325° F. Get out a sheet tray and silpat or nonstick cookie sheet, set aside.
In a medium sized bowl, add the almond flour, arrowroot or cornstarch, baking powder, pecans, butter, maple syrup, salt and vanilla extract.
Stir the batter together with a spatula until all ingredients are fully mixed and incorporated.
Using a 1 1/2-inch scoop, scoop the dough and roll it into ball shape with your hands, then place onto your sheet tray or cookie sheet. Continue with remaining dough, you should have about 12 cookies.
Place cookies into the oven and bake for 10-12 minutes until golden.
While the cookies bake, place the powdered sugar into a bowl and set aside.
Allow cookies to cool for 5 minutes and then roll in powdered sugar.
Place onto a cooling rack to finish cooling before digging in!
Classic Chocolate Chip Cookies, crisp on the outside, soft in the center, perfect!
Ingredients
Scale
1cupGranulated Sugar
1cupBrown Sugar
1cupUnsalted Butter (2 sticks, at room temperature)
2Eggs
1 1/2tspVanilla Extract
1tspBaking Soda
2tbspFlaxseed (Ground)
1tspKosher Salt
3cupsAll Purpose Flour
12ozChocolate Chips
Instructions
In the bowl of a stand mixer add the butter and sugars. Mix on medium to medium high until light and creamy.
Next, turn the mixer to low and add the eggs, one at a time until mixed in. Then, add the flaxseed and vanilla extract, mix until just combined.
In a separate bowl whisk together the flour, baking soda and salt.
With the mixer on low, slowly add the flour mixture to the wet ingredients. If necessary scrape down the bowl to make sure all ingredients are fully mixed.
Add the chocolate chips to the dough mixture, mix on low just until the chips are incorporated into the dough.
Cover your bowl or place dough into a container with a lid and refrigerate at least 4 hours or, preferably, over night.
When ready to bake, preheat your oven to 375° F.
Place a silpat mat or parchment paper onto a baking sheet tray. Using an ice cream scoop or large spoon, drop rounded scoops of dough onto your baking trays.
Place sheet tray into the oven and bake at 375 F for 10-11 minutes
Using a spatula remove cookies from hot sheet tray to a cooling rack. Let cool (if you can!) and enjoy!
Flourless and gluten-free and naturally sweetened, chickpea blondies will become a family favorite dessert!
Ingredients
Scale
1 can, 15ozChickpeas, drained and rinsed
1/2cup Peanut Butter
1/3cupMaple Syrup or Honey (or a combination)
1tspVanilla Extract
1/4tspBaking Powder
1/4tspBaking Soda
1/2tspKosher Salt
1/2tspCinnamon, ground
1Egg
1/3cupChocolate Chips +2 tablespoons for top
Cooking Spray
Instructions
Preaheat oven to 350° F. Spray an 8×8 inch pan with nonstick cooking spray and set aside.
In a food processor, add all of the ingredients except chocolate chips and process until batter is smooth. This will take a few minutes to get the batter to a smooth consistency.
Using a spatula, fold in the 1/3 cup of chocolate chips.
Spread the batter evenly into the prepared pan. Tap the bottom of the pan onto the counter a few times to get the batter level. Sprinkle 2 tablespoons of chocolate chips on top of the batter.
Bake for 20-22 minutes or until a toothpick comes out clean and the edges are slightly browned. Take care to not over cook! The blondies may look slightly underdone and that is okay.
Allow blondies to cool for at least 10 minutes. Cut into squares and enjoy!
Naturally sweetened energy bites packed with the perfect combination of peanut butter and chocolate.
Ingredients
Scale
1cupPitted Dates
1/4cupPeanut Butter or Almond Butter
1/4cupDark Chocolate Chips
1tbspFlaxseeds
2/3cupOats
2tbspChocolate Protein Powder
Instructions
Place the dates into a food processor or blender. Blend until they are broken down into very small pieces or they form a ball.
Add the remaining ingredients to the food processor or blender. Blend until the ingredients are combined, about 30 seconds. (You may need to stop and scrape down your bowl if the peanut butter sticks to the side!)
Using a 1-inch scoop or tablespoon, scoop the mixture and then roll gently in your hands to form them into ball shape. The recipe should yield about 15 balls.
Place the bites into a container and then pop them in the fridge. Let them set for 15 minutes (if you can wait that long!), enjoy!
This Sunrise Tropical Smoothie is a quick, refreshing blend of tropical fruit, spinach, and protein powder that makes a bright, nourishing start to your day. It’s naturally sweet, packed with nutrients, and comes together in minutes for an easy breakfast or snack.
Ingredients
Scale
2cupsFrozen Tropical Fruit (Such as Pineapple, Mango, Strawberry, Peach)
2cupsAlmond Milk (or your preferred milk)
1cupRaw Baby Spinach
1/4cupVanilla Protein Powder
Instructions
Add all ingredients to blender. Blend until smooth. Enjoy!
Better than Girl Scout Samoa cookies with just 4-ingredients! Plus, no added preservatives or artificial nonsense here!
Ingredients
Scale
2cupsUnsweetened, Shredded Coconut
2cupsPitted Dates
1/2cupSemi-Sweet Chocolate Chips
1tspCoconut Oil
Instructions
Preheat oven to 400° F for toasting the coconut.
In the bowl of a food processor add the dates and pulse for 10-20 seconds to break down the dates.
Pour coconut onto a sheet tray with a silpat or parchment paper and place in the oven to toast for 3-5 minutes. (Take care to watch it as it will burn easily!) Remove from oven and allow to cool for 2 minutes.
Add the toasted coconut to the dates in the food processor and pulse for 10-15 seconds. You will know the mixture is ready when it can be pinched together and stays together.
Scoop out tablespoon size portions of the mixture and form into a round cookie shape, pressing it into shape with your fingers. Place onto your sheet tray with the silpat or parchment from toasting the coconut. Continue to form cookies with the remaining mixture.*To make authentic Girl Scout Samosas, take a toothpick or small spatula handle and make a hole in the center of each cookie. You may need to press and shape the cookies to retain their shape.
Place the sheet tray into the freezer and freeze for 5 minutes to set the cookies shape.
Meanwhile, place the chocolate chips and coconut oil into a microwave safe bowl. Microwave on 25 second intervals until the chocolate is fully melted, stirring in between each interval.
Next, remove the cookies from the freezer. Dip the bottom of each cookie into the melted chocolate to coat the bottom and return to your silpat or parchment covered sheet tray. Repeat for all cookies. Then, using a spoon, drizzle the remaining chocolate over the cookies in a stripe pattern for the full Samoa look.
Place the cookies back into the freezer for at least 10 minutes so that the chocolate will set. Remove from the freezer and carefully peel the cookies off your silpat or parchment. Enjoy!
Cookie dough energy balls are naturally sweet and a great snack for adults and kids!
Ingredients
Scale
1cupPitted Dates
1/2cupAlmond Flour
1/4cupVanilla Protein Powder
2tbspOat Flour
1/4cupAlmond Butter
1/2tspVanilla Extract
1/4cupMini Chocolate Chips
Instructions
In the bowl of a food processor add the pitted dates and pulse until thoroughly broken down into small pieces or the dates form into a ball. Alternatively you can use a high powered blender.
Next, add the almond flour, almond butter, oat flour, protein powder and vanilla extract. Pulse again until the mixture begins to come together. To test this, pinch together some of the dough, it should hold its shape
Depending on the wetness of your almond butter, you may need to add a teaspoon or two of water to get the mixture to come together.
Add the mini chocolate chips and pulse for 3-5 times quickly to mix in the chips.
Finally, scoop tablespoon size portions and roll into balls. Continue with the remaining mixture. You should have 16-18 cookie dough balls. Store in the refrigerator and enjoy!
These chocolate lava cakes are a decadent treat, perfect for special occasions.
Ingredients
Scale
1/4cupUnsalted Butter
2ozSemi Sweet Chocolate Chips
1/2cupPowdered Sugar
1Egg
1Egg Yolk
1/2tspVanilla Extract
1/4cupAll Purpose Flour
1/2tspInstant Espresso Powder (Optional)
Instructions
Preheat your oven to 425° F.
Spray two small ramekins (6 or 8 oz) liberally with nonstick cooking spray and place onto a sheet tray. Set aside.
Tip: Be sure to coat your ramekins well otherwise your lava cakes will get stuck.
To a large microwavable bowl, add the butter and chocolate chips. Microwave in 25 second intervals, stirring in between each set, until the chocolate and butter are melted. Tip: Chocolate burns easily! Be sure to only microwave on 25 second intervals and stir thoroughly in between to avoid burning your chocolate.
Whisk the powdered sugar into the chocolate mixture. Next add the whole egg, egg yolk, vanilla extract and espresso powder if using. Whisk together until fully combined.
Add the flour into the mixture and whisk until just combined.
Divide the batter evenly into you two prepared ramekins. Tip: If using a kitchen scale to divide the batter, each ramekin should have about 116-118g or 4 1/8 oz.
Bake the lava cakes at 425° F for 12-14 minutes until the edges are firm and the center is still soft. Remove from the oven and allow to stand for 1 minute.
Run a knife around the edges of the ramekin to fully release the cakes. Then, invert the ramekins onto a plate.
Top with a sprinkling of powdered sugar, berries or peanut butter drizzle if desired.
The lava cake batter can be prepared ahead and kept in the refrigerator until ready to bake. When baking after being refrigerated, add 1-2 minutes to your cook time.
Refreshing, delicious and naturally sweet. Raspberry Mango Sorbet is the perfect summer treat!
Ingredients
Scale
16ozFrozen Mango
16ozFrozen Raspberries
2tbspFresh Lime Juice (Juice from 1 whole lime)
3tbspHoney
5tbspWarm Water
Instructions
In the bowl of a food processor add the frozen fruit, lime juice, honey and 2 tablespoons warm water.
Process for 1-2 minutes then stop and scrape down the bowl. At this point you will likely need to add a few more tablespoons of warm water to help break up the frozen fruit.
Process again for another 1-2 minutes until the fruit mixture becomes smooth.
Tip: A little patience is key with this recipe! Sometimes it is helpful to let the mixture thaw for a minute or two and then process again to get the smooth consistency of a sorbet.
After the mixture becomes smooth and cohesive, put the sorbet into a freezer container and place into the freezer for at least 30 minutes (if you can wait that long!)
Chocolate dipped fruit is a simple dessert with the wow factor! Pick your favorite fruit and dip away!
Ingredients
Scale
1/2cupSemi-Sweet Chocolate Chips
1tbspCoconut Oil
1lbFresh Fruit (Strawberries, Kiwi, Blueberries, Whatever you like!)
Instructions
Prep your Tray
Cover a sheet tray or plate with a silpat or parchment paper and set aside.
Melt Your Chocolate
In a medium sized microwave safe bowl, add the chocolate chips and coconut oil. Microwave for 25-second intervals, stirring after each interval until the chocolate and coconut oil are melted.
Rinse, Dry and Peel Your Fruit
Rinse the strawberries and pat them dry with a clean cloth or paper towel. Peel and slice the kiwis into 1/4 inch slices.
Dip Your Fruit
Holding the stem of the strawberry, dip half of the fruit into the chocolate and then set onto parchment paper. For the kiwis, dip half of each slice into the chocolate and then place onto parchment paper.
For blueberries or other small berries, use a spoon or fork to help cover the fruit in chocolate and then place onto parchment paper.
Set the Chocolate
Once all the fruit has been dipped, place the fruit into the fridge to chill and allow the chocolate to set and harden for 15 minutes.
Mango Popsicles are made with real, whole fruit with a touch of honey and lime, the perfect summer treat!
Ingredients
Scale
3cupsFrozen Mango
1tbspLime Juice
1/8tspLime Zest
1/4cupHoney
1/3cupWater
Instructions
Place all the ingredients into the bowl of a food processor. Process for 15 seconds, then stop and scrape down the bowl with a spatula. Process again for another 15-20 seconds until the mixture is smooth.
Spoon the mixture into your popsicle molds. Once full, tap the mold onto the counter a few time to release any air bubbles and level out the mango mixture and place popsicle stick and cover on top. Continue to fill all popsicle molds, then place into the freezer for at least 2 hours to fully harden.
*If you do not have a popsicle mold, enjoy this as mango sorbet! Simply put the mixture into a freezer safe container. Allow to freeze for 2 hours and then scoop out and enjoy!
A sweet and refreshing twist on classic sorbet, this Carrot Sorbet recipe was created for the Black Forest Farmer’s Market.
Ingredients
Scale
Carrot Sorbet
2cupsCarrots
2cupsWater
1cupSugar
2tbspFresh Mint Leaves
1/3cupLemon Juice
1/3cupLime Juice
Blackberry Syrup Drizzle
1ptBlackberries
1tbspMaple Syrup
1tbspWater
1tbspLemon Juice
Instructions
Blackberry Syrup Drizzle
In a small sauce pan, add the blackberries, maple syrup, lemon juice and water. Bring to a boil and then turn down to simmer. Simmer for 10 minutes.
Allow syrup to cool at least 10 minutes. Using a fine mesh strainer, strain the seeds from the liquid. Place the liquid into container with a lid. Set aside.
*Don’t throw away the pulp! Spread it onto a parchment or silpat lined sheet tray and bake at 400 F for 25-35 minutes to make fruit leather.
Carrot Sorbet
Scrub and peal and trim the ends off carrots.
Place 2 cups of water in a large pot. Add the carrots and bring to a boil. Turn down to a simmer and cook carrots until tender, 7-8 minutes. Once tender, drain and allow to cool slightly.
While the carrots cook, make the simple syrup. In a small sauce pan add 2 cups of water and 1 cup of sugar. Bring to a boil and then turn down to a simmer. Add the mint leaves and simmer for 10 minutes to infuse the mint into the simple syrup. After 10 minutes remove the mint leaves from the mixture and allow to cool slightly.
In the bowl of a food processor at the drained carrots, simple syrup, lemon juice and lime juice.
*Optional: add in 1 tbsp of corn syrup to make the sorbet extra smooth.
Puree the mixture for 4-5 minutes until completely smooth.
Now it’s time to freeze the sorbet. Add the carrot mixture to the frozen bowl of an ice cream maker. Turn ice cream maker on and allow to freeze for 15-20 minutes depending on your ice cream maker.
Pour the frozen mixture into a freezer save container and place in the freezer until ready to serve.
To serve, scoop the carrot sorbet into a bowl and top with a small drizzle of blackberry syrup. Enjoy!
Healthy Banana Nut Muffins are one of my most popular recipes! They are filled with flavor and potassium to keep you full and satisfy your sweet tooth.
Ingredients
Scale
1/2cupOat flour
1/2cupWheat flour
1/2cupAll-purpose flour
1/4cupFlaxseed
1tspCinnamon
1tspBaking soda
1/2tspKosher Salt
2Over Ripe Bananas
1/2cupHoney
1Egg
1/4cupOlive Oil
1/4cupAlmond milk
1/2tbspVanilla Extract
1/2cupPecans (chopped)
Instructions
Set out all in Ingredients and equipment for healthy baking!
Preheat your oven to 350° F. Line a muffin tray with paper liners or spray with nonstick spray.
In a large bowl add the flours, flaxseed, baking soda, cinnamon and salt and whisk together. Set aside.
In a medium bowl whisk together the mashed bananas, olive oil, honey, egg, milk, and vanilla.
Slowly add the dry ingredients to the wet ingredients.
Set 2 tbsp of pecans aside. Add the remaining pecans to the batter, mixing with a spatula, Be sure not to over mix! (This produces tough muffins.)
Spoon the batter evenly into 12 muffin cups.
Sprinkle remaining 2 tbsp chopped pecans over top of each muffin batter.
Place muffin tray into the oven and bake for 20-25 minutes until the tops are golden brown and a toothpick inserted in the center of a muffin comes out clean.
Allow muffins to cool on a wire rack for 10 minutes.
Notes
*Muffins will last up to 5 days in the refrigerator and up to 3 months in the freezer.
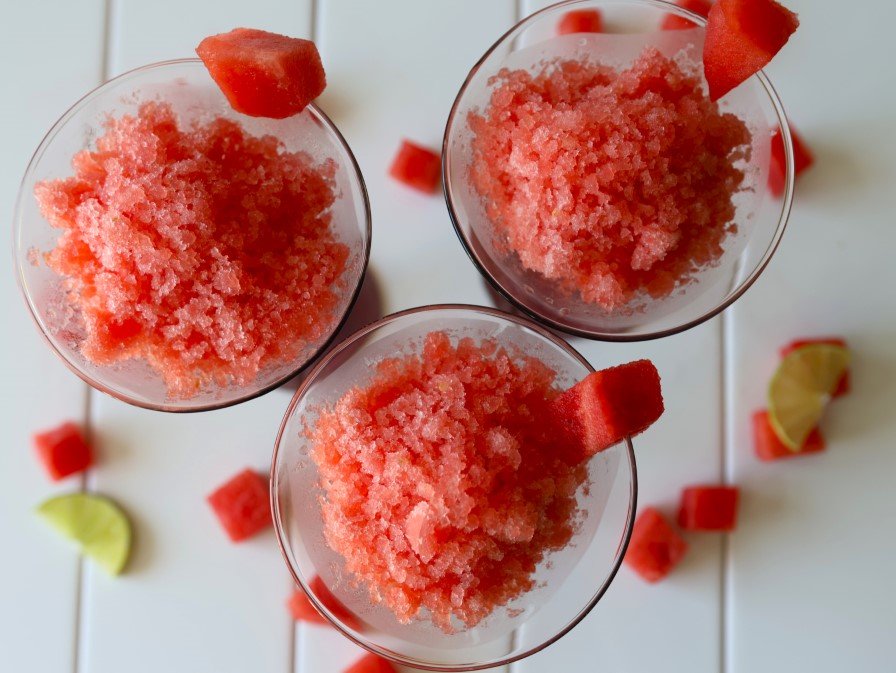
Watermelon Granita, a simple and refreshing dessert with just 3 ingredients!
Ingredients
Scale
5cupsWatermelon, Seedless, cubed
1Lime
1/4cupSugar
Instructions
In the bowl of a food processor or blender, add the 5 cups of watermelon and blend on high until smooth.
Zest the lime and add 1/2 tsp lime zest to the watermelon. Then, juice the entire lime (you should have about 2-3 tbsp) and add all the juice to the food processor.
Add the sugar and blend the mixture again on high until smooth.
Pour the mixture into a 9 x 13 pan and carefully place into the freezer. (Make sure you have a flat space in your freezer for the pan to sit on, otherwise you will have granita stuck to your freezer!)
Freeze for 2 hours and then remove from freezer. Using a fork, scrape the mixture, creating little crystals. Pop your pan back into the freezer for another hour.
Remove from the freezer and give the granita another rake with a fork to break up the entire mixture. Serve in a pretty glass or bowls, enjoy the slushy, refreshing crunch of watermelon granita!
Naturally blue from blueberries and made with oat flour and olive oil, these are a healthy, tasty treat!
Ingredients
Scale
1/2cupBlueberries
1/3cupSugar
1/2tspLemon Zest
1/3cupOlive Oil
1Egg
3/4cupAll Purpose Flour
1/4cupWhole Wheat Flour
1/2cupOat Flour
1/4tspSalt
1tspBaking Powder
1/3cupWhite Chocolate Chips
Instructions
Preheat your oven to 350° F. Prep a baking sheet with a silpat or parchment paper and set aside.
Place the blueberries into a microwave safe bowl and microwave on high for 30 seconds. Stir and microwave again for 15 seconds. Remove from the microwave and stir again, mashing the blueberries with a fork. Set the blueberries aside to cool slightly while you work on the the rest of the batter.
In the bowl of a stand mixer add the sugar, lemon zest, olive oil and egg. Cream together for 1 minute until fully mixed.
Next, add the oat flour, all purpose flour, whole wheat flour, salt and baking powder. Mix on low for 30 seconds or until the batter is just mixed together. Finally, add the blueberries and any juice into the batter and mix on low for 20-30 seconds. Watch as your batter turns blue/purple!
Remove the mixing bowl from your mixer. Add the 1/3 cup white chocolate chips to the batter and mix in with a rubber spatula.
Using a 1 1/2″ scoop, spoon batter onto sheet tray, leaving about 1″ between each cookie. Continue until all the batter as been scooped onto your baking trays. You should have 18-20 cookies.
Bake at 350° F for 9-10 minutes.
Move the cookies to a wire rack to cool slightly. Enjoy!
Roasted Cherries topped onto a goat cheese crostini is a lovely sweet and savory appetizer. This appetizer was created for the Black Forest Farmer’s Market
Ingredients
Scale
1lbCherries, Pitted and Halved
2tspOlive Oil
2tspMaple Syrup
1/2tspLemon Zest
3ozGoat Cheese
2tbspBasil, Julienned
1Baguette
Instructions
Preheat your oven to 400° F.
On a large sheet tray, place a piece of parchment paper. Next add the cherries, olive oil and maple syrup and stir together gently.
Roast for 7 minutes until the cherries are tender and slightly bubbling.
Slice the baguette into 1/2 inch slices. Place slices onto a sheet tray and drizzle with 1 tablespoon olive oil. Roast for 5 minutes then flip the slices over and roast for another 3 minutes until fully crisp.
To serve, spread 1/2 tablespoon goat cheese onto a crostini and top with 1 tablespoon roasted cherries then sprinkle with basil.
Pumpkin Chocolate Chip Muffins are full of fall flavors, packed with fiber and made extra special with chocolate chips.
Ingredients
UnitsScale
1/2cupOat Flour
1/2cupWheat Flour
1/2cupAll Purpose Flour
1/4cupGround Flaxseed
2 tsp Pumpkin Pie Spice
1 tsp Baking Soda
1/2 tsp Kosher Salt
3/4cupPumpkin Puree
1/2cupHoney
1/4cupOlive Oil
1/4cupAlmond Milk
1 Egg
1/2 tbsp Vanilla Extract
1/2cupChocolate Chips
Instructions
Preheat oven to 350° F. Line a muffin tray with paper liners or spray with nonstick spray.
In a large bowl add the flours, flaxseed, baking soda, pumpkin pie spice and salt and whisk together. Set aside.
In a medium bowl whisk together the pumpkin puree, olive oil, honey, egg, milk, and vanilla.
Slowly add the dry ingredients to the wet ingredients.
Set 2 tbsp of chocolate chips aside. Add the rest of the chocolate chips to the batter, mixing with a spatula, Be sure not to over mix! (This produces tough muffins.)
Spoon the batter evenly into 12 muffin cups then sprinkle the remaining 2 tbsp chocolate chips over top of each muffin batter.
Place muffin tray into the oven and bake for 20-25 minutes until the tops are golden brown and a toothpick inserted in the center of a muffin comes out clean.
Allow muffins to cool on a wire rack for 10 minutes.
Better than bakery scones, these homemade pumpkin scones save on fat and calories but not on flavor.
Ingredients
Scale
For the Scones
2cupsWhole Wheat Flour
3/4cupOat Flour
1tbspBaking Powder
3/4tspKosher Salt
2 1/2tspPumpkin Pie Spice
5tbspUnsalted Butter
2/3cupPumpkin Puree
1/3cupMaple Syrup
1Egg
2tspVanilla Extract
Simple Vanilla Icing
1/2cupPowdered Sugar
1tbspAlmond Milk (or soy for nut free)
1/4tspVanilla Extract
Instructions
Preheat oven to 425°F and line sheet tray with Silpat or parchment paper. Set aside.
In a large bowl, add the whole wheat flour, oat flour, baking powder, salt and pumpkin pie spice. Whisk together to combine.
Next, cut the 5 tbsp of unsalted butter into small pieces. Then, add to the dry ingredients. Using a pastry cutter or a fork, blend the butter into the dry ingredients until the butter is incorporated and the size of peas.
Add the wet ingredients to the bowl: canned pumpkin, maple syrup, egg, and vanilla extract. Stir into dry ingredients with a spatula until the dough just comes together.
Place dough onto prepared sheet tray. Form into 9 inch round circle. Using a bench scraper or butter knife, score the dough in half then each half into 5 slices.
Bake for 12-15 minutes until firm to the touch. While scones are baking, mix up the icing.
In a small bowl, whisk icing ingredients together until smooth. Allow scones to cool for at least 5 minutes before topping with icing. Using a spoon, drizzle icing over the scones. Enjoy!
Heat a 9-inch cast iron pan over medium low heat. Add the butter and cook until melted. Then turn off heat to pan.
In a medium sized bowl, add the eggs and whisk so the eggs are fully broken down. The sugar, lemon zest and salt. Whisk vigorously until mixture becomes slightly foamy on top.
Next, add the almond milk to the bowl and whisk.
Add the flours and whisk again to combine batter.
Pour the mixture into your pan with melted butter. Top with mixed berries, spread them out so that each bite will get berries!
Place into the oven and bake for 18-22 minutes until nicely golden brown.
Sprinkle powdered sugar over top, slice and enjoy!
Ultra-chocolaty, chewy, and naturally sweet, these healthy brownie bites with dried cranberries are a delicious treat in every bite. Loaded with fiber and antioxidants, they’re the perfect mix of rich cocoa and tart cranberry zing!
Ingredients
Scale
1 Cup Oat Flour
1/2 cup Cocoa Powder
1/4cupVanilla Protein Powder
2tbspGround Flax Seed
1tspBaking Powder
1/2tspKosher Salt
1/4cupHoney
1/4cupMaple Syrup
1/2cupAlmond Butter
1Egg
1/2 tsp Vanilla Extract
1/2cupDried Cranberries
1/2cupChocolate Chips
Instructions
Preheat your oven to 350° F
Set a nonstick sheet tray out for baking. Or line a sheet tray with parchment paper or silpat. Set aside.
In a large mixing bowl add the oat flour, cocoa powder, protein powder, salt, baking powder and flax seed. Whisk to combine the dry ingredients.
In a small mixing bowl add the honey, maple syrup,almond butter, vanilla extract and egg. Mix together to combine.
Add the wet ingredients to the dry ingredients. Using a spatula stir the batter together. It will be quite thick!
Add the dried cranberries and chocolate chips to the batter. Stir to combine.
Using a 1 1/2″ scoop, spoon batter onto sheet tray, leaving about 1″ between each brownie bite. The cookies will not spread very much. Continue until all the batter as been scooped onto your baking trays.
Bake at 350° F for 8-9 minutes. Be sure not to overcook, you want them slightly soft and gooey.
This fall compote is an easy appetizer, snack or even breakfast! Mix it up with your favorite apples or pears and serve on crostini or whole wheat waffles for a fall twist to your morning meal.
Ingredients
Scale
3Honey Crisp Apples
2Bartlett Pears
2tbspButter
1tbspHoney
1/2tspCinnamon
1/2tspLemon juice
Pinch of Salt
Instructions
Peel and core the Apples and Pears.
Cut fruit into 1/2-inch pieces. Set aside.
Heat a small saucepan over medium heat. Add butter and melt.
To the saucepan add apples, pears, cinnamon, honey, lemon juice and a pinch of salt.
Bring the mixture to a boil. Once the mixture has been brought to boil, reduce heat to low and simmer for 20 minutes, stirring occasionally, until the apples and pears are soft and tender.
Serve over pancakes, a toasted baguette with goat cheese, or ice cream.
Prep Time:10
Cook Time:20
Category:Appetizer, Black Forest Farmer's Market, Breakfast, Dessert, Snack